Set up Multiple RightScale Accounts
Single vs. Multiple RightScale Accounts
Although you can use a single RightScale account for managing all aspects of your company's cloud deployments there are a lot of advantages of using multiple RightScale accounts. As a best practice, it's recommended that you use at least two different RightScale accounts, although you may choose to have multiple RightScale accounts depending on your organization's IT cloud requirements.
Example: Using a Single RightScale Account
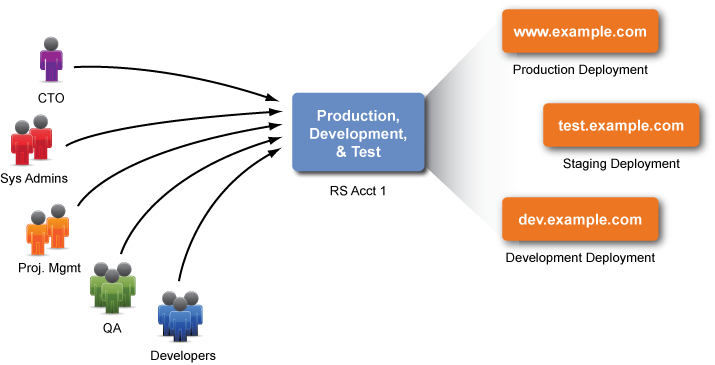
If you only use a single RightScale account, each user will have the same permissions across all deployments. Since you'll most likely have multiple projects organized into different deployments, you'll be forced to rely on users to essentially govern themselves since permissions cannot be granted on a per deployment basis. Although smaller teams may find one RightScale account sufficient for managing all aspects of their cloud infrastructure(s), most organizations will benefit from the extra control of using multiple accounts for better governance and compliance. Hopefully the examples below will clearly explain the advantages and disadvantages of each type of setup. Every team and organization has a unique set of requirements and objectives. You can either mimic one of the setups below or create your own setup based on the considerations and guidelines highlighted below.
Pros
- Easier to Manage - It is easier to manage a single RightScale and/or cloud account than multiple accounts.
- Sharing is Optional - Since everyone is using the same RightScale account (that's associated with the same set of cloud credentials), you no longer need to share RightScale-specific assets such as ServerTemplates and RightScripts, or cloud-specific assets such as images and volume snapshots.
Cons
- Limited User Access Control - Deployment-specific user role permissions are not supported. For example, a user with 'actor' user role privileges will be able to launch or terminate a server in any deployment in a RightScale account, which may be problematic if users should only be allowed to manage the deployment(s) that are related to their project.
- Vulnerable Production Environment - If the same RightScale account is used for both development and production environments, any user could unintentionally make a mistake that has global, account-wide ramifications (assuming they have the required user permissions) that may negatively affect a production application. For example, a user with 'security_manager' permissions could unknowingly change a firewall rule in a security group that accidentally opens up a port to any IP address. An easy way to protect your production environment is to simply use a separate RightScale account where a minimum set of user that have access to the account and its resources.
Example: Using Two RightScale Accounts
Key Takeaways
- Use multiple accounts and user permissions to control your various cloud deployments.
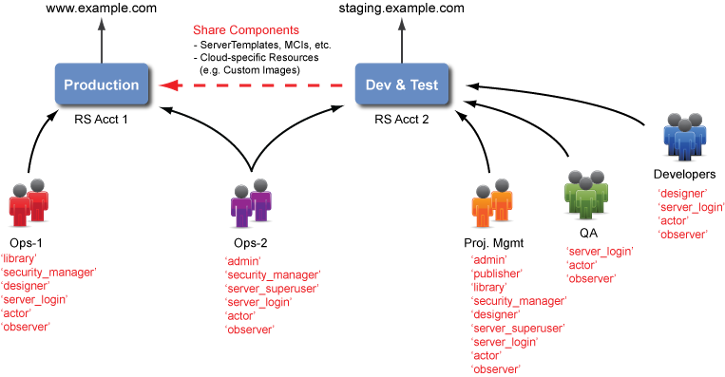
- The diagram above is designed to highlight some of the key user role permissions that a particular group of users might have in a RightScale account depending on their individual roles and responsibilities.
- Currently, you cannot create group-based permissions in the RightScale Dashboard where a user's permissions are defined by the group(s) that he/she belongs to; user role privileges are set on a per-user basis and are defined on a per-account basis. (i.e. a user may have 'actor' privileges in one RightScale account but not in another.)
- The 'Ops-2' group might consist of your CTO and/or VP of Engineering. You should only grant 'server_superuser' privileges in your Production account to a very select and trusted set of users.
- Depending on the level of access that you want to grant your Developer and QA teams, you may not want to grant them 'security_manager', 'server_superuser', and/or 'library' user permissions.
- Users with 'admin' privileges can grant themselves any user role permissions within that RightScale account.
- The Project Management group might be responsible for granting user permissions for the Dev & Test account, import approved design components from the MultiCloud Marketplace (e.g. ServerTemplates), set up the network and security groups, as well as publish and share tested components that are safe to use in the Production account. Note: Only committed, immutable ServerTemplates that are properly tested should be used in the Production account.
Key Benefits
- Isolate your production environment with strict network firewall permissions and limited user access. For example, you might want to restrict the number of users who have access to the Production account to a smaller subset of trusted users. The users that are developing and testing ServerTemplates probably do not need access to your production servers.
- More granular billing reports, which will help you more accurately track the actual cloud usage costs related to your production environment.
- Create and use credentials that leverage production-specific values that should not be visible or accessible to anyone outside of the RightScale account. For example, you can create ServerTemplates in the Dev & Test account that are configured to use the same credential. (e.g. DB_ADMIN_PASSWORD) You can create a credential with the same name in each RightScale account where different values are actually being used based on an account, in order to ensure that only the Operations team knows the actual value that's being used in the production environment, which means that you can use the same committed ServerTemplate in both accounts while still passing in different values depending on the account in which a server is launched and scripts are executed. See Manage Credentials.
- Currently, you cannot set up deployment-specific user roles. For example, you cannot grant a user 'actor' privileges in deployment A, but not in deployment B (within the same RightScale account). Therefore, the best and easiest way to control a user's permissions in such a manner is to simply use multiple RightScale accounts.
Things to Consider
- Each RightScale account must use unique cloud credentials. Therefore, you will need to create multiple cloud accounts/credentials for each RightScale account. (Note: If you are using AWS, you can consolidate your monthly AWS bill so that you only receive a single AWS bill at the end of the month. See Consolidated Billing for AWS Accounts.)
- Currently, you cannot set deployment-specific user roles within a RightScale account. Therefore, if you want a user to only have 'actor' user role privileges for a single deployment instead of across all deployments in a RightScale account, you can create a separate RightScale account for that particular deployment for more granular user access control. In other situations, you may want a user to have 'server_login' and 'server_superuser' privileges in one RightScale account but not another.
- If you are following best practices, you should only use committed ServerTemplates in a production deployment. Therefore, you will need to share committed ServerTemplates with your production RightScale account using the MultiCloud Marketplace, which will involve more coordination between your development, testing, and production teams. For more information on privately sharing RightScale components, see Sharing RightScale Components.
- If you are using custom-built machine images, be sure to make those images available to the other account(s) by sharing the cloud resources accordingly. For example, you can share AMIs and Snapshots in EC2. See Sharing Cloud Resources.
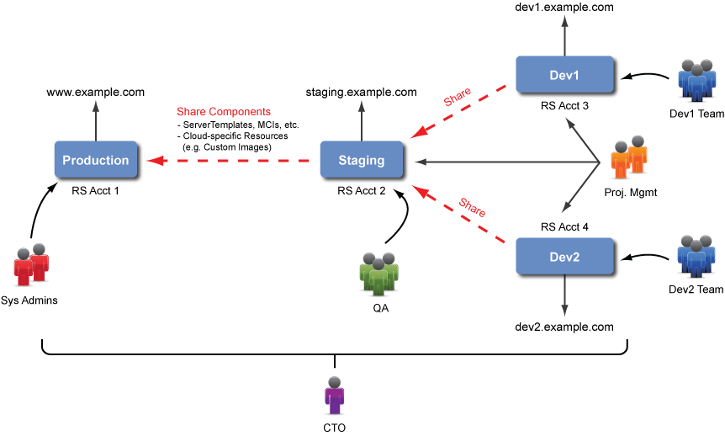
Example: Using 3+ RightScale Accounts
Use additional RightScale accounts for more granular user access control.
Configure a RightScale Account
The configurations below apply to a single RightScale account. If you are using multiple RightScale accounts, you should follow the guidelines below for each account.
Naming convention
The appropriate answer to this question depends on your overall setup. The name of your account might be inconsequential to you, especially if you only have access to a single RightScale account. However, if you are managing multiple RightScale accounts, which is the preferred setup for many companies, you may find it useful to devise a more logical naming convention to clearly distinguish accounts from one another. Be sure to keep names short and simple.
Example
- Dev1
- Dev2
- Staging
- Production
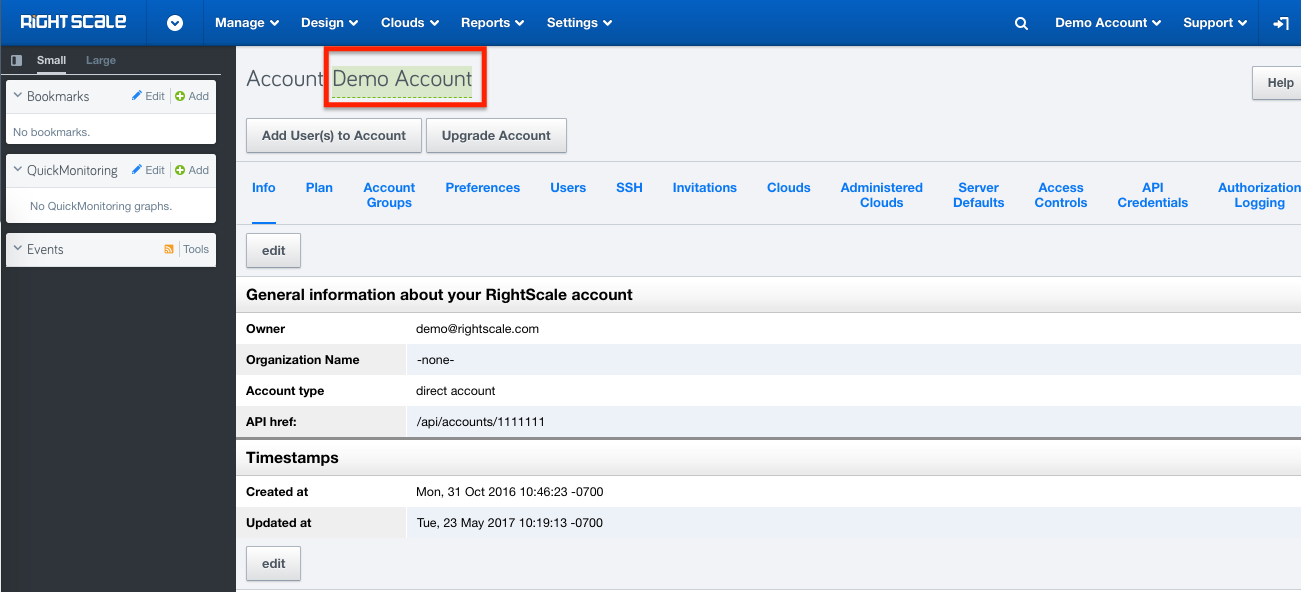
How to rename your RightScale account?
Renaming your RightScale account is easy and can be done from Cloud Management. You will need to have admin or enterprise_manager role to perform this action.
- Navigate to Cloud Management and select the account you wish to rename.
- Click Settings from the top menu options and then click Account Settings.
- Simply click on the account name, highlighted in green, and type the new name.
- Hit Ok to save the new name.
Who is the owner of the RightScale account?
The person who created the RightScale account is designated as the initial owner
of the account. However, it can be changed if a different person is maintaining the account going forward. Users with observer access may look up the owner
of the account in order to request additional privileges or to change an account-wide preference.
Other than being designated as a primary contact person for end-users, an account's owner has no special privilege; anyone with the admin role is capable of performing all administrative functions within the account.
- Go to Settings > Account > Info.
- Click Edit.
- Select a different user to be the new owner of the account. Note: You can only select another user of the account. You may need to add a new user to the account before you can select the correct user. If you want to use an email alias (e.g. ops@example.com) you will need to add a user to the account with that email address. See Invite Users to a RightScale Account.
- If you change the account owner, you should also consider updating the pre-configured alert escalations. See Update Default Alert Escalations.
Note: The Organization Name
is set in a different section of the Dashboard. If you have 'publisher' user role privileges, you can set the name under Design > Account > Library > Your Publishing Organization.
Who should receive email notifications when new instances become operational?
This service is enabled by default and sends the email notifications to the account owner. If you do not want anyone to receive email notifications when an instance becomes available, you can disable this setting. If you want the emails to go to an email alias instead of one person (e.g. ops@example.com) you will need to make ops@example.com a user of the RightScale account and make ops@example.com the owner of the account. (See the previous section.)
- Go to Settings > Account Settings > Preferences.
- Make your selection for the
Instance Available
setting.- Enabled (default) - The designated 'owner' will receive email notifications.
- Disabled
Should a server's tags only be usable to its deployment or be made usable account-wide?
Before you can answer that question you may be wondering, What are server tags and how are they used?
RightLink-managed cloud instances can perform various automation tasks involving tags. Some example use cases for tags:
- Query RightScale (via the rs_tag utility or API 1.5) to determine which instances have a certain tag and retrieve related information about that resource.
- Run an operational script or recipe (via the rs_run_right_script and rs_run_recipe utilities) on all instances that have a certain tag.
The tag scope for a deployment determines how the tags of its instances can be accessible and used by other instances located inside or outside of its deployment. By default, the scope is set to deployment,
which means that only the instances within that deployment will be returned in query results. Similarly, scripts that are executed on instances based on tags can only be performed by other instances within the same deployment.
If you change the tag scope to account,
instances within the deployment become accessible to instances located in all other deployments within the account, both for purposes of executing scripts and querying tags. Tag scope is a powerful but advanced setting that should only be changed by an experienced RightScale user who has a strong understanding about how tags are used in the context of the RightScale account.
Sample Misuse Case for Account-wide Tags
You clone a production deployment to create a staging one for testing purposes. If the production deployment had a server array configured for auto-scaling purposes and you didn't change the voter tag for the staging deployment's server array, the server tag scope setting could potentially affect the production deployment's ability to auto-scale. If the tag scope is set to deployment
(default), servers launched within the cloned deployment cannot affect auto-scaling in the production deployment. If the server tag scope of either deployment is set to account,
the production and staging arrays will influence each other's scaling decisions!
Sample Use Case for Account-wide Tags
You have a deployment that contains servers that perform some global function in your multi-deployment application, such as system log aggregation. You set the deployment's tag scope to global,
and instances in any deployment can query for the log aggregator's IP address, run scripts to register themselves as log senders, etc.
Important! Any changes to the server tag scope setting will immediately be applied to any running servers. Be sure to understand the implications of an update prior to changing this setting.
- Go to Settings > Account Settings > Preferences.
- Click Edit.
- deployment (default) - If selected, a server's tags will only be accessible to servers and/or resources within its deployment.
- account - If selected, a server's tags will be accessible to servers and/or resources outside of its deployment. This is an advanced option and should only be selected in specific use cases.
Who should be allowed to view cloud usage costs?
Users with role ca_user can view billing related information and much more in the RightScale Optima site. This type of information is especially useful for users who want to keep track of their estimated infrastructure costs in order to stay within the allotted budget.
Should users always see the Inputs Confirmation page when they run operational scripts on servers?
By default, when you manually execute an operational script from the RightScale Dashboard (not API) you will be presented with an Inputs Confirmation page which displays the inputs and values that will be used by the script. The Inputs Confirmation page gives you an opportunity to verify what value will be used by an input, as well as the option to change its value prior to a script's execution. Typically, you should find that values for most inputs were previously set using input inheritance rules at either the ServerTemplate or Deployment levels. (See Inheritance of Inputs.) However, there may be situations when an input is unspecified or it may need to use a different value for a particular run. If a value for an input is required and missing, you will not be able to execute the script until you've specified an acceptable value. (Note: You can only select the 'No value/Ignore' option for an input that's not required (i.e. Recommended or Optional).
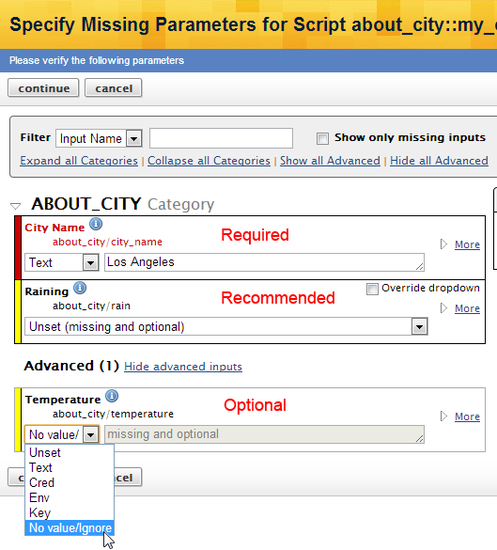
If you are using versions of ServerTemplates published by RightScale, it's recommended that you keep the default setting, which shows you the Inputs Confirmation page because there are some scripts that are designed with the assumption that the end user sees the confirmation page. For example, the recommended way to safely terminate a database server that's launched using a version of RightScale's 'Database Manager for MySQL 5.x' ServerTemplates is to run the db::do_delete_volumes_and_terminate_server operational script instead of using the Terminate button to ensure that detached volumes are properly deleted upon instance termination instead of simply being detached and left in an orphaned (and potentially billable) state. When you run the terminate script, you have the option to manually remove the terminate safety lock
which prevents the data volumes from being permanently deleted after they are detached from the instance being terminated.
Follow the steps below to specify the desired behavior for displaying the Inputs Confirmation screen for the RightScale account.
- Go to Settings > Account Settings > Preferences.
- Make your selection for the
Verify inputs
setting.- Enabled (default) - Users will always see the Inputs Confirmation page when they manually execute an operational script even if there are no required inputs with unspecified values.
- Disabled - Users will only see the Inputs Confirmation page when they manually execute an operational script if there are required inputs with unspecified values. Otherwise, if there are no required inputs with missing values, the Inputs Confirmation screen will not be shown.
Who should have access to the RightScale account and what should they be allowed to do?
User Roles and Permissions
RightScale uses role-based authorization to determine who can perform which actions in an account. Our platform has a fixed number of named roles, each of which confer a bundle of related capabilities on users who have that role. For example, the 'server_login' role allows people to log in to instances via SSH or RDP.
Roles are always held by a specific user, with respect to a specific RightScale account; we call each (user, account, role) trio a permission. Permissions can be granted or revoked by anyone with the 'admin' permission on an account. A user with one or more permissions in an account is considered to belong to that account; if their last permission is revoked as they no longer belong to the account.
It's important to understand the capabilities that each role bestows upon a user; capabilities are almost always disjoint (non-overlapping) between roles. For example, only someone with the 'actor' permission can launch and terminate servers; only someone with the 'designer' permission can modify ServerTemplates.
We suggest that you review the following pages before you begin inviting new users or granting additional permissions to existing users:
- User Roles Descriptions - Basic descriptions of each user role.
- User Role Privileges Matrix - A table that provides a more granular breakdown of the capabilities associated with each row.
Inviting Users
When you are ready to add users to a RightScale account, you can send them an invitation to the account. Invitations are sent via email and must be accepted by the user before they can log in to the Dashboard and view the RightScale account. You can find the step by step guide here.
From the time an invitation is sent, it must be accepted within six days or it expires. You can also cancel an existing invitation at any time before it is accepted.
Managing Existing Users
If a user has already accepted an invitation to your account, you can grant them new permissions or revoke existing permissions at any time, in any combination from Governance
You can also grant temporary access to a user (such as a short-term consultant) or grant an existing user an additional permission(s) that will automatically expire after a specified amount of days. For example, you may want to give additional permissions to developers during a site upgrade.
Permission Management Example
Let's say your company has two RightScale accounts.
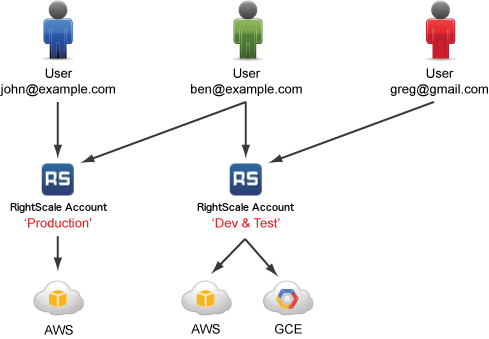
In this example, Ben's position within the company entitles him to interact with both accounts; however, his level of access in each account is very different. Although he can view the Production account, he cannot launch any servers or create any scripts. But in the Dev & Test account, he can modify ServerTemplates, launch and terminate servers, and login to running servers for troubleshooting purposes. We would enact this access policy by granting Ben the following permissions:

Can I use AWS Identity and Access Management (IAM) to further restrict user access?
(For Amazon Web Services EC2 only)
Yes, absolutely. It's important to remember that IAM restrictions are tied to a specific set of user security credentials. (i.e. AWS Access Key ID and AWS Secret Access Key) Since you can only apply a single set of security credentials to a RightScale account, the restrictions are enforced at the account level and not at the individual user level. Therefore, if you create an IAM user role that's only allowed to launch and terminate instances and use its security credentials with a RightScale account, users will only be able to launch and terminate instances from the RightScale Dashboard/API (assuming they have 'actor' user permissions) and will not be able to create/modify security groups even if they have 'security_manager' user permissions in the RightScale account.
For more information, see How do I use Amazon IAM with RightScale?
How do I control who can SSH or RDP into running servers?
There are several different ways that you can protect your running servers. You should use some or all of the available tools to satisfy the requirements of your company's SLA and related security policies.
Login-Related Roles
Use the following user role permissions to control who has remote access to running servers in an account.
- 'server_login' - This permission is required in order to SSH (Linux) or RDP (Windows) into a running instance. If users do not have this permission they will not see the SSH or RDP action buttons in the RightScale Dashboard.
- Linux - RightLink actively manages the system's SSH configuration to control who may log in and what privileges they possess. See User Settings - SSH for how different versions of RightLink handle SSH logins.
- Windows - RightLink does not manage RDP access policy. Users may learn the correct username and password defined by the following RightScript inputs:
- ADMIN_PASSWORD - Typically you will use a credential to specify and hide the actual password value. (e.g. WINDOWS_ADMIN_PASSWORD) If a user did not create the credential being used, he/she must have 'admin' user role privileges in order to see the actual value in the RightScale Dashboard. Therefore, you will need to provide the sensitive value in a different manner if you do not want all users with 'admin' access to view the actual value.
- ADMIN_ACCOUNT_NAME - This is an advanced input. If left undefined (default), a user must start a Remote Desktop Connection by logging in as the Windows 'Administrator' user. If you want to RDP into the instance as a different user, specify the new username using this input. In all cases, the value specified for the ADMIN_PASSWORD input will serve as the matching password.
- 'server_superuser' - (For Linux only) If a user has this permission, he/she will be able to use 'sudo' and SSH into a running instance as the 'root' user. Note: Even if a user has the 'server_superuser' user role privilege he/she will still need the 'server_login' permission in order to SSH into an instance.
Warning! Only trusted users should be given the 'server_superuser' permission. It's ultimately your responsibility to protect your infrastructure from any type of malicious activity. Once a user has this permission, he/she can 'root' the filesystem and install malicious code that may go unnoticed or be undetectable. If you need to revoke this permission from a user or remove a user from a RightScale account that had the 'server_superuser' permission at one point in time past, see Remove Users from RightScale in order to mitigate the risk of having a compromised server.
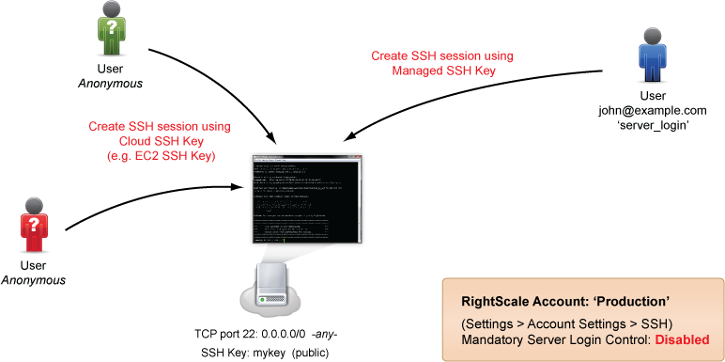
Mandatory Server Login Control
(For Linux only)
For clouds that support the use of SSH Keys (e.g. AWS), those keys can still be used to SSH into an instance by anyone who possesses the private key material. Moreover, cloud-provided SSH keys are installed in the root user's authorized_keys file, making these keys very powerful indeed! However, you can disable the use of the cloud's SSH key by enabling the Mandatory Server Login Control
setting on your account.
There are several reasons why you should consider enabling this setting for your account.
- SSH Keys are not used by all cloud infrastructures
- Some clouds (e.g. AWS) use cloud/region-specific SSH Keys that can only be used in their respective region.
- Users can use a cloud's SSH Key to log into a running instance as a 'root' user.
- Users are anonymous. It's difficult to determine who is actually using a cloud's SSH Key in order to log in to an instance.
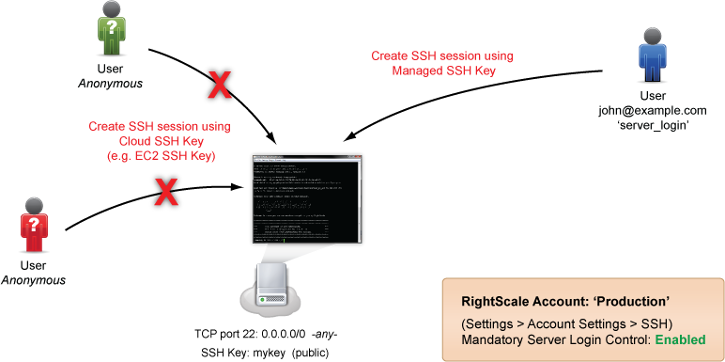
Enabling Server Login Control will give you the following benefits.
- The cloud's SSH Key can no longer be used for authentication purposes to SSH into an instance from either the RightScale Dashboard or from a third party SSH client. (Supported by images with RightLink v5.6+)
- Users will only be allowed to SSH into an instance using their managed SSH Key that's tied to their RightScale user profile. (Navigate to Settings > User Settings > SSH to view your own public key.)
- Only users with 'server_login' privileges can SSH into a running instance.
- Only users with 'server_superuser' privileges can SSH into a running instance as a 'root' user. (Supported by images with RightLink v5.9+)
- Users can no longer be anonymous. Users who SSH into an instance will be identified by their email address.
- A user with 'admin' privileges can revoke a user's SSH access at any time by removing 'server_login' privileges from a user. Note: When a user loses the 'server_login' privilege, every running RightLink-enabled instance in the account is automatically updated to remove that user's (public) SSH Key from the instance, thereby locking him/her out of any running instance.
When you log in to the RightScale Dashboard for the first time you may not have noticed that RightScale automatically generated a unique SSH keypair for you that's used for authentication purposes when you initiate SSH sessions from the RightScale Dashboard. RightScale's server login control is designed to provide a secure and cloud-agnostic method for allowing remote access to running instances via SSH.
Go to Settings > User Settings > SSH tab to view your public SSH key. If you want to use a third party client to SSH into an instance you can download the matching private key.
RightScale's Server Login Control policy is a user setting and cannot be enforced at the account level. Users have the option to either use the unique keypair that RightScale generated for them or create their own SSH keypair and manage it themselves. (See Manage an SSH Key Pair.) If your users are required to use their own SSH keypair in order to comply with your company's security policies and procedures, it's recommended that each user generate and manage their own keypair. SSH keys should only be known to an individual user for security reasons.
- Go to Settings > Account Settings > SSH.
- Specify the Server Login Control policy for the RightScale account.
- Disabled (default) - The cloud's SSH Key that was used to launch the server (if applicable) can still be used to SSH into the instance using a third party SSH client.
- Enabled - The cloud's SSH Key that was used to launch the server (if applicable) is disabled.* It can no longer be used to create an authenticated SSH session. Enable Server Login Control to ensure that only users with 'server_login' privileges in a RightScale account will be able to SSH into a running instance. Only users with 'server_superuser' login privileges will be able to use sudo to log into a Linux instance as the 'root' user.**
* Supported in images using RightLink v5.9+.
** Supported in images using RightLink v5.8+.
Important! You are the only person who should know or have access to your SSH keypair (matching public and private keys). If you think your keypair has been compromised in any way you should create a new SSH keypair immediately.
Note: RightScale will not generate a new SSH keypair for you. If you re-enable the Server Login Policy setting, you will be granted the same SSH keypair.
Network Firewall Permissions
Another way that you can control who can SSH/RDP into an instance is by using more restrictive cloud-level and OS-level network firewall rules, as applicable. The first layer of security is at the cloud infrastructure level using security groups. For Linux instances, you can also use iptables to create an additional (and optional) layer of firewall security that's enforced at the instance level. For clouds that do not support the use of security groups, you must rely on iptables for firewall security.
Security Groups
If a cloud supports the use of security groups (e.g. EC2, Google, OpenStack, etc.) you can use security groups to define more restrictive port permissions that are IP-specific instead of allowing access from any IP (0.0.0.0/0)
For example, you could create a security group permission that only allows SSH access from a specified subnet mask (e.g. CIDR 54.197.0/16). Or perhaps you only want users to SSH into an instance from company provisioned laptops.
Linux (SSH)
- direction: inbound | protocol: TCP | port: 22 | IPs: 0.0.0.0/0 (any IP; no restrictions) [Least Restrictive]
- direction: inbound | protocol: TCP | port: 22 | IPs: 54.0.0.0/8
- direction: inbound | protocol: TCP | port: 22 | IPs: 54.197.0.0/16
- direction: inbound | protocol: TCP | port: 22 | IPs: 54.197.22.0/24
- direction: inbound | protocol: TCP | port: 22 | IPs: 54.197.22.136/32 (single IP) [Most Restrictive]
Windows (RDP)
- direction: inbound | protocol: TCP | port: 3389 | IPs: 0.0.0.0/0 (any IP; no restrictions) [Least Restrictive]
- direction: inbound | protocol: TCP | port: 3389 | IPs: 54.0.0.0/8
- direction: inbound | protocol: TCP | port: 3389 | IPs: 54.197.0.0/16
- direction: inbound | protocol: TCP | port: 3389 | IPs: 54.197.22.0/24
- direction: inbound | protocol: TCP | port: 3389 | IPs: 54.197.22.136/32 (single IP) [Most Restrictive]
iptables
(For Linux only)
ServerTemplates published by RightScale (v12+) include support for iptables. Each ServerTemplate uses tags and iptables to create IP-specific firewall rules, which are typically used to set up isolated tier-to-tier communication depending on the desired functionality of the server. For example, an iptables rule can be dynamically created on a master database server which allows ingress communication from an application server's private IP address that was just launched (assuming it's been assigned an IP address).
Refer to the individual technical overviews for a ServerTemplate for a better understanding of how iptables are used to create firewall rules.
How do I add public and/or private clouds to a RightScale account?
The RightScale Management Platform (Dashboard and API) supports the infrastructure-as-a-service (IaaS
or compute
) capabilities of the following clouds:
- Public Clouds
- Amazon Web Services (EC2, S3, etc.)
- Google Compute Platform (Compute Engine, Cloud Storage, etc.)
- Microsoft Windows Azure
- SoftLayer
- Private Clouds
- OpenStack (Juno)
- OpenStack (Kilo)
- OpenStack (Liberty)
- VMware vSphere
You should only add clouds that you plan to use in your RightScale account. You can only add a cloud with a unique set of cloud credentials. A set of cloud credentials cannot be shared across multiple RightScale accounts. Therefore, if you are using multiple RightScale accounts you must use different and unique cloud credentials for each account. Although you can build hybrid cloud deployments that are spread across multiple clouds for high availability and disaster recovery scenarios, you will experience the most optimal performance if your software stack is deployed within the same cloud infrastructure and region. Obviously, this rule doesn't apply to datacenters/zones within a cloud/region as spreading your site's architecture across multiple zones/datacenters is a recommended best practice in the cloud.
Example
- 'Production' RightScale Account
- AWS Account Number: 1234-1234-1234
- 'Staging' RightScale Account
- AWS Account Number: 7777-8888-9999
Only users with 'admin' user role privileges can associate a cloud account with a RightScale account.
- Go to Settings > Account Settings > Clouds tab.
- Click Connect to a Cloud.
- See Add a Cloud Account to a RightScale Account to find more detailed instructions that are specific to the chosen cloud.
Pick the cloud that's best for you!
Remember, each application that you deploy in the cloud has a unique set of cost and performance requirements. Cloud infrastructures are equally unique and offer a wide range of resources and services. Ultimately, you should pick the cloud that's best suited for your application.

One of the key advantages of using the RightScale platform is that you can build cloud-agnostic ServerTemplates for your application. Launch and test your application in multiple clouds. Perform all of the necessary benchmark tests so that you can confidently select and deploy your software stack in the cloud that gives you the best performance and ROI. And if the net results ever change, you'll have the flexibility to easily migrate those applications to a different cloud of your choice.

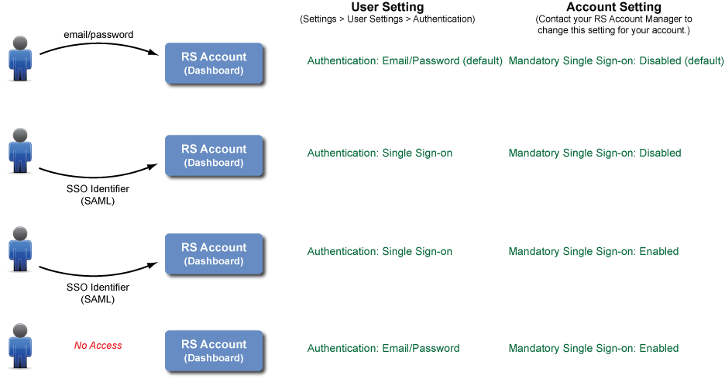
How do I control how a user accesses a RightScale account?
By default, users can access a RightScale account (via the web Dashboard or API) using their email and password from any location (i.e. public IP address). However, there are a few different ways that you can enforce stricter login policies. For example, you can control how a user accesses a RightScale account as well as from where he/she is allowed to access it.
- Login Preference (Authentication)
- E-mail/Password (default)
- Single Sign-on
- Location Restrictions
- Unrestricted (default) - Users can log in from any IP address.
- Restricted - Users/Services can only access the RightScale account from an authorized (public) IP address, as defined by an IP Whitelist.
Login Preferences
E-mail and Password
By default, users must use their email and password to log in to the RightScale Dashboard or authenticate a RightScale API call.
Single Sign-On (SSO)
RightScale supports the use of Security Assertion Markup Language (SAML) for using a Single Sign-on (SSO) identifier/token for accessing a RightScale account via the Dashboard and/or API. RightScale supports both types of SAML providers.
- Hosted SaaS
- On-premise SaaS
All users can specify how they want to authenticate themselves with the RightScale Dashboard and/or API under Settings > User Settings > Authentication. By default, you will use your email and password for authentication purposes. However, if you prefer to use SAML-based authentication, you can change the default authentication method to use Single Sign-on instead where an SSO Identifier is used for authentication purposes instead of your regular password.
Important! If you enable SSO, you must also Enable OAuth_ to authenticate API calls.
Enforce Single Sign-on (SSO) for Dashboard Access
If you want to disable a user's ability to log in to the RightScale Dashboard or authenticate an API call using their email and password, you can contact your RightScale Account Manager and request that the Mandatory Single Sign-on
preference be 'Enabled' for your RightScale account, which effectively disallows a user from being able to use their email and password for authentication purposes. If enabled at the account level, all users will also be required to Enable OAuth for API access.
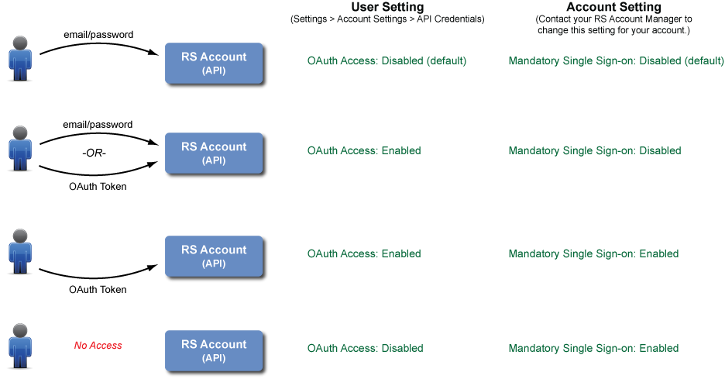
API Access
There are several different ways that you can control access to your RightScale account an its resources via the API.
- User Permissions - The same user role permissions are enforced by the RightScale Dashboard and API. For example, a user will need 'actor' user role privileges to launch a server via the Dashboard or API.
- API Credentials - Typically a user will authenticate an API call using the same email and password that he/she uses to log in to the RightScale Dashboard. However, a user also has the ability to set up and use an OAuth token for authentication purposes. See Enable OAuth.
- Access Controls - Define an IP Whitelist Range to control where users are allowed to make API calls. See Location Restrictions.
Enable OAuth
By default, you can construct a RightScale API call using your email and password for authentication purposes. However, if you prefer to use an OAuth token instead of your email and password, you can enable the OAuth feature. See OAuth.
The ability to authenticate your RightScale API calls using an OAuth 2.0 token is a user setting that can enabled on a per account basis.
- Go to Settings > Account Settings > API Credentials.
- Click Enable / Disable.
- If Enabled, you can use your OAuth token for authentication purposes when making a RightScale API call for the specified RightScale account. Note: You will still be allowed to make an API call using your email and password for authentication purposes unless the RightScale account has been configured to only allow OAuth tokens for API access. ( i.e. the
Mandatory Single Sign-on
account preference is 'Enabled')
Warning! Be sure to keep your OAuth token in a safe location. If someone else knows your OAuth token, they can make API calls on your behalf, with all of your permissions. If your OAuth token is ever compromised you should create a new token by disabling this feature and then re-enabling it (to generate a new token). - If Disabled (default), you can cannot use an OAuth token for authentication purposes when making a RightScale API call for the specified RightScale account; you must use your email and password.
- If Enabled, you can use your OAuth token for authentication purposes when making a RightScale API call for the specified RightScale account. Note: You will still be allowed to make an API call using your email and password for authentication purposes unless the RightScale account has been configured to only allow OAuth tokens for API access. ( i.e. the
Enforce OAuth for API Access
If you want to disable a user's ability to make API calls using their email and password for authentication purposes, you can contact your RightScale Account Manager and request that the Mandatory Single Sign-on
preference be 'Enabled' for your RightScale account, which effectively disallows users from using their email and password to make API calls. If enabled at the account level, all users will also need to set up SSO (SAML) and use their SSO Identifier to log in to the RightScale Dashboard.
Location Restrictions
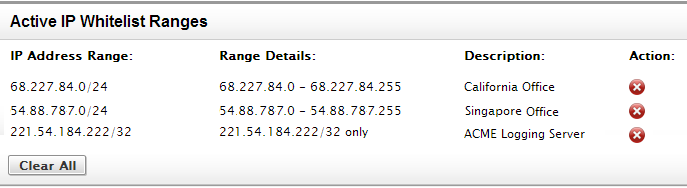
IP Whitelists
If your users should only be allowed to access the RightScale Dashboard from on-premise laptops, you can use a set of IP Whitelists to define a valid list of IP addresses or range of IPs. In such cases, you can can restrict access to your RightScale account by enforcing a list of approved IP addresses or IP range(s) using CIDR rules.
Define a specific range of (public) IP addresses from which users or services can access a RightScale account and its managed resources. For example, perhaps users should only be allowed to access the RightScale Dashboard from a specific on-premise location or maybe a service running inside your local infrastructure needs to issue RightScale API calls.
- Go to Settings > Account Settings > Access Controls.
- Add an IP Whitelist Range(s). (e.g. 125.15.8.0/24)
- Click Add.
- Create additional rules, as necessary.
Example
Should I set default configurations for servers?
If your RightScale account has multiple users who are creating and launching servers, you may find it useful to set some account-wide default settings. Currently, you can specify default settings for adding servers to a deployment. For example, maybe you want to minimize your cloud infrastructure costs by encouraging your users to only use the 'small' instance types for development and testing purposes because they are cheaper and sufficient to perform the required software quality assurance tests. Or perhaps you purchased a block of discounted instances (e.g. EC2 Reserved Instances). Therefore, it's in your best interest to encourage your users to launch instances at the discounted rate in order to optimize your cloud infrastructure usage and related costs. In such cases, you can specify various default configurations that will be inherited (i.e. pre-selected) when a user creates a new server/array and adds it to a deployment.
The example screenshots below demonstrate how two server defaults for the 'AWS US-West' cloud are inherited and pre-selected when you use the Add Server wizard to create a server.
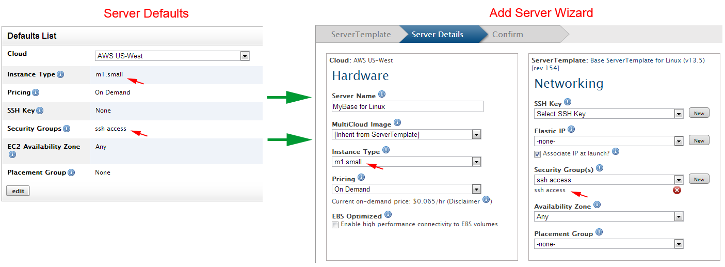
Server defaults are cloud-specific and are designed to encourage (not enforce) server configurations. The server defaults are only applied when a user creates a new server. The settings are not retroactive and will not affect any previously defined servers that are active or inactive. Server defaults can only be applied to servers that are created using ServerTemplates using the Add Server wizard in the Dashboard.
Important! A user will still be able to override a server default setting and make a different selection. However, you can use server defaults to define your preferred server configuration settings and then enforce these preferences using your own set of internal policies and procedures to ensure that your users are using the predefined server defaults, as necessary. Be sure to perform account-wide audits on a regular basis to enforce your configuration guidelines.
Only users with 'admin' user role privileges can define server defaults for a RightScale account.
- Go to Settings > Account Settings > Server Defaults tab.
- Select a cloud. (Remember, server defaults are cloud-specific.)
- Click Edit.
- Select desired resources and/or values that you want to use as default selections for any new servers that will be launched into the specified cloud.
- Determine if and how you will enforce the proper use of these default settings for your organization.
Collaboration Between RightScale Accounts
If you are using multiple RightScale accounts for your organization, read the sections below to understand how you can properly set up multiple RightScale accounts so that you can effectively share and reuse assets between them for effective collaboration. For example, you might need to share account-specific assets (e.g. ServerTemplates, Images, etc.) across different accounts because you're developing ServerTemplates in one account and deploying them in your production environment that's in a different account. In such cases, you can set up your accounts so that the ServerTemplate functions in a slightly different way depending on the account in which it's used, which is especially useful for hiding sensitive values such as passwords that are only used in your production environment. Each scenario will be described in more detail below.
Share Account-specific Assets
Things you can share between RightScale accounts:
- ServerTemplates
- RightScripts
- Images*
- Snapshots*
* If supported by the cloud. For example, images and snapshots can be shared between AWS accounts. Since cloud credentials can only be mapped to a single RightScale account, these types of cloud resources can be considered account-specific assets similar to ServerTemplates.
Determine who is in charge of the sharing process and make sure they have 'publisher' user role privileges, which is required in order to facilitate the sharing process between multiple RightScale accounts.
To learn how you can share RightScale components and Cloud resources, see our Publishing and Sharing guide.
Manage Credentials
As a best practice, you should use credentials (Design > Credentials) to hide sensitive values from being visible to your users while still making the value accessible to your configuration scripts. If you are managing multiple RightScale accounts (e.g. Production, Development & Testing, etc.) a helpful way to use credentials is to create ones with the same name across all RightScale accounts, which will allow you to use the same immutable, committed revision of a ServerTemplate across multiple accounts, where different values are used in each account.
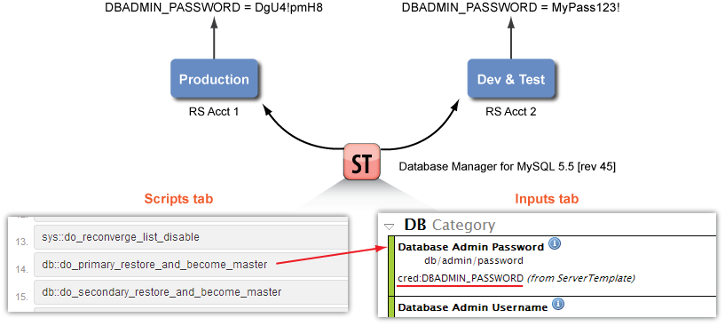
For example, you can use a different password value in the Production account than in the Dev & Test account, which is especially useful if you're developing and testing ServerTemplates in a different account than the account you're using for your production environment. Remember, user role permissions are account-specific. Therefore, custom ServerTemplates can be developed in the Dev & Test account where your software developers can create and use credentials with their own passwords for development and testing purposes. But once those same ServerTemplates are locked down, tested, and ready for production-use, you can share committed revisions of those templates with the Production account for deploying your production servers. Except when they're used in the Production account (where the software engineers do not have access), the ServerTemplates use credentials with secure passwords that are only known to you and your Operations team.
- Create Credentials with the same name across all RightScale accounts.
Configure each custom ServerTemplate to use the same credentials. In the example screenshot above, a script uses a password that is defined by the DBADMIN_PASSWORD credential. Notice that the actual values for the same credential are different depending on the type of account.
- Dev & Test Account : DBADMIN_PASSWORD = MyPass123!
- Production Account :DBADMIN_PASSWORD = DgU4!pmH8
Share the committed revision of a ServerTemplate that passed final testing with your Production account.
Use the shared ServerTemplate to launch servers in the Production account.