Overview
When you sign-up with RightScale, you create a personal RightScale account for yourself that's associated with your email and password. You can either use this account for your own purposes or be invited to other RightScale accounts. If you do not want to create your own RightScale account, the only other way to create a Dashboard login is to accept an invitation to someone else's account. In all cases, your email address will be used as a unique identifier or username.
User Settings - Info
Navigating to Settings > User in the Cloud Management (CM) Dashboard displays the User Info tab by default. A variety of user information is listed on this screen including:
- Email – Recall that a RightScale User is associated with an email account. That is who you log in as, and should be reflected here (as well as within the footer on the lower right)
- Accounts owned – Accounts that are owned by this RightScale User. All accounts created via the “New Account” action button will be listed here. Further, notice that the accounts listed here will also be in the drop down menu in the header (upper right). You should be able to switch between accounts that you own. Note: There could be more Accounts in your drop down menu than are listed in the Info tab. Any accounts you have been invited to are also listed in the drop down.
- Roles - User permissions for each Account you can switch to.
User Settings - Authentication
Navigating to Settings > User > Authentication displays the Authentication tab. The Authentication tab defines the method required by users to access the account. Two options can be selected to gain entry into an account: 'Using my email address and password' and 'Use single sign-on'. Clicking Edit allows you specify which authentication method you would like to use.
- Using my email address and password - Allows the account to be accessed by email and password. Through this selection, the account's password can be changed.
- Use single sign-on - Allows the account to be accessed by Single Sign-On (SSO). Through this selection, the SSO Identifier can be specified. When a user is logging into the account, if they have not already been granted access by the Identity Provider, they must provide the SSO Identifier on the RightScale Dashboard.
User Settings - Preferences
Navigating to Settings > User > Preferences displays the Preferences tab. From this screen you can set your preferred timezone and choose to receive informational RSS feeds. Clicking Edit allows you select your preferred timezone from a drop-down control. Timestamps inside the audit entries will be displayed according to the selected timezone. This preference is not account-specific. RightScale will use the same timezone across all RightScale accounts to which you have access. Actions that are defined in crontab format will be based upon the selected timezone. You can also subscribe to informational RSS feeds. Use the provided RSS link to subscribe to a feed that consolidates all of the activity across all RightScale accounts to which you have access. Similarly, you can also subscribe to an account-specific feed under the Events pane by clicking the RSS feed icon.
User Settings - SSH
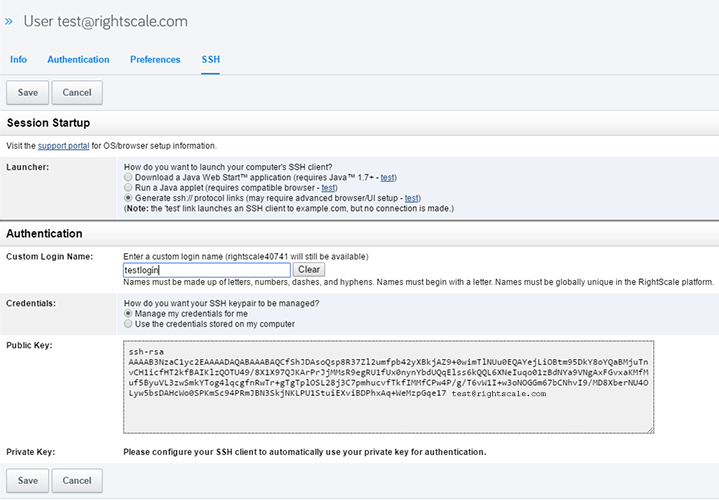
Navigating to Settings > User Settings > SSH displays the SSH tab. From this screen you can set your SSH client preference and the corresponding authentication method
Session Startup - Choose your preferred SSH Client Application you prefer to use when connecting to servers. Choose between your computer's natively installed SSH client or the MindTerm's Java-based client.
Authentication - The Server Login Control feature provides per-user SSH access control based upon a new user role ('server_login' and 'server_superuser') and a private SSH Key Pair that either you can manage yourself or RightScale can manage for you.
- Custom Login Name - The user definable custom login name that can be used to log into a RightScale managed instances using RightLink 10.5 or higher.
Actions and Procedures
The following sections describe the common actions and procedures related to user settings, preferences, authentication, and ssh-handling.
Joining RightScale with No Invitation
It is possible to perform SAML login without having received an invitation to join a RightScale Account, for instance by performing IdP-initiated login, or by performing SP-initiated login without having clicked an invitation URL. This is a less-than-optimal case for usability, but still supported as follows:
- Open the RightScale dashboard and choose the Use Single Sign-On option on the Login page.
- Enter a valid discovery hint in the
SSO Identifier
field. - Click the Log In button.
A warning dialog displays indicating that “You have logged in successfully but you do not have access to any RightScale accounts”.
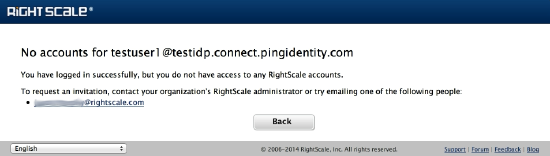
The warning dialog directs you to contact your organization's RightScale administrator so that he/she can invite you to join some accounts.
Joining RightScale with an Invitation
Most users will join RightScale after receiving an email invitation sent by an enterprise_manager or account admin. They can perform SP-initiated login and join RightScale as follows:
- Click the link provided the invitation email. You are taken to the RightScale invitation dialog.
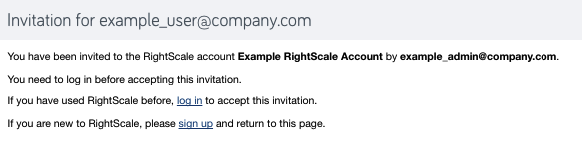
- Choose the Single Sign-on option. You are redirected to the the RightScale Login page.
- On the RightScale Login page, choose the Use Single Sign-On option.
- Enter a discovery in the SSO Identifier
- Click Log In. You are re-directed to your Identity Provider, prompted to log in, and taken back to the RightScale invitation page.
- Click Accept Invitation.
Joining RightScale with a SAML-Linked Invitation
If your RightScale Account Manager has configured your SAML provider to be the canonical authority for an email domain, then all invitations sent to emails in that domain can only be accepted through SAML, and only when the SAML response contains suitable attributes. From the user's perspective, this works as follows:
- Click the link provided in the invitation email. You are taken directly to the RightScale Login page. The
Single Sign-On
option is pre-selected and the SSO Identifier field is pre-filled with the correct discovery hint. - Click Log In. You are re-directed to your Identity Provider, prompted to log in, and taken back to the RightScale invitation page.
- Click Accept Invitation.
This login scenario is the most streamlined as the user does not need to know or remember a SAML discovery hint; however, before you can send SAML-linked invitations, a RightScale support representative must verify your ownership of the email domain you specify and perform additional setup steps. Furthermore, in order for this scenario to function, your Identity Provider must be configured to send the email,
surname
and givenname
attributes in every SAML assertion. For more information, contact RightScale Support.
Joining RightScale Via Provisioning API
You can also create users that are pre-configured with SAML through our provisioning API. This enables third parties like Okta and PingIdentity to automatically create users from Active Directory or other identity sources. Similarly, you can create your own synchronization scripts to connect to any proprietary identity stores, grant and revoke roles, and perform other advanced functionality.
For more information about creating SAML users through the RightScale API, see the SAML Provisioning API End-to-End tutorial.
Identity providers are exposed as a read-only API resource so you can enumerate the providers available to an enterprise account. It is possible to modify an existing user's information through the provisioning API, but if a user becomes unlinked from the enterprise's Identity Provider, you will no longer be able to update their user record.
Managing Your Own SSH Key Pair
By default, RightScale manages the SSH key pairs for all users in an account. This does not have to be the case. A user can manage their own SSH key pair if they would like or, under some circumstances, can be required to (an account manager can mandate that all users manage their own key pairs; see Enable Mandatory Server Login Control for more information). To manage your own SSH key pair, follow the steps below.
Prerequisites
- 'server_login' and 'server_superuser' if you are running RightImage 5.7 and lower (both roles will need to be enabled to be able to SSH into a server). If you are running 5.8 or newer, you will either need 'server_login' (which allows you to login as the user of the account without root access) or 'server_superuser' (which allows you to login as root to the server. For more information, see RightScale Account and User Management.
- An understanding of Server Login Control.
Steps
- Go to Settings > User Settings > SSH and click Edit.
- You have the option to select how you would like to SSH into your server:
- Download a Java Web Start Application - Uses a Java Web Start application to launch an SSH session. Requires Java 1.7 or later.
- Run a Java Applet - Uses a standard Java Applet to launch an SSH session. Requires a compatible browser.
- Generate ssh:// Protocol Links - For advanced users who do not want to use Java to launch an SSH session. May require additional browser configuration for proper operation.
You may experience issues with Java depending on the browser you are using (for example, Chrome does not support version 7 of Java for Macs). For additional information, see Which Browsers are Supported by RightScale.
- In the Authentication section, you are given the option to choose how you would like your user-specific, SSH credentials to be managed. You can have RightScale manage your credentials or you can choose to have your credentials stored on your computer.
- Manage my credentials for me (default) - When you first set up your user account with RightScale, an SSH keypair is automatically generated for you. When you SSH into an instance, your Managed SSH Key will be used for authentication purposes (even if you launched the server with a cloud-specific SSH key (e.g. EC2 SSH Key).
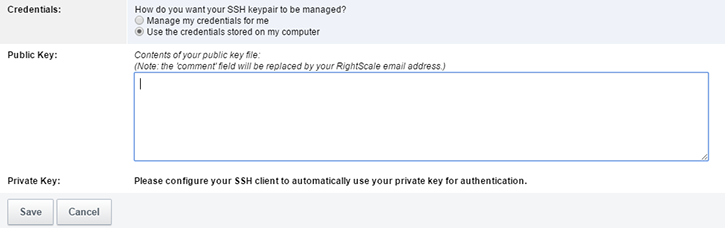
- Use the credentials stored on my computer - Select this option if you want to use your own SSH keypair instead of the one that RightScale created for you. For example, some company's may not allow you to use an SSH Key that was generated by someone other than yourself. If you choose this option, you must provide your public key, keeping the private key material secured on your workstation. If you use more than one device (e.g. laptop, smartphone, etc.) to SSH into a running server, be sure to place the private key on each device. Note: If you wish to switch back to having RightScale manage your credentials, just click Manage my credentials for me and RightScale will generate a new SSH keypair for youi; all previously RightScale generated SSH keypairs are discarded forever. Note: If Mandatory Server Login Control option is 'enabled' on a RightScale account, users with 'server_login' access will be required to use their own credentials.
- Public Key - Copy and paste the contents of the public key in the text field.
- When the information has been entered, click Save.
For Account Managers who need to keep track of multiple users of an account, when a user pastes in their own public key, RightScale will automatically add the user's email to the end of the public key (i.e. [Public SSH Key] john.doe@example.com). This makes it easier to identify the public keys of multiple users in an account.
Download and Store your Private User SSH Key
Once you generate your new Public Key, you will need to download and save your Private Key to your machine so you can properly SSH into a server. You will need this private key on every machine that is going to SSH into a server on the account. After saving your Public Key, you can click Download Private Key. This link is below your Public Key information.

Getting Started with SAML
Security Assertion Markup Language (SAML) is a suite of protocols used to authenticate users from an Identity Provider (IdP) to a Service Provider (SP) across the Internet. SAML allows a user to log on once to a site (an IdP) and have access granted to affiliated Web sites (SPs). With SAML and SSO, an organization can require two-factor authentication, enforce geo-location restrictions, and send authentication logs to an IDS (Intrusion Detection System).
RightScale has SAML 2.0-based Single Sign-On (SSO) functionality for all Enterprise Plan customers. With this feature enabled, you can synchronize a RightScale account with an existing identity provider (such as OneLogin, Okta, PingIdentity, etc.) to create, update, and provision users to access RightScale.
Prerequisites
- You must have an Enterprise plan.
- You must have a SAML 2.0-compliant IdP in use within your organization. RightScale has partners that can provide this functionality if you do not yet have an IdP set up.
- If you are using OpenID, you will not be able to use SAML. Disable OpenID before following the steps to set up SAML.
- If you wish to configure SAML settings for your RightScale accounts, you must have the 'enterprise_manager' permission.
- If you wish to use the provisioning API to create users and manage their permissions, you must have the 'admin' permission in the account.
Perform One-Time SAML Setup
Create Identity Provider Trust Relationship
You must already have a SAML identity provider -- such as OneLogin, Okta, PingFederate, or ADFS -- currently set up. If you are using a hosted solution, you may wish to search for the RightScale app by name to see if your provider offers a guided setup process.
Use the following information to set up a trust relationship with RightScale's SAML Service Provider:
| Entity ID | PingConnect |
|---|---|
| saasid (if prompted) | ccf4ffe6-7005-4c84-946b-898d182f9338 |
| Assertion Consumer Service URL | https://sso.connect.pingidentity.com/sso/sp/ACS.saml2 |
Depending on your identity provider, you may need to enter either all three or just two of the above items.
We provide XML metadata that you can download or point your IdP to. Its URI is: http://us-3.rightscale.com/saml/sp-...rightscale.xml
Decide on a Discovery Hint
The discovery hint is what your users would type into the SSO Identifier
field if they arrived at the RightScale login page without having performed IdP-initiated login, or if they wanted to link their existing RightScale user to your IdP.
Your organization's domain name (e.g. exampledomain.com) is a good choice for a discovery hint. The hint must be a well-formed (but not necessarily valid) DNS name, and must be unique within the RightScale platform. If you are concerned about revealing to third parties that you use RightScale, then you should specify a non-obvious discovery hint.
Administrators can choose not to provide a discovery hint by unchecking the Allow RightScale-initiated SSO
checkbox. By disallowing RS-initiated SSO, only IdP-initiated SSO will be supported. In addition, existing RightScale users who are currently using a password will not be able to link themselves to the IdP from Settings > User > Authentication.
The Discovery Hint/SSO Identifier must be in the form of a domain name and not just a single word.
Create Service Provider Trust Relationship
Before you can roll out SAML SSO to your organization you must configure RightScale with some information about your Identity Provider. You must have 'enterprise_manager' permissions.
- Log in to the RightScale dashboard using your user profile with 'enterprise_manager' permissions.
- Navigate to Settings > Organization > Single Sign-On. Click New. The following dialog displays.
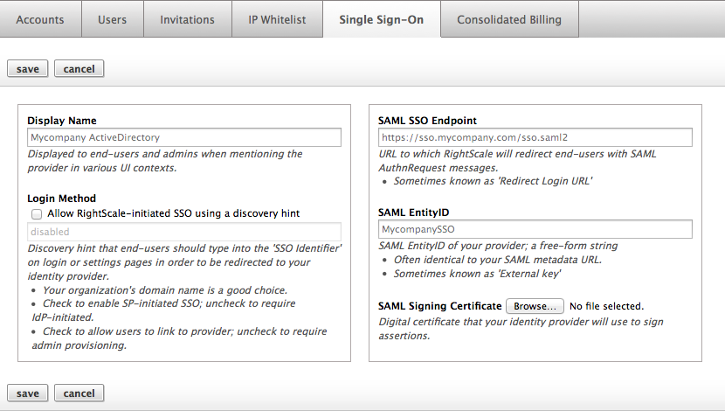
- Enter appropriate values for Display Name , Login Method , SAML SSO Endpoint and SAML EntityID as described on the dialog.
- Use the SAML Signing Certificate Browse button to select the digital certificate that your identity provider will use to sign assertions.
- Click Save to complete SAML Provider configuration.
Enable Single Sign-On for Users
Once SAML has been enabled for your RightScale Enterprise, there are two main use cases to consider:
- People who already have access to one or more of your accounts and want to enable SAML SSO instead of password-based login.
- People who have not yet joined RightScale.
Existing RightScale Users
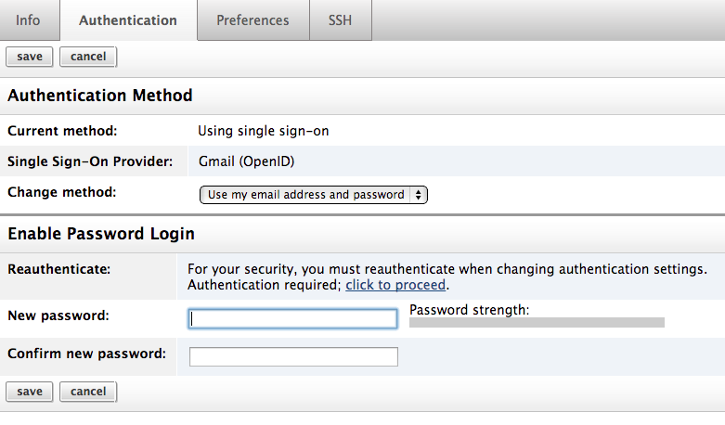
People who currently log in to RightScale with a password can enable SAML SSO for a user by logging in, then navigating to Settings > User Settings > Authentication.
This step is recommended for Enterprise Managers who are setting up SAML and want to test it with their own user profile before rolling out SAML to the enterprise.
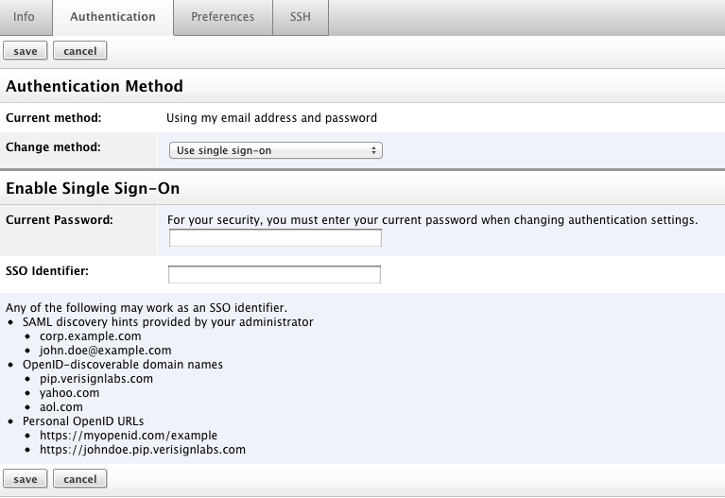
- Switch Current method from
Use my email address and password
toUse single sign-on
- Enter your current password
- Under SSO Identifier , enter the discovery hint chosen by your security administrator.
- Click
Save.
You will be redirected to your Identity Provider to authenticate, then back to the RightScale dashboard.
New RightScale Users
New users can come to use SAML in a number of ways:
- Users who happen upon RightScale and perform SSO without being invited
- Users who receive an invitation to join a RightScale account and perform SSO while accepting the invitation
- Users who are added to RightScale by their account administrator via REST API request
The user experience for each of these additional login scenarios differs slightly and is described in the following sections.
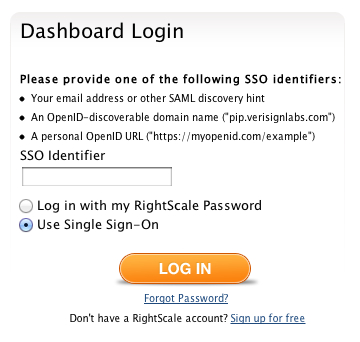
Log in with SAML
To log in with SAML SSO, choose Use Single Sign-On
on the RightScale login page. Enter the Discovery Hint identifier provided by your company's security administrator.
After logging in, you are authenticated against your IdP and automatically directed to the RightScale Dashboard.
RightScale creates an informational cookie on your machine with the Identifier you provide. This way, you will not need to enter your Identifier every time you login using Single Sign-On. However, you should remember your Identifier in order to login from different machines.
Additional Single Sign-On Considerations
There are two additional use cases in the context of SAML single sign-on that need to be considered when setting up or maintaining your RightScale enterprise for SSO. These use cases are described below.
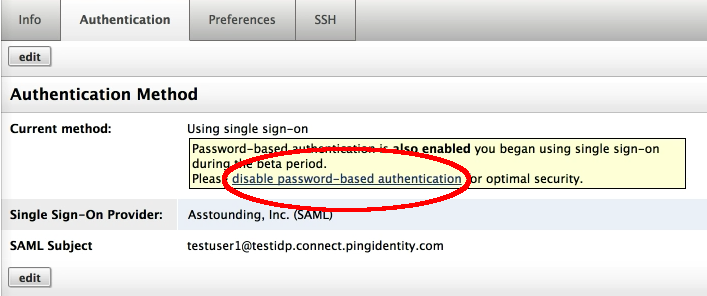
- Existing user that has both password-based authentication and SSO because he originally started with password-based authentication then switched to using single sign-on during the SSO beta period. Under this case...
- RightScale has not disabled the original user password that still exists.
- A link is provided for the user to disable password-based authentication on the Settings>Authentication page.
- Single sign-on user has forgotten attempts to use the Forgot Password? link on the RightScale login page to reset his password. Under this case...
- The user is taken to the Reset Password dialog. The user enters the email address and clicks Email link to set up new password button. The system displays the following warning message.
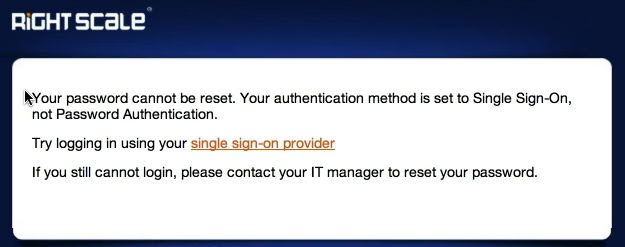
The user clicks the single sign-on provider link which takes him back to the main RightScale login page with the Use Single Sign-On option selected and the SSO Identifier field pre-filled.
Disable Single Sign-On with OpenID
Service-level response times are the same as for general-release features. Although this new feature/technology has undergone significant testing and is not expected to change significantly prior to general release, the use of this feature/technology is not recommended for production environments. You are encouraged to use this feature/technology for development and testing purposes only.
Single Sign-On functionality on RightScale enables companies to use their OpenID-enabled identity provider to authenticate users on the RightScale Dashboard. If you would like to use SAML instead of OpenID, or if you would like to switch back to password-based authentication, you will need to disable OpenID.
Steps
- Go to Settings > User Settings > Authentication and click Edit.
- For security reasons, you will need to reauthenticate. Select
click to proceed
and you will be prompted for your OpenID authentication information. Once entered, you will be redirected to the Authentication tab and see Authentication Succeeded. - You can either enter in a new password or switch to another Single Sign-On provider. If you would like to switch to SAML instead of using OpenID, see Getting Started with SAML. Note: Since SSO is still in beta, it is possible to sign in with both your email address and password or your OpenID information.
- Click save.