End-to-end (E2E) examples leverage the shorter more specific API examples, including a more practical, robust description of what is going on each step of the way.
Beginner E2E API Example
Objective
Combine several commonly used API calls into a practical end-to-end example that helps facilitate learning the RightScale API.
Introduction
This example leverages several stand-alone scripts that invoke the RightScale API via HTTP/curl calls. Each script has a preamble
whereby it sets up the type of script and defines environment variables specific to the environment. For example, use the Bourne shell (/bin/sh) and set the Cloud ID to 2112. You may choose to change up your environment. That is, use C or Bash not the Bourne shell, or create a single script with one preamble where you set the shell type and define all required variables for all subsequent API calls. Whether you use a single script or several, your cloud resources are unique and you must identify them correctly. You may either obtain their ID's from the Dashboard (when available¹) or invoke the API and parse the output.
Note that this format allows you to copy/paste example scripts, set the variables for your environment, and run them as is.
Reminder : API examples are meant as a learning tool, and should be utilized with the following additional resources:
- API on-line reference - Use this as a reference to help construct URL's for API usage
¹ Although you can discover many resource ID's by simply navigating the the RightScale Dashboard (helpful for learning and exploring the API), not all resources are available via the Dashboard. Most notably, specific cloud resources must be obtained from API queries. For example, when navigating to Clouds > CloudName all resources supported by that cloud must be obtained via API queries. Lifting the number from the URL will not work.
Steps
Authenticate
Before you can use the RightScale API, you must authenticate yourself as a Dashboard user. It is presumed you already have registered with RightScale, have access to a private or public cloud, and are able to log in ( https://my.rightscale.com) and navigate around the UI. Running the following will authenticate you and deposit a session cookie in the file 'mycookie'. This cookie is valid for approximately two hours. Once authenticated, you can run additional API commands without authenticating again (for the life of the session cookie).
    #!/bin/sh -e
    email="john.doe@example.com" # The email address for your RightScale User in the Dashboard
    pswd="SomeSecurePassword" # Your User's password
    account="1234" # Account ID, easily obtained from navigation in the Dashboard
curl -i -H X_API_VERSION:1.5 -c mycookie -X POST --data-urlencode "email=$email" --data-urlencode "password=$pswd" -d account_href=/api/accounts/"$account" https://us-3.rightscale.com/api/session
Note: Although OAuthis preferred for production environments, the Examples section of the API guide uses standard user/pass authentication for simplicity sake.
Important!_ Be sure to use the correct API endpoint in accord with your account when using the API. If your Account is located in US-3, then you use US-3 API endpoint. Same applies when your account is in US-4.
If you have not registered with RightScale, please contact sales@rightscale.com
List Clouds
Now that you have authenticated, you can tap into the power of the RightScale API. Lets start with a simple query for Cloud ID's. When you log into the RightScale Dashboard, your RightScale user and account only have access to some clouds, not all clouds. The List Clouds example below lists the Cloud ID's you have access too. Before you can create and launch a Server, you need to specify which cloud it should run in... hence listing clouds is a good place to start. In addition, listing resources is generally easier than creating them, so this is a good way to ease into using the API.
    #!/bin/sh -e
    curl -i -H X_API_VERSION:1.5 -b mycookie -X GET https://us-3.rightscale.com/api/clouds.xml
Other Notes:
- You can specify the output as either
.json
or.xml.
By default, if you do not specify a URL suffix, the API will respond in JSON format. - Querying for information (such as listing available clouds) requires an HTTP GET method. Later, you'll modify resources that require other HTTP methods such as POST or DELETE in the URL construction.
- Select the appropriate Cloud ID from the response. For example, 1234 in the following sample output:
<link href="/api/clouds/1234" rel="self"/>
Create a Deployment
Deployments are a great way to organize your cloud assets. Lets create a deployment that you can later add servers to, launch those servers, etc. Note that a deployment is not cloud-specific, so there is no need to specify the Cloud ID for this example.
Upon receiving a HTTP/1.1 201 Created
response, you are ready to start creating cloud assets in your new deployment.
Note : The example above uses a \
as a line continuation character for readability sake. Your scripts can do the same. Either way, Its important to know that the curl command issued must be interpreted by the shell as a single command.
Create a Security Group
Although not all clouds support security groups, they are quite common and a simple way to provide ingress security measures. First, you'll need to create the security group itself, then add any security group rules that should be enforced. Because security groups are cloud specific, a Cloud ID is required. Again, you can obtain your Cloud ID via the URL in the Dashboard ( Clouds > CloudName) or by querying the API for it.
Reminder : Requires 'security_manager' role on the account.
List Security Groups
Security groups are cloud specific and a cloud resource who's ID is not obtainable from navigation within the RightScale Dashboard. In order to create security group rules you will have to provide the security group ID the rules apply to. Hence, listing the security group before creating individual rules is required.
Create a Security Group Rule
In the same way that a deployment is a container for cloud assets, a security group is a container for security group rules. In and of themselves, a deployment does not actually do anything, neither does a security group. Creating a security group rule is done either by group or IP. This example is CIDR IP based. (The Examples section of the RightScale API Guide includes an example of creating one by group.)
Warning : Although its tempting to specify multiple start/end port combinations to allow access on additional ports, you cannot do that with a single API call.
First, this example will open up port 22 allowing SSH access.
Create Security Group Rules by CIDR IPS
To enable browsing on HTTP port 80 you can simply:
- Copy the script above
- Change the start and end ports from 22 to 80
- Run the script
You can add additional ports that should be opened up with similar logic. For example, to enable SSL change the start/stop port of 80 to 443, etc.
List Instance Types
At this point its tempting to create and launch a server. However, there are two more parameters we'll need: the instance type and MCI (Multi Cloud Image). The instance type is a cloud specific resource that you will have to query the API for the correct ID. The MCI can be queried via the API using the MultiCloudImage resource, or using the Dashboard (click the MultiCloud Image link for the ServerTemplate your server is based on).
Example instance types are small, medium and large (referring primarily to the memory and compute power). You'll need the instance type ID from the output looking similar to: <link href="/api/clouds/2112/instance_types/8E7KP200RBRU5" rel="self"/>
Note : Above example output is XML.
Create a Server
Actually creating the server is arguably one of the more difficult API calls due to the number of parameters specified. Having obtained all of the information needed to create a server from either the API or navigating in the Dashboard, you are ready to invoke the API and create the next instance
of the server. Tip: See other API Examples to help with your learning and getting additional resource information as needed.
Note : A \
character has been added to allow a single curl command to continue for several lines in the editor. This is for readability sake. The shell will interpret the script's curl command as a single line.
    #!/bin/sh -e
    DEPLOYMENT="306795001" # Deployment to add Server to
    CLOUD="2112" # Specify Cloud to add Server to
    ST="250769001" # Set the ServerTemplate the Server will be based on
    SG="DEU7O32167MJ4" # Set the Security Group
    MCI="240802001" # Set MultiCloud Image (MCI)
    ITYPE="9F6N6MA39F7E9" # Set the Instance Type for this Sever, this cloud, ...
    curl -i -H X_API_VERSION:1.5 -b mycookie -X POST \
    -d server[name]=my_app_server \
    -d server[description]=my_app_server_description \
    -d server[deployment_href]=/api/deployments/$DEPLOYMENT \
    -d server[instance][cloud_href]=/api/clouds/$CLOUD \
    -d server[instance][server_template_href]=/api/server_templates/$ST \
    -d server[instance][multi_cloud_image_href]=/api/multi_cloud_images/$MCI \
    -d server[instance][instance_type_href]=/api/clouds/$CLOUD/instance_types/$ITYPE \
    -d server[instance][security_group_hrefs][]=/api/clouds/$CLOUD/security_groups/$SG \
    https://us-3.rightscale.com/api/servers
Although no content is generated, you should recive a HTTP/1.1 201 Created
response. If the server cannot be created, API responses are quite good at indicating what the issue is. (Usually this is tied to missing or improperly specified parameters.)
List all Servers in a Deployment
Its simple to list all servers in a deployment. If there are multiple servers they all get displayed. Note that for each server there will always be a next instance
. This is all of the DNA
or blueprint
of information pertaining to the next server launched. There is also a current instance
if the server has an a running instance as well. Although often times the current and next server are effectively the same, they do not have be. Consider any server level input changes... those are based on the next server, not the current one. Hence after server level input changes the current and next servers will differ. Similarly if you change the instance type, MCI, Datacenter / Zone, machine tags, etc.
Launch Server
Now that the server ID is known a server can be launched. Recall that all specifics for a server (including the cloud, deployment, MCI, etc.) are specified when created, so only the server ID is required to launch.
No content is returned just a HTTP/1.1 201 Created
message.
Run (Rinse and Repeat)
At this point in the end-to-end example, you have learned how to authenticate, GET (list) information, POST (create) resources, etc. Your API sandbox
has a deployment with a server up and running in your cloud of choice. If there are other aspects of the API you want to explore, now is a good time to do that. With these Examples and the Online Reference, you should be able to use the API for most tasks. Recall that several examples include a Supplemental section that often use filters to help narrow in on more specific content in the response. The next steps in this tutorial will shutdown and wrap up the deployment. (Reminder : If you have been creating temporary scripts on a server in the cloud using the servers local (ephemoral) storage, when terminating the server you will lose those scripts. If you want to retain them for future use remember to back them up... even it it's a simple copy/paste into local files on your PC, or a backup to a remote object store.)
Post Tutorial Steps
Terminate Server
Warning! If you create shell scripts to test the API using local storage on a server in the cloud, when you terminate the server the scripts will be lost. That is not a permanent storage solution, but only exists for the life of the server. Because the sample scripts are so short, if you do need to terminate your server you can simply copy/paste the contents of the scripts into files stored on your local hard drive for future use.
Of course the one piece of information required to terminate a server is the server ID itself. This can be obtained from either navigating in the Dashboard or querying the API. (See Show Server or List all Servers in a Deployment above for examples.)
Delete Deployment
Warning! You can delete an unlocked deployment, even if it has servers in it (provided the servers are not operational). Non-operational servers will get deleted along with the unlocked deployment.
One use case for deleting a deployment is general cleanup. In fact, a use case for this entire end-to-end example (or something very similar) is automating the spin-up of a basic environment for people to get acquainted with the cloud and using the RightScale Dashboard. Although you could List Deployments in your enterprise training account, parse the output and delete them all programatically when the class is over, this example simply deletes a specific deployment.
Create 3Tier Servers
Objective
Use the RightScale API to create servers for a sample 3 tier deployment based on settings in configuration files.
Overview
Introduction
The RightScale Support Portal tutorials and Training exercises often include a familiar production-like 3 tier architecture for running and managing your web servers in the cloud. This tutorial uses the API to create a 3 tier architecture consisting of 6 servers:
- 2 HA proxy load balancers
- 2 PHP application servers
- 2 MySQL 5.5 database servers
Use Case
A possible use case for automating this procedure is a training environment where the ability to effectively reset
the students environment is a simple script/API call away. Perhaps you have already trained your staff on the basics of the RightScale Dashboard. They know how to login, navigate, create a deployment, SSH keys, security groups, etc. However, their training environment often gets broken or muddled, so reconfiguring in an efficient manner to a known
starting point is desirable. Then students can configure security group rules, download/configure your application, change deployment inputs, spin up servers in the proper order, lock them, etc.
Advantages
There are other potential advantages to using the API in a manner such as discussed in this 3 tier tutorial, such as:
- Environment control. Locking down and controlling your training environment, right down to the cloud and ServerTemplates used. In a training environment, using a HEAD version of a published ServerTemplate could sneak up and surprise you. For example, input name or default values could change or the introduction of new inputs could alter the behavior of the ServerTemplate. Programmatically creating your environment quickly and in a repeatable fashion may suit your needs.
- Out of band usage. That is, ability to create this environment external to the RightScale Dashboard. (You could even invoke the script using the API from a smart phone. For example, using a SSH client to access a host and invoke an API/script to create the environment, terminate or relaunch a server, etc.)
Steps
Configure
This script uses two very basic configuration files. The settings are read in from these files then used within the script. That way, you can configure one time , and run as often as required.
Warning! There is no input validation. The correct IDs are assumed, and a space is used for the delimiter.
generic.cfg - Contains three resource IDs on one line separated by white space. They are:
- < Cloud_ID> < Deployment_ID> < SecurityGroupID¹>_
- Example: 2117 316785001 DEU7O3167M2J4
3tier.cfg - Contains the ServerTemplate, MCI and Instance Type resource IDs for each tier (load balancer tier (LB), application tier (APP) and database (DB)). The format is also white space delimited on a single line. (Note: Shown on three lines below for readability.)
- < ServerTemplate_LB> < MCILB> < Itype_LB>_
- < ServerTemplate_App> < MCIApp> < Itype_App>_
- < ServerTemplate_DB> < MCIDB> < Itype_DB>_
- Ex: 252299001 240802001 9F6N6MA39F7E9 252293001 240802001 9F6N6MA39F7E9 269641001 240802001 9F6N6MA39F7E9
Note that if a ServerTemplate in your environment changes for an reason (new image, instance type size, inputs, etc.) you can modify your configuration file and re-run your script. No code changes are necessary once you have your script correct.
¹ Reminder: Not all clouds support the same cloud resources. In our example, security groups are included. Some clouds do not support security groups. If this is the case, simply remove this entry from your generic.cfg file, as well as references to the $SG (security group) variable in the script.
Authenticate
As always, you must be authenticated prior to using the RightScale API.
    #!/bin/sh -e
    email="john.doe@example.com" # The email address for your RightScale User in the Dashboard
    pswd="SomeSecurePassword" # Your User's password
    account="1234" # Account ID, easily obtained from navigation in the Dashboard

    curl -i -H X_API_VERSION:1.5 -c mycookie -X POST --data-urlencode "email=$email" --data-urlencode "password=$pswd" -d account_href=/api/accounts/"$account" https://us-3.rightscale.com/api/session
Note: Although OAuth is preferred for production environments, the Examples section of the API guide uses standard user/pass authentication for simplicity sake.
If you have not registered with RightScale, sign up for FREE!
Create Script
Although the contents of our example script to create all the cloud resources is a bit long, the logic used is quite simple. The trick is configuring it correctly, and constructing the URLs appropriately.
    #!/bin/sh -e
    #
    if [$# -ne "1"]; then
            echo "Usage: 3tier ServerNamePrefix"
            echo "ServerNamePrefix will get prepended to all created servers"
            echo "Exiting . . ."
            exit 0
    fi
    # CONFIGURATION
    echo "Reading configuration files . . . "
    read CLOUD DEPLOYMENT SG < generic.cfg
    read ST_LB MCI_LB ITYPE_LB ST_APP MCI_APP ITYPE_APP ST_DB MCI_DB ITYPE_DB < 3tier.cfg
    echo "Done (config)"
    echo "Values set: $ST_LB $MCI_LB $ITYPE_LB $ST_APP $MCI_APP $ITYPE_APP $ST_DB $MCI_DB $ITYPE_DB"

    # Create Load Balancers
    echo "Create Load Balancer #1"
    curl -i -H X_API_VERSION:1.5 -b mycookie -X POST \
    -d server[name]=$1_load_balancer1 \
    -d server[description]=$1_load_balancer1 \
    -d server[deployment_href]=/api/deployments/$DEPLOYMENT \
    -d server[instance][cloud_href]=/api/clouds/$CLOUD \
    -d server[instance][server_template_href]=/api/server_templates/$ST_LB \
    -d server[instance][multi_cloud_image_href]=/api/multi_cloud_images/$MCI_LB \
    -d server[instance][instance_type_href]=/api/clouds/$CLOUD/instance_types/$ITYPE_LB \
    -d server[instance][security_group_hrefs][]=/api/clouds/$CLOUD/security_groups/$SG \
    https://us-3.rightscale.com/api/servers
    echo "Done (load bal 1)"

    echo "Create Load Balancer #2"
    curl -i -H X_API_VERSION:1.5 -b mycookie -X POST \
    -d server[name]=$1_load_balancer2 \
    -d server[description]=$1_load_balancer2 \
    -d server[deployment_href]=/api/deployments/$DEPLOYMENT \
    -d server[instance][cloud_href]=/api/clouds/$CLOUD \
    -d server[instance][server_template_href]=/api/server_templates/$ST_LB \
    -d server[instance][multi_cloud_image_href]=/api/multi_cloud_images/$MCI_LB \
    -d server[instance][instance_type_href]=/api/clouds/$CLOUD/instance_types/$ITYPE_LB \
    -d server[instance][security_group_hrefs][]=/api/clouds/$CLOUD/security_groups/$SG \
    https://us-3.rightscale.com/api/servers
    echo "Done (load bal 2)"

    echo "Create App Server #1"
    curl -i -H X_API_VERSION:1.5 -b mycookie -X POST \
    -d server[name]=$1_app_server1 \
    -d server[description]=$1_app_server1 \
    -d server[deployment_href]=/api/deployments/$DEPLOYMENT \
    -d server[instance][cloud_href]=/api/clouds/$CLOUD \
    -d server[instance][server_template_href]=/api/server_templates/$ST_APP \
    -d server[instance][multi_cloud_image_href]=/api/multi_cloud_images/$MCI_APP \
    -d server[instance][instance_type_href]=/api/clouds/$CLOUD/instance_types/$ITYPE_APP \
    -d server[instance][security_group_hrefs][]=/api/clouds/$CLOUD/security_groups/$SG \
    https://us-3.rightscale.com/api/servers
    echo "Done (app server 1)"

    echo "Create App Server #2"
    curl -i -H X_API_VERSION:1.5 -b mycookie -X POST \
    -d server[name]=$1_app_server2 \
    -d server[description]=$1_app_server2 \
    -d server[deployment_href]=/api/deployments/$DEPLOYMENT \
    -d server[instance][cloud_href]=/api/clouds/$CLOUD \
    -d server[instance][server_template_href]=/api/server_templates/$ST_APP \
    -d server[instance][multi_cloud_image_href]=/api/multi_cloud_images/$MCI_APP \
    -d server[instance][instance_type_href]=/api/clouds/$CLOUD/instance_types/$ITYPE_APP \
    -d server[instance][security_group_hrefs][]=/api/clouds/$CLOUD/security_groups/$SG \
    https://us-3.rightscale.com/api/servers
    echo "Done (app server 2)"

    echo "Create DB Server #1"
    curl -i -H X_API_VERSION:1.5 -b mycookie -X POST \
    -d server[name]=$1_db_server1 \
    -d server[description]=$1_db_server1 \
    -d server[deployment_href]=/api/deployments/$DEPLOYMENT \
    -d server[instance][cloud_href]=/api/clouds/$CLOUD \
    -d server[instance][server_template_href]=/api/server_templates/$ST_DB \
    -d server[instance][multi_cloud_image_href]=/api/multi_cloud_images/$MCI_DB \
    -d server[instance][instance_type_href]=/api/clouds/$CLOUD/instance_types/$ITYPE_DB \
    -d server[instance][security_group_hrefs][]=/api/clouds/$CLOUD/security_groups/$SG \
    https://us-3.rightscale.com/api/servers
    echo "Done (db server #1)"

    echo "Create DB Server #2"
    curl -i -H X_API_VERSION:1.5 -b mycookie -X POST \
    -d server[name]=$1_db_server2 \
    -d server[description]=$1_db_server2 \
    -d server[deployment_href]=/api/deployments/$DEPLOYMENT \
    -d server[instance][cloud_href]=/api/clouds/$CLOUD \
    -d server[instance][server_template_href]=/api/server_templates/$ST_DB \
    -d server[instance][multi_cloud_image_href]=/api/multi_cloud_images/$MCI_DB \
    -d server[instance][instance_type_href]=/api/clouds/$CLOUD/instance_types/$ITYPE_DB \
    -d server[instance][security_group_hrefs][]=/api/clouds/$CLOUD/security_groups/$SG \
    https://us-3.rightscale.com/api/servers
    echo "Done (db server #2)"
Run Script
Running the script is simple. It does require one command line argument however. Whatever you specify will be prepended to every server's name in your deployment. (This could be useful if working in a classroom environment. For example, prepend with real names or simply Student1, Student2, etc.)
Reminder: Don't forget to change your script's permissions so that it is executable. Further, if the current directory .
is not in your environment's PATH variable you must invoke your script explicitly. (As shown below.)
Before running your script:
- Navigate to the Deployment you are adding your 3 tier servers too
- Note what servers exist
Now run your script, providing the name to prepend. (Note: Example output truncated.)
    $ ./3tier Bethany
    Reading configuration file. . .
    Done (config)
    Values set: 252299001 240802001 9F6N6MA39F7E9 252293001 240802001 9F6N6MA39F7E9 269641001 240802001 9F6N6MA39F7E9
    Create Load Balancer #1
    HTTP/1.1 201 Created
    Server: nginx/1.0.15
    Date: Mon, 05 Nov 2012 16:40:17 GMT
    Content-Type: text/html; charset=utf-8
    Transfer-Encoding: chunked
    Connection: keep-alive
    Status: 201 Created
    Location: /api/servers/571162001
    X-Runtime: 688
    X-Request-Uuid: f591fd74f1674457964586ee258265af
    Set-Cookie:
    Cache-Control: no-cache

    Done (load bal 1)
    Create Load Balancer #2
    HTTP/1.1 201 Created
    Server: nginx/1.0.15
    Date: Mon, 05 Nov 2012 16:40:18 GMT
    Content-Type: text/html; charset=utf-8
    Transfer-Encoding: chunked
    Connection: keep-alive
    Status: 201 Created
    Location: /api/servers/571163001
    X-Runtime: 531
    X-Request-Uuid: 3ab82dfdc84d45079b656ec605d6484a
    Set-Cookie:
    Cache-Control: no-cache

    Done (load bal 2)

    . . . .
    Done (db server #2)
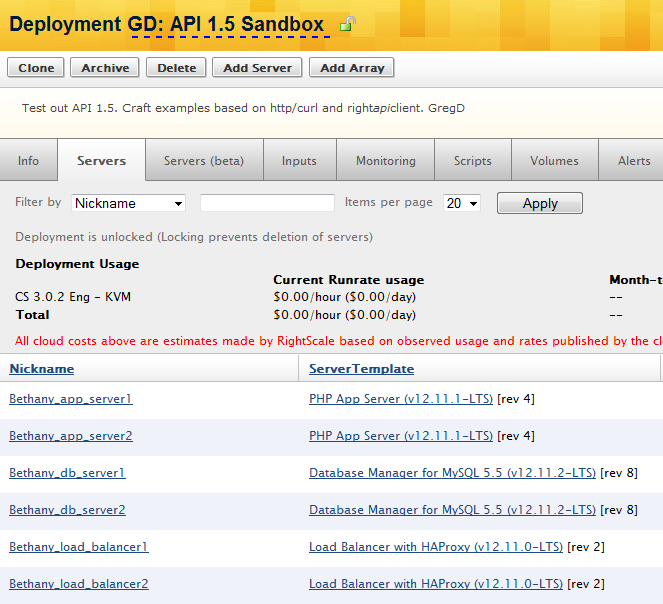
Now refresh your browser. You should see all servers created based on the cloud resources you specified in your configuration files. In our example:
Post Tutorial Steps
There are many ways to configure and accomplish the steps in this tutorial. It is meant as a learning tool and provide ideas that could work in your specific use case. Some may want to explore further or implement slightly different based on their needs.
- Convert the script above to a RightScript that uses inputs not configuration files
- Locate a client for your smart phone so you can invoke an API script remotely
- Add more elaborate configuration files and error checking/validation to your script
Destroy Deployment
To delete the deployment and all servers within it, based on information from a configuration file used to originally create the servers in the deployment.
Warning! The example script provided deletes all servers and the deployment itself. Please be sure that is the desired outcome before running the script. This script assumes the deployment you wish to delete is specified in the generic.cfg file.
Overview
This tutorial is designed to clean up the example deployment and servers initially created in the Create 3 Tier Servers End to End tutorial. Note that the curl call is identical to the individual Delete Deployment API example. The only difference is the deployment ID is read in from a configuration file.
Prerequisite : Example assumes you have previously authenticated, and your valid session cookie is in 'mycookie'.
Steps
Terminate Servers
Terminate any servers in the deployment if they are currently running. You can do this from the Dashboard or using the API.
Verify Configuration
Verify the generic.cfg file contains the correct configuration informaiton. In our example, specify the Cloud ID (2112), Deployment number (306795001) and Security Group seperated by a space.
2112 306795001 DEU7O32167MJ4
Create Script
Create the following script, name it Destroy3tier.
    #!/bin/sh -e
    # CONFIGURATION
    echo "Reading configuration files. . . "
    read CLOUD DEPLOYMENT SG < generic.cfg
    echo "Done (config)"
    echo "Deleting deployment number ${DEPLOYMENT} and all servers. . ."
    curl -i -H X_API_VERSION:1.5 -b mycookie -X DELETE https://us-3.rightscale.com/api/deployments/$DEPLOYMENT
    echo "Done."
Reminder: Make sure the script is executable before running it.
$ chmod 755 Destroy3tier
Run Script
    $ ./Destroy3tier
    Reading configuration files. . .
    Done (config)
    Deleting deployment number 306795001 and all servers. . .
Post Tutorial Steps
- Note you could also remove other resources, such as the security group (whose ID was also read in from the generic.cfg file)
- More intelligence could be added to this basic script to make it more practical. For example, rather than assuming the servers are shutdown, you could look for operational servers in the deployment and terminate and delete them. That leaves the option of not deleting the deployment itself, just the servers in it, and other cloud resources you do want remove.
SAML Provisioning API E2E
Objective
To become familiar with the basics of RightScale's Provisioning API through the use of SAML SSO. This includes understanding how to search for SAML identity providers, create users, grant and revoke privileges, and perform other various tasks through the RightScale API.
Prerequisites
- You must have an Enterprise plan
- You must have the 'admin' permission enabled for every account whose users and permissions you wish to manage.
- You must have a SAML identity provider configured to a RightScale account. For more information, see our SAML page.
Overview
This tutorial will outline how to use the RightScale API to create users configured with SAML. This end-to-end tutorial will walk you through how to locate you SAML identity provider information, create a user, and set up permissions for a newly created user via HTTP/curl calls. Additionally, it will explain how to update a current RightScale users with SAML and, at the end of the tutorial, will point to an advanced example that explains how RightScale manages and provisions a large number of internal users.
Note :
- Some code examples below contain a
\
character to allow a single curl command to continue for several lines in the editor. This is done for readability so the shell will interpret the script's curl command as a single line. - Each section that contains a code example starts with a heading that corresponds to the auto-generated reference information of the RightScale API. For example, the section Create Permissions is an example based off of the Create Permissions reference information. You can use the headings as a way to navigate the RightScale API Reference information for more information about parameters, filters, or other calls that can be made with a resource.
- If you are using OpenID, you will not be able to use SAML. Disable OpenID before following the steps to set up SAML.
Steps
Authenticate
You must be able to log in to your Enterprise account using SAML. See our SAML page on how to setup your account with this feature.
Before making any API requests, you should enable OAuth 2.0 API access to each of your accounts.
Note : You can also login to the API using an email address and password, as described in Authentication, but for the purposes of this tutorial, it is assumed that you are using SAML and have disabled password-based authentication to RightScale.
Follow the steps below to enable OAuth:
- Make sure you're in the account you want to enable with OAuth.
- Go to Settings > Account Settings > API Credentials.
- In Status , click enable.
- Obtain the API refresh token in order to make API requests without logging in. It's important that this token is protected.
Note : The hostname of the Token Enpoint (API 1.5)
may vary between RightScale accounts depending on the geographical region in which each account is hosted. Make sure to use the correct endpoint for your account when making API request, both OAuth and otherwise.
Once set up, you can make the following request. Note that this token does not expire until it is disabled.
When it is enabled,
a new token will be generated.
Warning! Anyone with this token can log in to the API and perform API requests on your behalf, with all the permissions you have access to. Protect this token appropriately.
Example Call
    curl -i -H X-API-Version:1.5 -X POST \
     -d refresh_token='cda1fe275610b099d0d901fb2c60512e0f2565e5' \
     -d grant_type='refresh_token' \
    https://us-3.rightscale.com/api/oauth2
Example Response
{ "access_token":"eNotkMuOg...8vf4A2GhbCA==", "expires_in":7200, "token_type":"bearer" }
Use the access_token in place of a session cookie when you make API requests. As documented in the OAuth 2.0 Reference Documentation, this is a bearer-type token, meaning that you should include it as an Authorization header with every request.
Note : With the exception of the first example below, the access_token will not be displayed in other examples for readability sake.
Create a RightScale User with SAML
Get the SAML Identity Provider Href
List Identity Providers
After SAML is set up for your enterprise account, and you have been authenticated, you have to search for the identity provider associated with your account. This is so you can have the necessary information when creating a RightScale SAML user. The information you need first is the identity_provider_href. The identity_provider_href is the href of your SAML identity provider as known by RightScale.
Note : There is usually only one identity provider associated with an account.
Example Call
    access_token="eNotkMuOg...8vf4A2GhbCA=="
    curl -i -H X_API_VERSION:1.5 -H "Authorization: Bearer $access_token" \
     -X GET https://us-3.rightscale.com/api/identity_providers.xml
Example Response
    <?xml version="1.0" encoding="UTF-8"?>
    <identity_providers>
      <identity_provider>
        <created_at>2013/01/04 23:31:06 +0000</created_at>
        <discovery_hint>examplecompany.com</discovery_hint>
        <updated_at>2013/01/04 23:38:40 +0000</updated_at>
        <actions></actions>
        <name>Docs and Ed Test Provider</name>
        <links>
          <link href="/api/identity_providers/64" rel="self"/>
        </links>
      </identity_provider>
    </identity_providers>
Make note of the self-link href that is associated with the identity provider you want. You will specify this href when creating users that are linked to this identity provider. The identity provider href never changes after it is created, so discovering your provider is generally a one-time operation.
Preconfigure a New User with SAML
Create a User
Before a user is created in RightScale, make sure the user is set up with an account with your SAML identity provider. You can only create or modify a user's authentication settings in RightScale when they are connected to your SAML identity provider. Creating a user with SAML access in RightScale is similar to creating a non-SAML user, the only difference being the two additional parameters that need to be specified: identity_provider_href and principal_uid. The identity_provider_href is what is returned from the GET identity_providers request. The principal_uid has to be the unique identity information (the SAML NameID or Subject) that your identity provider associates to the user. This is usually an email address, but its format can change depending on how you have configured your identity provider.
Note :
- It's possible to enable a current RightScale user's with SAML settings. See Update a Current RightScale User with SAMLto do this.
- Be careful using special characters when you input information, for example, adding
-
or()
to the phone number can cause errors.
Example Call
    curl -i -H X_API_VERSION:1.5 -H "Authorization: Bearer $access_token" -X POST \
     -d user[email]=john.doe@example.com \
     -d user[company]='Example Company' \
     -d user[phone]=1234567890 \
     -d user[first_name]=John \
     -d user[last_name]=Doe \
     -d user[identity_provider_href]='/api/identity_providers/64' \
     -d user[principal_uid]='john.doe@example.com' \
    https://us-3.rightscale.com/api/users
Example Response
    HTTP/1.1 201 Created
    Server: nginx/1.0.14
    Date: Tue, 08 Jan 2013 18:07:15 GMT
    Content-Type: text/html; charset=utf-8
    Transfer-Encoding: chunked
    Connection: keep-alive
    Status: 201 Created
    Location: /api/users/64522
    X-Runtime: 488
    X-Request-Uuid: 63ddefa1840844a1a2069efb8546270a
    Set-Cookie:
    Cache-Control: no-cache
Make note of the href of the new user. In the example above, the location specifies the user href: /api/users/64522.
Manage Permissions for a SAML User
Create Permissions
Once a user has been created, you should grant some permissions to that user in one or more accounts so the user can access the RightScale Dashboard. The first permission that must be added for a given account is 'observer.' Observer allows a user to login to the account and view the Dashboard. Even if an 'admin' role is added, the observer role still needs to be set first.
    curl -H X_API_VERSION:1.5 -H "Authorization: Bearer $access_token" \
     -d permission[user_href]='/api/users/64522' \
     -d permission[role_title]=observer \
    -X POST https://us-3.rightscale.com/api/permissions
Once a user has the observer role, you can add additional roles as needed. For information on the roles a RightScale user can have, see User Roles Privileges.
Note that since each permission is modeled as a distinct REST resource, you can only grant one role per API call. Additionally, you can also manage a user's permissions through the RightScale Dashboard by going to Settings > Account Settings > Users.
Note : Before you can manage a user's permissions through the Dashboard, you must first set 'observer' on the user so they appear in the Dashboard as a member of that account.
List Permissions
You can view the permissions available to a specific user by applying a filter on a GET call of the permissions collection. Displaying the permissions assigned to a user is helpful since you need the permission ID to remove an individual permission you previously granted.
Note : Attempting to show permissions on a user that has no permissions set would yield the same view as attempting to show a user that has not been created. In both cases, the response body will contain an empty list.
Example Call
    curl -i -H X_API_VERSION:1.5 -H "Authorization: Bearer $access_token" \
     -X GET https://us-3.rightscale.com/api/permissions.xml -d filter[]="user_href==/api/users/64522"
You will receive an output of all the permissions available to the specific user.
Example Response
    <?xml version="1.0" encoding="UTF-8"?>
    <permissions>
      <permission>
        <links>
          <link href="/api/permissions/590219" rel="self"/>
          <link href="/api/accounts/1234" rel="account"/>
          <link href="/api/users/64522" rel="user"/>
        </links>
        <created_at>2012/10/04 19:25:29 +0000</created_at>
        <role_title>observer</role_title>
        <actions></actions>
      </permission>
    </permissions>
Destroy Permissions
To remove permissions from an account, you will need to delete each permission using the permission IDs that are returned when showing the permissions of a specific user. You can remove all permissions of a user and they will no longer have access to RightScale. If you ever need to grant access to a user that has had all permissions removed, just create permissions for the user. Note that you will need the user's href to do this. If you don't recall the user's herf, you can create the user again and the href associated to the user's email will be returned. A new href will not be created for a user that has been previously created in RightScale.
Note :
- You must remove the 'observer' permission last or you will receive an error. The observer role allows a user to login and view the RightScale Dashboard.
- Permissions can only be deleted one at a time since you are removing the permission ID associated to the user role.
Update a Current RightScale User with SAML
There are two uses cases that can occur when updating a RightScale user with SAML access.
- You can have a user linked to your identity provider. If that is done, you have the capability to update that user's information. This will include their email address, name, phone number, and SAML settings.
- If a user is not linked to your identity provider, you can find information about the user (by listing the user) and can grant or revoke privileges, but you cannot update their information.
Link a user to your Identity Provider
To link a user to your identity provider, you can have the user opt in through Authentication Settings in the RightScale Dashboard.
Note : You can avoid having to have a user opt in through the dashboard, but that would require having to create an entire new account for them (see Create a RightScale User with SAML).
List Users
When a user is linked to your identity provider, you can list them to find their information. When you list users, you will see every user that has any permission on the current account. You can apply a filter to help narrow your search. The example below looks for a particular user email. If a user is linked to your SAML identity provider, the identity provider href will be displayed below the user ID information.
Note :
- A user cannot have an account that uses both OpenID and SAML.
- If a user becomes unlinked from the identity provider, you will no longer be able to update the user information through the provisioning API.
Example Call
curl -i -H X_API_VERSION:1.5 -H "Authorization: Bearer $access_token" -X GET https://us-3.rightscale.com/api/users.xml -d filter[]="email==john.doe@example.com"
Example Response
    <?xml version="1.0" encoding="UTF-8"?>
    <users>
      <user>
        <last_name>Doe</last_name>
        <updated_at>2012/12/28 22:51:34 +0000</updated_at>
        <links>
          <link href="/api/users/7825" rel="self"/>
          <link href="/api/identity_providers/64" rel="identity_provider"/>
        </links>
        </links>
        <first_name>John</first_name>
        <email>john.doe@example.com</email>
        <company>ExampleCompany</company>
        <actions></actions>
        <created_at>2008/10/14 23:48:55 +0000</created_at>
        <phone>1234567890</phone>
      </user>
    </users>
Make note of the user ID and identity provider ID.
Update Users
The same information is needed for updating a user as it is for creating a user, the only major difference is the call that's made. Instead of a POST to /api/users, you make a PUT request to /api/users/$user_id. You can update some or all of the user's attributes.
Note : Be careful when changing a user's principal_uid. This could prevent the user from being able to log in with SAML if the wrong value is accidentally provided. Or if you modify a user's identity_provider_href you can also prevent them from being able to log in or even prevent you from updating their information.
The example below updates the listed user's company name and SAML identity provider information.
    user_id="7825"
    curl -i -H X_API_VERSION:1.5 -H "Authorization: Bearer $access_token" -X PUT \
     -d user[current_email]=john.smith@example.com \
     -d user[company]='New Company' \
     -d user[phone]=1234567890 \
     -d user[first_name]=John \
     -d user[last_name]=Doe \
     -d user[identity_provider_href]='/api/identity_providers/76' \
     -d user[principal_uid]='examplecompany.com' \
    https://us-3.rightscale.com/api/users/$user_id
Note : You will unable to modify a user that is not linked to your identity provider. If you attempt to, you will receive a 403 Forbidden error.
Update a Current RightScale User's Permissions
You can modify current user's permissions just like you would a newly created user. See Manage Permissions for a SAML User.
Post Tutorial Steps
Now that you have been walked through the basics of how to create and provision users through the RightScale API, you may find it beneficial to see how this is done if you need to manage a large amount of users that need varying levels of permissions to RightScale. A RightScale developer created a RubyGem to help automate this for RightScale's own internal accounts, which can be viewed here: rs_user_policy.
You can also read this blog post for more information regarding this tool: Manage Large-Scale User-Access Control with the RightScale API.