Overview
This tutorial covers the creation of a 3-tier Windows Deployment from scratch using the Microsoft IIS App Server (v14.0) and Database Manager for Microsoft SQL Server (v14.0.1) ServerTemplates on Amazon EC2 (Load Balancer with HAProxy (v14.1.1) as a load balancer, Microsoft IIS App Server (v14.0) as an application server and mirrored Database Manager for Microsoft SQL Server (v14.0.1) as a database server).
This tutorial works with the v14.x infinity lineage branch only. Earlier ServerTemplates are not compatible.
Prerequisites
- 'actor', 'server_login', and 'security_manager' user role privileges
- Access to a DNSMadeEasy Account
- If the following ServerTemplates do not exist in your RightScale account (Design > ServerTemplates), you need 'library' user role privileges to import them from the MultiCloud Marketplace:
- Microsoft IIS App Server (v14.0)
- Database Manager for Microsoft SQL Server (v14.0.1)
- Load Balancer with HAProxy (v14.1.1)
- Windows server with RightLink installed
- A zip archive that contains your application code and full backup of the application database. This tutorial uses DotNetNuke (http://www.dotnetnuke.com/) as example application.
Steps
Create an EC2 SSH Key
Determine which AWS region the Windows servers will be launched into and create an EC2 SSH Key in that region. See Create a New SSH Key.
Create Elastic IPs (EIP)
You will need two EIPs for both of the front end Load Balancers. Name them appropriately (e.g., myapp-lb1 and myapp-lb2). For this example, choose the EC2 Classic network option. See Create Elastic IPs (EIP).
Write down your EIP names and their IP addresses.
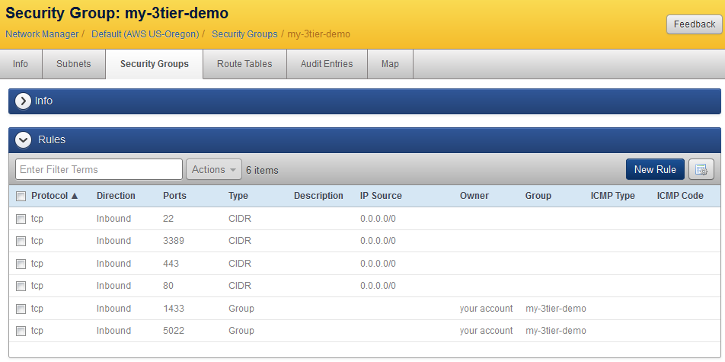
Create an EC2 Security Group
Create an EC2 Security Group with the following port permissions in the selected AWS region. For development and test purposes you can simply create a single security group that will be used by all Windows servers. However, if you are building a production environment, you should consider creating separate security groups for each tier. Use 0.0.0.0/0 CIDR notation to open the ports to any IP address. See Create a New EC2 Security Group.
- 22 for SSH access (Linux) (The load balancers in this example will be Linux instances.)
- 80 (HTTP)
- 443 for (HTTPS) -- Ignore if you are not using SSL.
- 3389 for RDP access (Windows)
- 1433 for SQL Server database connections
- 5022 for SQL Server mirroring connections
The created security group should have permissions that look like the following:
Save Application and Database Files in an S3 Bucket
Create an S3 bucket with a properly formatted name (see Create a New S3 Bucket) and upload an archive file of the application code (.zip) and a valid database file. You can either restore the database using a SQL backup file (.bak) or attach an existing database file (.mdf). Upload the files to the S3 bucket. Later in this tutorial you will need to provide the URLs to these files as input values. If you do not have your own files that you would like to use, you can download and use the following example files to complete the tutorial.
When you upload a file to an S3 bucket, its access permissions will automatically be set to private
which means it can only be accessed with the AWS account credentials. Our scripts will be able to access the database dump file if it is located inside one of your account's S3 buckets even if it is private
because the AWS account credentials can be used for authentication. However, if you're using an application or dump file that's in an S3 bucket that doesn't belong to this account, you will need to make sure the file is set to public-read
by updating its permissions with the drop down menu.
Configure DNS Records
The Database Manager for Microsoft SQL Server (v14.0.1) ServerTemplate supports the following DNS Providers:
- DNS Made Easy
- DynDNS
- Route53
You will need to create three DNS A records: two for both of the load balancers and one for the SQL Server principal node. Log into your DNS account and follow the steps below.
The following steps were created using a DNS Made Easy account.
Load balancer - 1
- Create an 'A Record' for your first Load Balancer in your domain. For example,
myapp-www
. Note: In this basic example, the fully qualified domain name becomes: myapp-www.example.com. - For the IP address field, use the public IP address that was assigned to the first EIP you created earlier in this tutorial.
- Uncheck Dynamic DNS.
- Leave the Password field blank (if prompted).
- Since this is a load balancer, it is OK to use a longer TTL. Set the value to 1800 seconds.
Load balancer - 2
- Create another 'A record' for your second Load Balancer.
- You must use the same name as the first Load Balancer (i.e. myapp-www).
- Use the second EIP you created in the RightScale Dashboard earlier. (Important! - The only difference between the two 'A Records' created for the two Load Balancers is that each Load Balancer should be using a different Elastic IP)
SQL Server - Principal Node
- Create an 'A Record' for the server that will point to the
principal
Microsoft SQL Server. Name it something simple, for example your initials thendb1
(e.g. abc-db1). - Give it any legal, temporary IP address. (e.g. 1.2.3.4) The actual value does not matter, since it is simply a placeholder IP address that will be replaced at a later time when the DNS script is run.
- Set the TTL to 60 seconds. TTL=60
- Be sure to check the Dynamic DNS option so that the DNS A record will be assigned a 7-digit code that will be used to identify and update the record. The DDNSID will be a required input parameter that you will need to provide when you define your deployment's inputs. This will allow the temporary IP address of 1.2.3.4 (which you created above) to be dynamically replaced by the actual IP address of the cloud server after it boots up.
- Leave the Password blank (if prompted).
- Record the DDNSID of your Master (displayed in a pop-up window when you select the DDNSID link in your DME account). (e.g. 1234123)
Create a Deployment
Create a new deployment that will be used to contain all of the Windows servers. See Create a New Deployment.
Launch the Primary Server
Now that you have a deployment, you can now use the Database Manager for Microsoft SQL Server (v14.0.1) ServerTemplate to launch a SQL database server.
Go to the new Deployment and click Add Server button. See Add a Server to a Deployment.
- Add the Server to the AWS region into which you will later launch your database servers.
- Select the Database Manager for Microsoft SQL Server (v14.0.1) ServerTemplate.
- Under Server Name in the Server Details tab, enter a name for the server (e.g. MyApp-DB1). Do not include
primary
in the server's nickname because the server's role might change in a disaster recovery or failover scenario. To avoid future confusion in the event that you promote a partner server to become the new primary server, you should use generic server nicknames. - Select the SSH Key that you created earlier in this tutorial.
- Select the Security Group that you created earlier in this tutorial
- Ignore all other values.
- Click Confirm and then Finish.
Define Inputs
The next step is to provide values for any missing inputs at the Deployment level. Some input parameters are inherited from the ServerTemplate, whereas some are left undefined because they are user-specific.
Go to the Deployment's Inputs tab and click Edit. Although you technically only have to define inputs that are required to launch a database server, you might want to define values for some of the other missing inputs at the deployment level so that you can better manage and keep track of your settings. Also, if you define your inputs now, you will not need to provide any inputs later when you run any of the Operational Scripts.
Required Inputs
- You will need to create a credential for the ADMIN_PASSWORD input.
- Password to set for the local administrator account. Required parameter. You will use this password to log into the Server using RDP. Create a Credential to use and name it ADMIN_PASSWORD.
You will need to provide a password that meets the syntax requirements.
- Minimum of 7 characters
- At least one upper case letter
- At least one lower case letter
- At least one number
Go to the Inputs tab of your Deployment and click Edit and define these missing inputs:
| Input Name | Description | Example Value |
|---|---|---|
| ADMIN_PASSWORD | Set the password for the local Administrator account. This should be at least 7 characters long with at least one uppercase letter, one lowercase letter, and one digit. | Cred: ADMIN_PASSWORD |
| AWS_ACCESS_KEY_ID | Your AWS credentials are used to set up EBS volumes created and attached to your server. | Cred:AWS_ACCESS_KEY_ID |
| AWS_SECRET_ACCESS_KEY | Your AWS credentials are used to set up EBS volumes created and attached to your server. | Cred:AWS_SECRET_ACCESS_KEY |
| DATA_VOLUME_SIZE | Enter the size (in GB) for the volume that will be used to store the database file. By default, drive letter *D:\ * will be used for the data volume. To override this setting and use a different drive letter you can use the OPT_DATA_VOLUME_LETTER input. | Text: 30 |
| DB_LINEAGE_NAME | The lineage of the database backups. A string that is used to track all backups in a certain 'set' usually deployment wide. | Text: dotnetnuke |
| DNS_DOMAIN_NAME | Enter the Fully Qualified Domain Name (FQDN) of the DNS record. | e.g. text: abc-db1.domain.com |
| DNS_ID | Enter the DDNSID of the DNS record you created in a previous step. | 1234123 |
| DNS_IP_ADDRESS | Choose whether to use 'public' or 'private' IP addresses for the DNS record. | text:Public IP |
| DNS_PASSWORD | Enter the password of your DNS account or select the appropriate credential. | Cred:DNS_PASSWORD |
| DNS_SERVICE | Select one of the predefined DNS provider: DNS Made Easy, DynDNS, or Route53. Note: Do not override the predefined values. | text: DNS Made Easy |
| DNS_USER | Enter the user name of your DNS account or select the appropriate credential. | Cred:DNS_USER |
| DNS_TTL | Enter the TTL of the DNS record. The default value is 60 seconds. | Text:60 |
| INIT_MIRRORING_METHOD | Method of transferring database files and certificates between principal and mirror server to initialize mirroring session. Since we are placing principal and mirror servers in different availability zones, set this input to Remote Storage. | Text: Remote Storage |
| LOGS_VOLUME_SIZE | Enter the size (in GB) for the volume that will be used to store the database log file. By default, drive letter E:\ will be used for the log volume. To override this setting and use a different drive letter you can use the OPT_LOGS_VOLUME_LETTER input. | Text: 10 |
| OPT_USE_PUBLIC_IP | Since we are placing principal and mirror database servers into different availability zones, this input should be set to True to use public (external) IPs for mirroring connection. | Text: True |
| REMOTE_STORAGE_CONTAINER, REMOTE_STORAGE_CONTAINER_APP | Enter the name of S3 bucket to be used as storage for application files, initial database backup and certificate exchange. | Text: Bucketname e.g. mybucket |
| REMOTE_STORAGE_ACCOUNT_PROVIDER, REMOTE_STORAGE_ACCOUNT_PRROVIDER_APP | Type of remote storage used to store database backup, application code and certificate exchange. Currently AWS S3, Windows Azure Storage, and SoftLayer Object Storage are supported. In this tutorial we are using S3. | Text: Amazon S3 |
| REMOTE_STORAGE_ACCOUNT_ID, REMOTE_STORAGE_ACCOUNT_ID_APP | The Account ID or Name of the Remote Storage account which is used to authenticate your requests to Remote Storage services. We are using S3 in this tutorial so AWS access key id should be used. | Cred:AWS_ACCESS_KEY_ID |
| REMOTE_STORAGE_ACCOUNT_SECRET, REMOTE_STORAGE_ACCOUNT_SECRET_APP | The Secret Key or Password of the Remote Storage account which is used to authenticate your requests to Remote Storage services. We are using S3 in this tutorial so AWS secret access key should be used. | Cred:AWS_SECRET_ACCESS_KEY |
| SYS_WINDOWS_TZINFO | Set the system time to a specific timezone. Some examples are provided in the dropdown, but can be overridden if the timezone is not listed. | Text: Pacific Standard Time |
We are using the same S3 bucket to store IIS application code and SQL Server database. In a real world scenario you might want to use different S3 buckets (so 2 buckets need to be created and inputs REMOTE_STORAGE_CONTAINER and REMOTE_STORAGE_CONTAINER_APP set to appropriate values).
If you want to download application code from some URL (i.e. https://mydomain.com/app.zip) or from SVN repository you will need to set inputs ZIP_URL and SVN_APP_PATH, SVN_PASSWORD, SVN_USERNAME respectively. For this tutorial all these inputs should be set to 'ignore'.
Other inputs can be left set to default values.
Click Save.
Launch the Server
- Launch the server. On the Server's page click the Launch action button. You can also launch the server from the deployment's Servers tab. All of the required inputs should have defined values. Keep the default values for the SERVER_UUID and SKETCHY inputs. Click the Launch button again to confirm that you want to launch the server with the predefined input values.
- Wait for the server instance to become operational before going to the next step.
Import the database
The next step is to import the database onto the instance by restoring it from a backup file (.bak) or attaching an SQL Server data file (.mdf). You will need to select and run the appropriate operational script based upon the chosen method.
Restore from a database backup (.bak)
Follow these instructions if you want to load the database by using a backup file (.bak).
- Go to the server's Scripts tab and run the DB SQLS Restore database from local disk / Remote Storage (v14.0) operational script. You will need to provide values for the following inputs before the script can be run:
| Input Name | Description | Example Value |
|---|---|---|
| BACKUP_FILE_NAME | Enter the filename of the database backup file (.bak) that will be used to load the database. (e.g. DotNetNuke.bak) | e.g. text: DotNetNuke.bak |
| BACKUP_LOCAL_DIR | You can leave this input with default value ('ignore'), it could be used to restore from backup file located on file system of the server (not downloading from S3 as in this tutorial). | No value/Ignore |
| DB_NAME | The name of the default SQL Server database that will be created. (e.g. DotNetNuke) Note that this name should match the original database name the backup was taken from. | text: DotNetNuke |
| OPT_BACKUP_TEMP_DIR | You can leave this input with default value ('ignore') | No value/Ignore |
| OPT_LOGICAL_FILE_NAME | Use this optional input to provide the logical name of the data and log files. If your backup files use the default SQL Server logical files naming convention, set this input to 'Ignore'. | No value/Ignore |
| OPT_FORCE_NORECOVERY | For this tutorial you can leave the default value of False to restore the database in Normal mode. | False |
| REMOTE_STORAGE_CONTAINER | Since we already configured this input on deployment level it should contain the name of S3 bucket where the database backup file (.bak) is stored. | Text: Bucketname e.g. mybucket |
| REMOTE_STORAGE_ACCOUNT_PROVIDER | Leave the default value of Amazon S3 for this input. | text: Amazon S3 |
| REMOTE_STORAGE_ACCOUNT_ID | Leave the preconfigured value -- AWS access key ID. | Cred:AWS_ACCESS_KEY_ID |
| REMOTE_STORAGE_ACCOUNT_SECRET | Leave the preconfigured value -- AWS secret access key. | Cred:AWS_SECRET_ACCESS |
Click Continue.
Attach a database file (.mdf)
Follow these instructions if you want to load the database by using a SQL Server data file (.mdf).
- Go to the server's Scripts tab and run the DB SQLS Attach database from local disk / Remote Storage (v14.0) operational script. Most inputs you will need to provide should have the same values as for restoring from backup file (.bak). The only different input is that MDF_FILE_NAME is set to the filename of the SQL Server data file (.mdf) located in the S3 bucket. (e.g. DotNetNuke.mdf)
- Click Continue.
Now you have your principal server ready to serve the database.
Launch the Partner (Mirror) Server
- Clone the existing (primary) database server. (e.g. MyApp-DB1)
- Click Edit and rename the cloned server appropriately. (e.g. MyApp-DB2)
- Set the Availability Zone field of the cloned server to place it in another availability zone than your primary database server (you might need to check the current availability zone of the principal server on the Info tab of the Server page).
- Launch the cloned server.
- When viewing the inputs confirmation page, set the SERVER_MODE to Text:Mirror.
- Click the Launch button. Do not click the
Save and Launch
button because you do not want to save this setting for future launches of this server because its role may change over time. You only want to launch this current server as amirror
server because you earlier launched aprimary
server. - Go to the principal server's Scripts tab and execute DB SQLS Init principal Operational Script. You do not need to wait until your mirror server is operational to run this script. DB SQLS Init principal waits for the mirror server automatically. Note that DB SQLS Init principal automatically completes the DB SQLS Init mirror script so this script does not need to be ran on the partner server.
- Wait for your mirror server to become operational and mirroring initialization to complete. (That takes approximately 20-25 minutes).
Register the Primary Server with the DNS Provider
Go to the primary
server's Scripts tab and run the DNS Register IP Operational Script.
The inputs required to run this script have been defined at the Deployment level.
Create a SQL Server Login
Create the SQL Server login username/password that will be used by the application servers to connect to the primary
SQL database server. Run the DB SQLS Create login script and specify the following inputs:
| Input Name | Description | Example Value |
|---|---|---|
| DB_NAME | Enter the name of the database. | text: DotNetNuke |
| DB_REMOTE_SQL_LOGIN | (Optional) Enter the SQL Server login username with administrative rights to the remote SQL Server database server. | cred:DB_SQL_Login |
| DB_REMOTE_SQL_PASSWORD | (Optional) Enter SQL Server login password. You can enter a text:'password', but for best practices it would be best to create a credential with your password value and name it something like DB_LOGIN_PASSWORD. | cred:DB_SQL_PASSWORD |
| DB_NEW_LOGIN_NAME | Enter the login name for the new SQL Server user. You can enter a text:'password', but for best practices it would be best to create a credential with your password value and name it something like SQL_SERVER_USER_NAME. This value needs to match the OPT_CONNECTION_STRING_DB_USER_ID defined later in this tutorial. To be properly configured, this DB value needs to match the IIS Server value (OPT). | cred:SQL_SERVER_USER_NAME |
| DB_NEW_LOGIN_PASSWORD | Enter the login password for the new SQL Server user. You can enter a text:'password', but for best practices it would be best to create a credential with your password value and name it something like SQL_SERVER_USER_PASSWORD. This value needs to match the OPT_CONNECTION_STRING_DB_USER_PASSWORD defined later in this tutorial. To be properly configured, this DB value needs to match the IIS Server value (OPT). | cred:SQL_SERVER_USER_PASSWORD |
You may not need to perform this step if your SQL Server configuration already contains all necessary logins/users for database access.
Create Load Balancers
Go to the new Deployment and click Add Server button. See Add a Server to a Deployment.
- Add the Server to the AWS region into the same cloud/region as your database servers.
- Select the** Load Balancer with HAProxy (v13.0)** ServerTemplate.
- Enter a name for the server (e.g. MyApp Load Balancer 1) and select the SSH Key and Security Group that you created earlier in this tutorial.
- Select one of the Elastic IPs that you created in a previous step (e.g. MyApp-LB1).
- Ignore all other values.
- Click Confirm and then Finish.
- Since you want to create two load balancer servers for redundancy purposes, clone the created server and rename it. (e.g. MyApp Load Balancer 2)
- You now have two load balancer servers that have identical configurations. Under the second load balancer server Info tab, click Edit and select the second Elastic IP you created in previous step.
For high availability purposes, you might want to launch the load balancers into different zones from each other. Typically, you will want to use the same zones as the database servers so that each zone will contain a load balancer and database server. To change availability zone of the server you can go to Info tab of that server and click Edit.
Define Inputs
Go to the deployment's Inputs tab and define values for the following missing inputs:
| Input Name | Description | Example Value |
|---|---|---|
| APPLICATION | Enter the name of the application. | (e.g. myapp) |
| HEALTH_CHECK_URI | The URI of the health check page, which is used by HAProxy for checking whether the site is up or not. You must create your own health check page, which returns HTTP 200 OK. The contents of the page are not relevant but its name should be unique (preferably a random number). The same page is used for ALL application servers to determine if the server is UP. For example, if you use '/hlthchk378923.html' (Note: be sure to include the slash before the filename), the health check page would be 'http://www.mydomain.com:80/hlthchk378923.html' and its content could be as simple as OK.For simplicity we are using /Default.aspx in this tutorial. |
text: /Default.aspx |
Launch the Servers
Go to the deployment's Servers tab and launch both of the load balancer servers.
Create and Configure a Scalable Server Array for Application Tier
The next step is to create and launch server array consisting of Microsoft IIS Application Servers.
Go to the Deployment and click Add Array button.
- Add the Server Array to the AWS region into the same cloud/region as the other servers.
- Select the Microsoft IIS App Server (14.0) ServerTemplate.
- Enter a name for the server array and select the SSH Key and Security Group that you created earlier in this tutorial.
- Continue to the Array Details tab. Set the following autoscaling parameters:
- Minimum = 2 servers
- Maximum = 5 servers
- Resize Up by = 3
- Resize Down by = 1
- Resize calm time = 8
- Make sure that the status is disabled for now and array type is alert-based.
- Click Confirm and then Finish.
You may receive a warning ‘Some of the Input parameters for boot scripts are missing. Please update them to launch instances successfully’. This is OK, you will take care of the remaining inputs shortly.
Under the server array's Next Alerts tab you will be able to add to the existing alert specifications that are being inherited by the array's application ServerTemplate. Next, you will need to add two new alert specifications that will be used for triggering auto-scaling. When you set up your own custom deployment, you will want to pick appropriate metrics and thresholds that make sense for auto-scaling your own application. But for this tutorial, you can use the suggested parameters below:
- Click New to create two new alert specifications. Fill out the fields with the following information.
- Name:
Scale Up
- Condition: if "cpu-0/cpu-idle.value < '30' for 5 min then vote to grow array by setting the tag to be the name of your server array. We used '3tier'.
- Name:
- Click Save.
- Create another, by again clicking New.
- Name:
Scale Down
Scale Down
- if cpu-0/cpu-idle.value > '80' for 5 min then vote to shrink array by setting the tag '3tier'- Click Save.
Define Deployment-level Inputs
Go to the deployment's Inputs tab and Edit values for the following missing inputs.
The required inputs will be different depending on whether you are downloading the application code from a URL or SVN repository or Remote Storage. In this tutorial we are using ZIP file located in AWS S3 bucket.
| Input Name | Description | Example Value |
|---|---|---|
| OPT_CONNECTION_STRING_DB_NAME | Name of the database for the application server to connect to. This is the database served by pair of SQL Server instances you configured earlier in this tutorial. | e.g. text: DotNetNuke |
| OPT_CONNECTION_STRING_DB_SERVER_NAME | Fully qualified domain name of the database server you created earlier in this tutorial. | e.g. text: abc-db1.example.com |
| OPT_CONNECTION_STRING_DB_USER_ID | Login name to be used for database connections created earlier in this tutorial. This value needs to match the DB_NEW_LOGIN_NAME defined earlier in this tutorial. To be properly configured, this IIS Server value needs to match the DB value. | cred:SQL_SERVER_USER_NAME |
| OPT_CONNECTION_STRING_DB_USER_PASSWORD | Password for the login created by OPT_CONNECTION_STRING_DB_USER_ID above. This value needs to match the DB_NEW_LOGIN_PASSWORD defined earlier in this tutorial. To be properly configured, this IIS Server value needs to match the DB value. | cred:SQL_SERVER_USER_PASSWORD |
| OPT_CONNECTION_STRING_NAME | Application-specific name of the connection string. For DotNetNuke the name is 'SiteSqlServer'. | e.g. text: SiteSqlServer |
| ZIP_FILE_NAME | File name of the zip file containing the application code located on remote storage (note that we already configured STORAGE_TYPE and STORAGE_CONTAINER_NAME inputs on deployment level earlier in this tutorial). | e.g. text: DotNetNuke.zip |
Note, if you want to download application code from some URL (i.e., https://mydomain.com/app.zip) or from SVN repository you will need to set inputs ZIP_URL and SVN_APP_PATH, SVN_PASSWORD, SVN_USERNAME respectively. For this tutorial all these inputs should be set to 'ignore'.
Other inputs you can leave to its default values.
Click Save.
Launching the Server Array
Now that you have operational load balancers ready to accept requests, and primary/mirror database servers on the backend, you are ready to start-up the server array to run your application.
Go to your server array page. Here you have two alternatives:
- Manually launch a single server into the array for testing by navigating to the array and clicking Launch. As a best practice, you should launch a single instance before enabling an array to test if everything has been properly configured.
- Enable the server array - if you are using this tutorial for learning purposes, just enable the server array by going to the server array's Info tab and clicking the enable link in the Status row.
After being enabled, the array launches application servers as specified in the Default Min Count autoscaling policy parameters (configured earlier in this tutorial).
Testing the Deployment
To test if your deployment is operational just enter your LB_HOSTNAME in browser address fields. (http://my-www.example.com)
Shut Down the Deployment
You may find the need to perform some clean up, either to minimize costs, or to perform the tutorial again from a clean slate. Follow these high level steps to do so:
- Disable the server array.
- Terminate all servers in the array.
- Delete the server array.
- Terminate the load balancers.
- Terminate the mirror and primary database servers.
- Delete the deployment.
- Delete the two EIPs.
- Delete the SSH key.
- Delete the security group.
- Delete all credentials (unless you are sharing your account or deployment with others who might still be using them).
- Delete all four DNS Made Easy A records.
- Delete the application and database dump file from the two S3 buckets.
- Delete the S3 buckets for your application and database.
- Delete all snapshots produced by databases servers.