Add a Server to a Deployment
Objective
To add a server to an existing Deployment using a ServerTemplate.
Prerequisites
- A deployment for your server(s)
- SSH Key
- Security Group (or groups)
- Elastic IP (if applicable to the servers)
Steps
- Navigate to the deployment you previously created (where you are adding the server).
- Even before selecting the Add Server action button, you should select the cloud that the server should be in. Use the Select Cloud drop down menu to make your choice. Remember that if you specified a default Availability Zone for your deployment, you should add the server to a cloud that includes that zone. (e.g. US-East)
- Click Add Server to add a server to your deployment. The Add Server Assistant opens. Use the field descriptions listed below to add a server (example shown is from EC2):
- Click Add after you have filled out all the fields.
Field Descriptions:
- Deployment - A Server always exists within the context of a deployment. Therefore, when you create a Server, you must specify into which Deployment the Server will be added. Each RightScale account has a
Default
Deployment that's best used for testing purposes. Select either theDefault
one or another Deployment that you've already defined. - ServerTemplate - Select the type of ServerTemplate from the pull-down menu. When launching directly from a ServerTemplate, this has already been decided and will simply be listed in the dialog box.
- Private - ServerTemplate from your private MultiCloud Marketplace. That is, ServerTemplates that you either created from scratch, or imported and cloned. These ServerTemplates are your own copy that you are free to customize. They maintain their own lineage.
- Imported - Anything you have imported directly from the MultiCloud Marketplace (which is a static copy). Additionally, any ServerTemplates that you have subscribed to (which is a HEAD version, changing not a static revision.)
- Then select the actual ServerTemplate name from another pull-down menu. (e.g. Simple Linux Server)
- Cloud _ What cloud the Server should be added to. When adding a Server, this has already been selected via the Select Cloud action button, so in this dialog window you cannot alter it. It is simply displayed for informational purposes.
- MultiCloud Image - Select the MCI to use or leave inherit from the ServerTemplate (default).
- Instance Type - Select the Instance Type (e.g. small, medium, large, etc.) or inherit from the MultiCloud Image (default)
- Nickname - Give a descriptive name for the Server's primary purpose.
- SSH Key - Specify the (previously created) SSH Key to use.
- Security Group - Select the (previously created) Security Group (or Groups) to use for security purposes.
- Availability Zone - Select what Availability Zone (EC2) this Server should be in. Recall that there are additional charges for traffic across zones. Servers are typically placed in the same zone, unless the Deployment is working towards high availability across different zones. Some clouds have multiple zones or regions.
- Elastic IP - Specify what EIP (or none) to use for the Server.
- Associate IP at launch - Normally you will leave this default (checked) so that an IP address is associated with the Server at launch.
Post Tutorial Steps
- Select the Launch action button to launch your server when ready. Remember, you pay cloud usage fees for operational servers (instances).
Archive or Unarchive a Deployment
Objective
To archive an existing Deployment. Conversely, unarchive an archived Deployment.
Overview
You can archive an existing Deployment to help manage and prevent excessive clutter in the RightScale Dashboard. This is typically done with Deployments you wish to keep, but are not at the forefront of your current work. This is an excellent alternative to deleting a Deployment that you think you might need again sometime in the future.
Things to Remember
- Important! Archived deployments will not show up in any drop down menus. (For example, the Design > Macros > New action button has a calculated Deployments drop-down menu, as does the Alert Escalations menu. Any such menus will not include archived deployments to draw an association with.)
- You cannot archive the Default deployment. The Archive functionality does not apply to the Default deployment.
- Archived deployments can be unarchived.
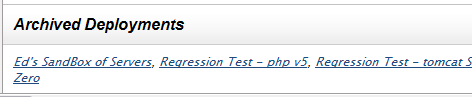
- All archived deployments are displayed in a comma separated
Archived Deployments
list at the bottom of the Deployments' page.
Steps to Archive a Deployment
- Navigate to Deployments in the RightScale Dashboard in any of the following ways
- RightScale logo in the header
- Home > Dashboard > Deployments Tab
- Manage > Deployments
- Select the specific deployment (e.g.
Archive Test
) - Select the
Archive
action button
The following should occur:
- A flash message in the RightScale header (e.g.
Deployment was successfully archived
) - The deployment is added to the
Archived Deployments
list. The list is at the bottom of the Deployments display.
Steps to Unarchive a Deployment
Steps to unarchive a deployment are very similar.
- Navigate to Deployments in the RightScale Dashboard in any of the following ways
- RightScale logo in the header
- Home > Dashboard > Deployments Tab
- Manage > Deployments
- Scroll to the bottom of the display, and select the specific deployment you wish to unarchive
- Select the
Unarchive
action button
The following should occur:
- A flash message in the RightScale header (e.g.
Deployment was successfully unarchived
) - The deployment is removed from the
Archived Deployments
list, and displayed with the other Deployments.
Change a Server's Public IP
Objective
To change a running Server's Public IP address.
Note: Currently, this tutorial is specific to EC2 instances.
Prerequisites
- An existing Deployment with an unlocked, running Server
- 'actor' user role privileges
Overview
Each EC2 instance can only have one public IP address at a time. An instance either has a public IP address that it was randomly assigned by the cloud provider or it's specifically assigned an Elastic IP address that you designate at launch time or later when an instance is operational.
Note: You cannot change a running Server's Public IP address if it's locked.
Steps
- Go to Manage > Deployments and select a Deployment.
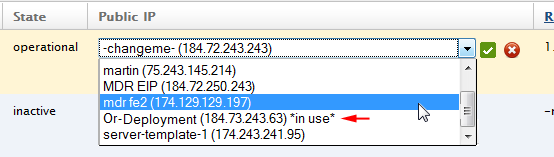
- At the Deployment level, click on the
Change
icon next to the running Server's Public IP address.

- Select the Elastic IP address you want to assign to the current instance. The name of the EIP is followed by the actual IP Address. Be careful! It is possible to steal an EIP that's currently being used by another instance. Instances that are currently assigned to running instances are denoted with *in use* for precautionary reasons.
- Confirm the action.
Clone a Deployment
Objective
To clone an existing deployment.
Overview
When you clone a deployment, you create an exact copy of a deployment's configuration too. The most common use case for cloning a deployment is for setting up a staging deployment for the purposes of further development and test.
Steps
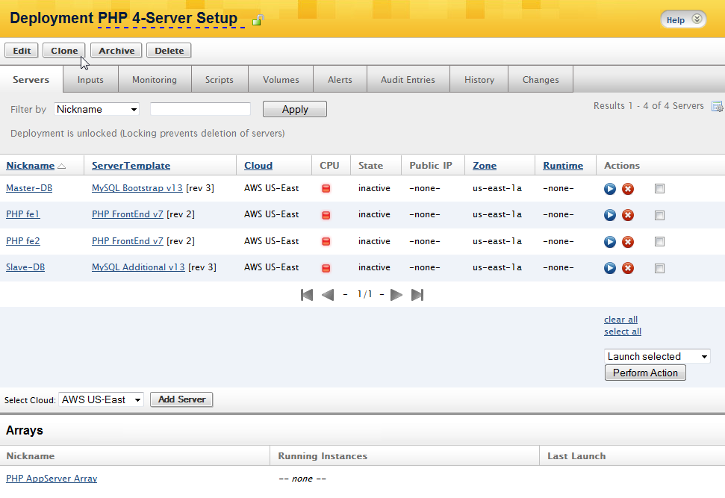
- Navigate to the deployment you wish to clone
- Select the Clone action button
- Be sure to change the name of the new deployment after you've cloned it.
Things to Consider
- Elastic IPs are copied over, so be careful not to
steal
an Elastic IP from a running server. Be sure to check the cloned deployment and change the EIPs when necessary. - If you clone a deployment that has
operational
servers with attached volumes, the volumes will appear in the cloned deployment as unattached volumes that can be attached at boot time. (EBS volumes can only be attached to one server at any time.) - If you clone a deployment that has
stopped
servers that are configured to attach a specific volume at boot time, the same configuration will appear in the cloned deployment. - When you clone a deployment where server arrays are attached, the server arrays will also be cloned. Since the cloned server array will have the same name as the original, it is recommended that you change the name of the cloned deployment so that you can easily distinguish the server arrays from each other.
- If you're cloning a deployment so that you can create a
staging
deployment, in addition to using different Elastic IPs, you must also remember to isolate the databases and their backups from each other by specifying a different database inputs.
Create a New Deployment
Objective
To create a new deployment in the RightScale Dashboard.
Overview
A deployment is a logical, user-defined grouping of servers. They can range from basic (e.g., a single server) to complex.
Steps
- Go to Manage > Deployments. Click New and provide the following information:
- Nickname - User-defined name for the deployment.
- Description - A short, internal-only description of the deployment.
Delete a Deployment
Objective
To delete a Deployment.
Prerequisites
- An existing Deployment
- 'actor' user role privileges
Overview
Warning! When you delete a Deployment, its configuration and any defined Servers within that Deployment will be permanently deleted. Server Arrays that are associated with the Deployment will not be deleted. You cannot undo the deletion of a Deployment. Lock the Deployment if you want to prevent a Deployment from accidentally being deleted. If you are reluctant to permanently delete a Deployment, you might want to Archive or Unarchive a Deployment instead.
Note: You cannot delete a Deployment if it contains running servers and/or active arrays. Also, you cannot delete the 'Default' Deployment (although you can change the name of the 'Default' Deployment).
Steps
- Go to Manage > Deployments and select a Deployment you wish to delete.
- Click the Delete button.
- Confirm the deletion action.
Delete a Server from a Deployment
Objective
To delete a Server from a Deployment.
Prerequisites
- An existing Deployment that's unlocked
- 'actor' user role privileges
Overview
You can only delete a Server that's inactive. You cannot delete a Server in a locked Deployment.
Warning! When you delete a Server from a Deployment, it's permanently removed from the Deployment.
Steps
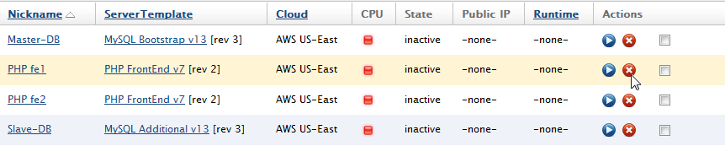
- Go to Manage > Deployments and select a Deployment in which you want to delete one of its Servers.
- At the Deployment level, there are several different ways to delete and remove a Server from a Deployment.
- Click the Delete icon next to the Server you want to remove from the Deployment.
- Use the select checkbox to select which Server(s) you wish to delete from the Deployment, select
Terminate Selected
from the dropdown menu and then click the Perform Action button. - Click on the Server's Nickname link and then clicking the Delete action button.
- Confirm the deletion action.
Download CSV of External Repositories
Objective
Export all Input information at the Deployment level to a CSV file so you can view and report on it from an Excel spreadsheet.
Steps
Navigation
- Navigate to Manage > Deployments > View all
- Select the Deployment you are interested in
- Select the Inputs tab. Inputs at the Deployment level are displayed.
Generate and save data
- Select the Download CSV of External References action button (located under the Inputs tab)
- Save (or open) the resulting CSV file directly.
- The file name generated is of the following format: xref_report_
.csv - Example: xref_report_1260895780.csv
- The file name generated is of the following format: xref_report_
Viewing the data
- The partial CSV excerpt below shows the data types and example data in the resultant file

Where the following brief data type description applies to each column:
- Input - Input name
- Server - Server name in the Deployment
- ID - Unique ID of the Server
- RightScript/Chef Recipe - Name of the RightScript or Chef Recipe that uses the Input (Note: Multiples can use the same Input.)
- Phase - Boot, operational or decommission phase
- Value - Input Value. See also Input Types.
- Source - Whether the Input was set at the ServerTemplate or Deployment level
Edit a Deployment
Objective
To edit a Deployment's configuration.
Prerequisites
- An existing Deployment that's unlocked. You cannot edit a locked Deployment.
- 'actor' user role privileges
Overview
You can change all of a Deployment's parameters. The Default
parameters only affect new Servers that are added to a Deployment. Warning! You can have more than one Deployment with the same name in your account. For detailed descriptions about each field, see Create a New Deployment.
Launch a Server
Objective
To launch a Server at the Deployment level.
Prerequisites
- An existing deployment
- 'actor' user role privileges
Overview
You can either launch a server at the server level or deployment level. At the deployment level, you also have the option of launching multiple servers at the same time.
Launch Options
Launch a Single Server
- Go to Manage > Deployments and select a deployment.
- At the deployment level, click on the
Launch
icon next to the inactive server that you want to launch. - The pre-launch Inputs confirmation screen will appear for the selected server. All required inputs must be defined. As a best practice, all inputs should be defined prior to the pre-launch screen for production environments. However, you do have the option to change any inherited values, which you may find as a useful option for testing purposes. In production environments, a server should always inherit its inputs from either the ServerTemplate or deployment level.

- Once all required inputs are defined you can safely launch your server. See What is the difference between the
Launch
option andSave and Launch
option? for more information.
There are two launch options:- Launch - Launches a server using the defined inputs. Any changes that are made at the inputs confirmation screen will only apply to the current instance being launched and will not be applied to future launches of the server. (i.e. Changes are not saved at the server level, which are displayed under the
Next
server's Inputs tab. - Save and Launch - Launches a server using the modified inputs and also saves those changes so that it will be applied to future launches of that server. (i.e. Changes are saved at the server level, and are highlighted as overrides under the
Next
server's Inputs tab.)
- Launch - Launches a server using the defined inputs. Any changes that are made at the inputs confirmation screen will only apply to the current instance being launched and will not be applied to future launches of the server. (i.e. Changes are not saved at the server level, which are displayed under the
Launch Multiple Servers
- Go to Manage > Deployments and select a deployment.
At the deployment level, use the checkboxes to select all servers that you want to launch at the same time. Note: You can only launch multiple servers if you've defined valid values for ALL inputs that are required by the boot scripts. The input confirmation screen is not displayed when launching multiple servers.
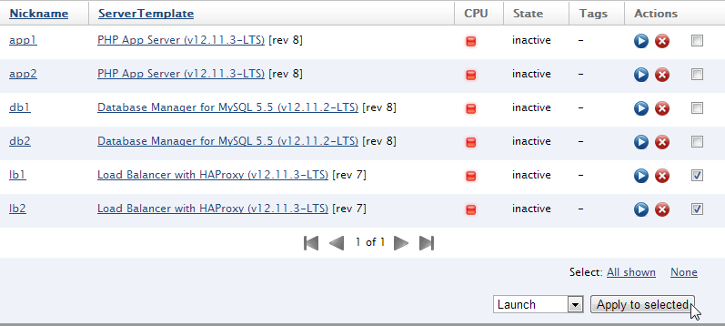
Select the Launch option from the dropdown menu and click the Apply to selected action button.
Launch an Instance in a Server Array
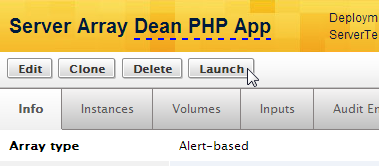
- Go to Manage > Arrays and select your server array. (If a server array is associated with a deployment, you can also select a server array at the bottom of the deployment's Servers tab.)
- At the server array's show page, click the Launch action button to manually launch a single instance (server) into the array. Note: You can manually launch a new server instance into the array regardless of whether or not the array is active (enabled), which is recommended for testing purposes before you enable an array.
Lock or Unlock a Deployment
Objective
To lock or unlock Deployment.
Prerequisites
- An existing Deployment
- 'actor' user role privileges
Overview
When you lock a deployment, you cannot delete the deployment, any of its servers and/or server arrays. However, you will still be able to manage all other aspects of your deployment such as launching or terminating servers, as well as editing server and deployment configurations. If you are defining a mission critical deployment it is recommended that you lock the deployment once it's deployed.
Note: You can also lock a single server.
Steps
- Go to Manage > Deployments and select a Deployment you wish to lock.
- To lock a Deployment, click the
Lock
icon next to the Deployment's name.

- To unlock a Deployment, click the
Unlock
icon next to the Deployment's name.

- To check and see who last locked/unlocked the Deployment, click on the Deployment's Changes tab.
Terminate a Server
Objective
To terminate a running Server in a Deployment.
Prerequisites
- An existing Deployment with an unlocked, running Server
- 'actor' user role privileges
Overview
You can only terminate an unlocked Server.
Steps
- Go to Manage > Deployments and select a Deployment in which you want to terminate one of its Servers.
- At the Deployment level, there are several different ways to terminate a running Server from a Deployment.
- Click the Terminate icon next to the Server you want to terminate in the Deployment.
- Use the select checkbox to select which Server(s) you wish to terminate in the Deployment, select
Terminate Selected
from the dropdown menu and then click the Perform Action button. - Click on the Server's Nickname link and click the Terminate action button.

- Confirm the terminate action.
Update Inputs of Multiple Running Servers
Objective
To update the current input values of multiple running servers within a deployment.
Overview
With deployments that contain many servers, you may update the inputs on a selected number of servers for either the 'current' servers or the 'next' launched servers. Use this feature to manage your running instances by updating input values before running operational scripts rather than having to re-launch in order to update multiple servers at once.
Steps
Select running servers to update
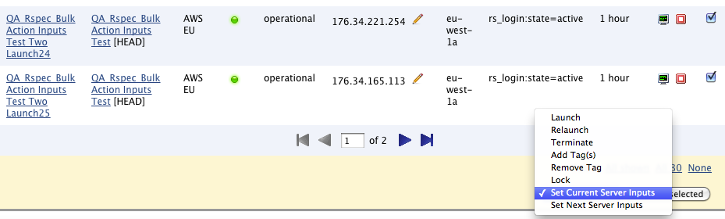
Navigate to the index page of a deployment. Select your running servers using the checkboxes on the right. For large amounts of servers, utilize the toggles at the bottom of the page.

Select 'Set Current Server Inputs'
After making your selections, click 'Set Current Server Inputs' from the dropdown in the bottom right. Click Apply to Selected.
Edit the inputs of current servers
Under Bulk Inputs Update, the number of servers you selected is shown. The dropdown next to each input consists of two options that are unique to this flow: 'Unchanged' and 'Use deployment value.' When first viewing the page without making any changes, all the inputs will say 'Unchanged' by default to let you know that none of the inputs have been edited. Otherwise, use the other options in the dropdown to specify your value.
Use Deployment Value
sets the input to the current input value on the deployment. Future changes to the input at the deployment level will not affect the server(s).
After making your edits, click the Show only changed inputs checkbox to filter only the inputs that were changed. Use this checkbox to confirm the changes you are about to make.
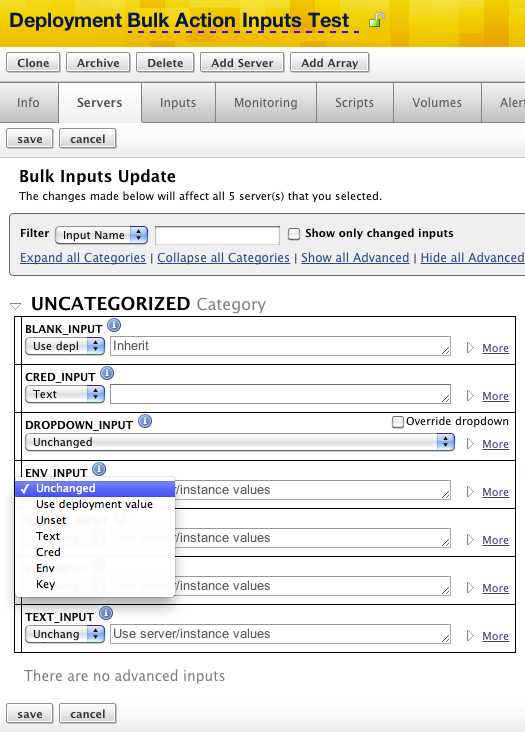
Make your edits and click Save. You will return to the Servers tab of the deployment.
Use Tags in a Deployment
Add or Remove Tags to Servers within a Deployment
Objective
To add/remove tags (bulk tagging) to multiple Servers in a Deployment.
Prerequisites
- 'Actor' User Role Privileges
Overview
The ability to tag multiple servers (bulk tagging) at the same time is a useful feature, especially if you use tags to perform operations on Servers across your Deployment(s) using the RightScale API. Bulk tagging is only supported at the Deployment level.
Steps
Add Tags
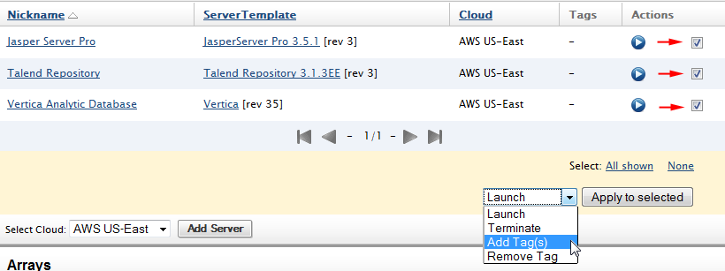
Go to Manage > Deployment > YourDeployment. Under the Servers tab, select which Servers you want to add the same tag to, select Add Tag(s) from the dropdown menu and click the Apply to selected button.
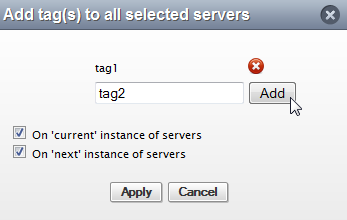
Next, enter the tag that you want to add. Add as many tags as you want. Be sure to specify if you only want the tag to apply to the current
server or apply to all future (next
) servers. This preference will apply to all tags that you add during this action. If you want to use separate preferences for a tag, you will need to repeat the process and add it as a separate action.
When you're finished, click the Apply button.
Remove Tags
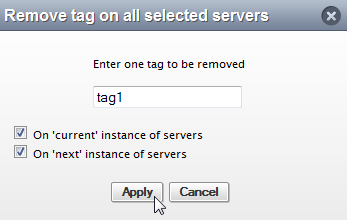
Unlike adding tags, you can only remove one tag at a time. To remove a tag, simply select which servers you want to remove the tag from, select the Remove Tag option, and click the Apply to selected button.
You will need to manually enter the tag you wish to remove and click the Apply button.
Run 'Any Script' On a Server
Objective
To use the 'Any Script' option to run a single RightScript on one or more Servers
Prerequisites
- 'actor' user role privileges
Overview
When a Server is running, you can run any of its scripts on-demand at anytime under the Scripts tab. A Server is designed to inherit its scripts from its ServerTemplate. Typically, the ServerTemplate will contain any relevant RightScripts for a particular server. However, you may need to run a script to perform a one-time upgrade to a running server or apply a patch across a set of servers. In such cases, instead of adding the script to the Server's ServerTemplate (which may not be possible if you launched the Server with a committed ServerTemplate) just so that you can perform a one-time operation, you can use the 'Any Script' option. The 'Any Script' option is useful if you need to execute a script that wasn't inherited by the ServerTemplate. For example, you might want to run a script from one of the 'Toolbox' ServerTemplates.
Steps
The 'Any Script' option is only available for use on running servers. Although an 'Any Script' can be used at multiple levels, the operation functions slightly different depending on where it's executed. The 'Any Script' option can be found under the Scripts tab at the following levels:
- Server
- Deployment
- Server Array
Select an 'Any Script'
Go to the Scripts tab at the level where you're going to run the 'Any Script' and click on the dropdown bar to open a selection window where you can select which RightScript you want to execute. Note: You can only use the 'Any Script' option to run a RightScript. It cannot be used to run a Chef Recipe.
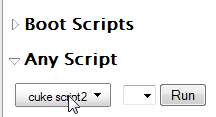
Select the revision of the script you want to run and click the Run button.
Select which Servers the Script should be run on
Unless you are running the 'Any Script' at the Server level, you will be prompted to select which active Servers the script should be run on. (You cannot run an 'Any Script' on an inactive Server.)
Deployment Level
There is an intermediary page where you can filter by one of the following prior to making the selection of what Servers to run the selected RightScript against
- Server's Nickname
- ServerTemplate
- Machine tags
Based on the result set of the filters you choose you can also select all shown
, none
or all *Number#*
(where Number# is the total number of Servers in the result set. This is only displayed if pagination is involved in the Servers result set). Notice this feature can be very helpful in the event you need to patch all (or most all) Servers in your Deployment. For example, perhaps you have a change to make to the /etc/bashrc (or similar startup file) on 10 Servers in a Deployment, that use 3 or 4 different ServerTemplates. You could write a one-off RightScript to make the change, and run it as an 'Any script' against all the Servers in your Deployment. (There is no need to add the RightScript as an Operational script to each ServerTemplate, etc.)
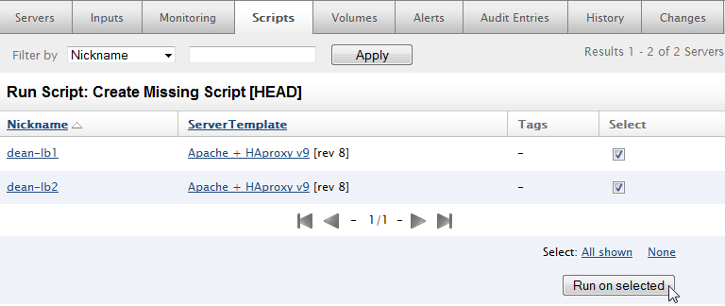
Make your selection(s) and click the Run on selected action button when ready.
Note: When you run an 'Any Script' at the Deployment level, the script will not be run on any instances in a Server Array that's attached to the Deployment. To run the script across all instances in an array, you will need to perform the 'Any Script' operation at the Server Array level.
Server Array Level
When you run an 'Any Script' at the Server Array level, the script will be run on all selected instances. Typically, each instance in the server array will be launched with the same ServerTemplate. However, if there are instances that were launched with different ServerTemplates, they will be listed separately. You can only run the script across all instances that were launched with a particular ServerTemplate. You cannot select instances individually. (If you want to run the script only on certain instances, you can do so at the individual Server level.)
- Run on oldest - Only run the script on the oldest instance of a ServerTemplate group. The
oldest
instance is the one with the longest runtime. For example, you may want to run the script on the oldest server before you run it on the rest of the servers. - Run on all - Run script on all selected ServerTemplate groups.
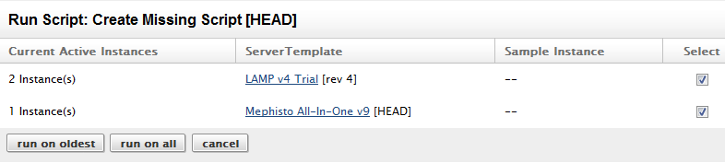
Select which action you wish to run.
Specify Input Parameters
Next, you will need to specify any missing input parameters.
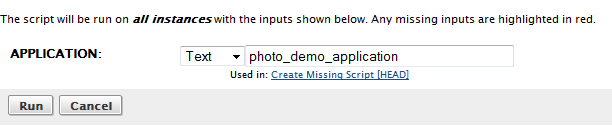
If you are running the 'Any Script' at either the Server or Server Array levels, input inheritance rules will apply, so the input parameters will be pre-populated if any of the script's inputs have been predefined at either the ServerTemplate, Deployment, or Server/Server Array levels.
However, if you are running the 'Any Script' at the Deployment level, input parameters will not be pre-populated. You will need to manually enter all input parameters. If you want to use the same value for an input that's been predefined at a different level, you will need to use the Inputs tab as a cross-reference.
Once all input parameters have been defined, click Run to actually run the script on the server(s).