Add a MultiCloud Image to a ServerTemplate
Objective
To add a new MultiCloud Image to a HEAD ServerTemplate.
Prerequisites
- 'designer' user role privileges
Overview
A ServerTemplate is cloud-agnostic. However, the reason why a ServerTemplate can be used to create and launch servers across multiple clouds is because of its list of MultiCloud Images (MCIs). You can only create a server for a cloud if one of the ServerTemplate's MCIs has a valid reference to an actual image that's available in that cloud.
If you are using ServerTemplates published by RightScale, you'll notice that they are often published with multiple MCIs. However, you may need to add new MCIs or update existing ones if new revisions are available. This document explains how to add a new MCI to a ServerTemplate.
Why should I add a new MultiCloud Image to a ServerTemplate?
There are several reasons why you may want to add a new MCI.
- Add cloud support. If you want to use the ServerTemplate in a cloud that it currently does not support, you can add a new MCI that supports that particular cloud. For example, RightScale could announce support for a new cloud infrastructure and release a set of new MCIs that support that cloud. In such cases, you could simply add those new MCIs to your ServerTemplate. Of course, you will need to test your ServerTemplate in those clouds to make sure that it's compatible.
- RightScale or another publisher releases newer versions of MCIs that you would like a ServerTemplate to use. If the MCIs are of a different lineage, you will need to manually add them.
What are the ramifications of adding a new MultiCloud to a ServerTemplate?
If you add a new MultiCloud Image, you are introducing new functionality that may or may not be supported. Be sure to test each iteration of an MCI to ensure that the ServerTemplate can successfully be used with any of the new MCIs. As long as the scripts and inputs of the ServerTemplate are not cloud-specific, you may be able to add cloud support to a ServerTemplate by simply adding new MCIs.
It's important to remember that a ServerTemplate imported from the MultiCloud Marketplace was originally published with a set of MultiCloud Images. The publisher of the ServerTemplate is responsible for supporting their asset as long as it has not been modified. However, if you decide to modify the ServerTemplate and introduce new functionality such as adding a new MultiCloud Image, you accept full responsibility for those changes. Any compatibility issues and bugs that are caused by any of your changes to the ServerTemplate are your responsibility.
Steps
- Navigate to an editable HEAD version of a ServerTemplate. You can only add a new MCI to a previously committed ServerTemplate because it's static.
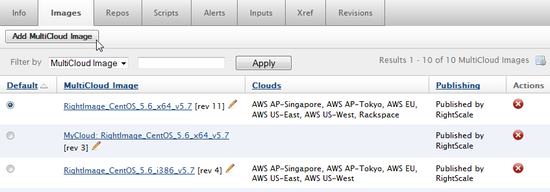
- Click on the Images tab to see the list of MultiCloud Images that the ServerTemplate is currently using.
- To add a new MCI, click the Add MultiCloud Image button. You will see a responsibility disclaimer about adding a new MCI to a ServerTemplate.
- Use the
MultiCloud Image Selector
to find the MCI that you want to add to the ServerTemplate. You can only add one MCI at a time. Note: If an MCI has a committed revision, the most recent revision will be displayed. If no revision exists, the HEAD version will be displayed. - Select an MCI and click Select.
- The new MCI will now be listed under the Images tab. To use a different revision of the selected MCI (if available), click the Edit icon next to the MCI to change its revision.
Add Server Assistant
Overview
To make it easier to define new servers in the dashboard using ServerTemplates RightScale provides a simple wizard that will walk you through the appropriate steps to create a server based on the chosen cloud. Since each cloud infrastructure is unique, the selections in the wizard may differ depending on the cloud's server requirements. For example, you must select an EC2 SSH Key and Security Group to launch a server in one of the AWS EC2 clouds/regions. However, other clouds might use IP tables instead of security groups.
Be sure to take advantage of the information offered in the tooltips throughout the wizard. Just hover over a tooltip icon to view additional information about that specific component.
Steps
Add a New Server or Array
There are several different ways to get to the Add Server Assistant wizard in the dashboard.
- Manage > Deployments > Deployment Name > Add Server or Add Array button
- Manage > Servers > New Server button
- Design > ServerTemplates > ServerTemplate Name > Add Server or Add Array button. (Note: After successfully importing a ServerTemplate from the MultiCloud Marketplace you are left here.)
Choose a Cloud
When you click the Add Server or Add Array buttons you will be prompted to make a cloud selection. Select the cloud where you will eventually launch the server. (Servers are cloud-specific.) If you are adding a server or server array through the Design > ServerTemplate route or through the Manage > Servers > New Server/Array route as shown above, you will need to specify a cloud and deployment. If you are adding the server or array directly from a deployment, the Deployment
row will be hidden and you will only need to specify a cloud.
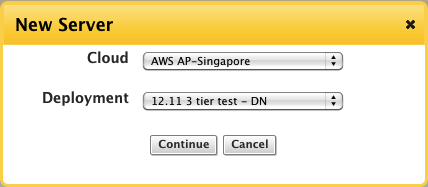
You will only be able to create a server in the chosen cloud if one of the ServerTemplate's MultiCloud Images supports that cloud.
Make your selections and click Continue.
ServerTemplate
You will only see this tab if you are adding the server from a deployment or from the Manage > Servers section. If you already selected the ServerTemplate, proceed to the Server Details
tab.
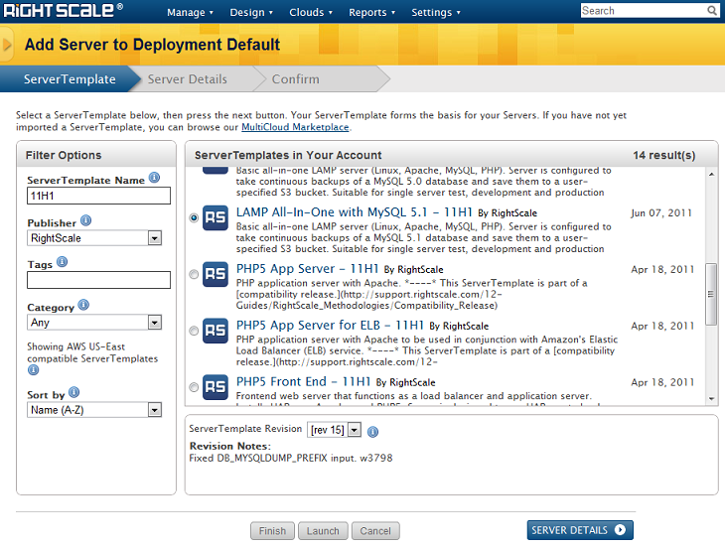
Select the ServerTemplate in your RightScale account that you are going to use to create a server. Only ServerTemplates that support the selected cloud (from the previous step) will be displayed. Enter the name of the ServerTemplate or sort the list by using one or several of the Filter Options including Publisher, Tags, Category, and Name or Date. After choosing a ServerTemplate, select which revision you would like to use (if multiple revisions are available) and click the Server Details button to proceed to the next step.
Other Buttons
- Finish - Save and go to the show page of your server where you can edit settings and launch your server if you have the minimum of required components.
- Launch - Launch your server and skip the Confirm tab if you have all of the required components.
- Cancel - Cancel your selections and take you back to the Server index page or the Servers tab of your deployment.
Server Details
The Server Details tab allows you to select configuration details about the server. Some of the options are cloud-specific and will vary depending on the selected cloud. Go to the section that applies to the selected cloud.
AWS
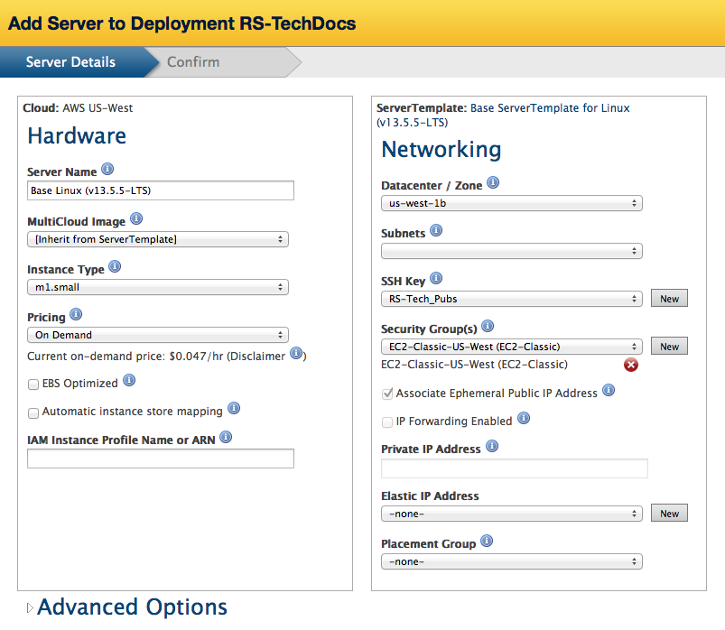
- Server Name - Provide a name for the server.
- MultiCloud Image - Select the MultiCloud Image to be used for the server or keep the
Inherited from the ServerTemplate
option to use the ServerTemplate's default MCI selection. - Instance Type - Specify the type (size) of instance to launch or keep the
Inherit from MultiCloud Image
option to use the MCI's default instance type selection. - Boot to New Volume - If enabled, the instance will launch into volume storage. Otherwise, it will boot to local storage. Available only on certain clouds.
- Delete Volume on Termination - If 'Delete' is selected, the associated volume will be deleted when the instance is terminated. Only shown if 'Boot to New Volume' is enabled.
- Root Volume Size (GB) - The size (in gigabytes) of the volume that contains the root filesystem of the instance. Available only on certain clouds.
- Pricing - Choose either Spot or On-Demand for your instances. See the
AWS Pricing
section below. - EBS Optimized - Select this option if you would like to use an EBS Optimized instance. If you're using a Provisioned IOPS volume with an EBS Optimized instance, performance benefits can be seen if you're using high amounts of network bandwidth and disk bandwidth at the same time. Additionally, Amazon guarantees that when a Provisioned IOPS volume is attached to an Optimized Instance, the volume will perform within 10% of their provisioned performance 99.9% of the time.
Only certain instance types support EBS Optimized Instances. For information on which AWS Instance Types support EBS Optimized Instances, see EC2 Instance Types.
- IAM Instance Profile or ARN - Enter the Identity and Access Management (IAM) Instance Profile name. If you prefer, you can enter the Amazon Resource Name (ARN) in the ARN format (arn:aws:service:region:account:resource). IAM roles contained in the Instance Profile will be assigned to the server instance at launch time. For additional information on AWS IAM see What is IAM?
- Automatic instance store mapping - Select this option to create and attach the maximum number of ephemeral disks to your EC2 instance at boot time as permitted by the instance type you launch. Note that you can add more ephemeral space to an existing server by editing that server, enabling Automatic instance store mapping, then relaunching the server.
The Networking section will have some or all of the following fields, depending on the selected AWS region:
- Datacenter / Zone - Specify the Availability Zone where your new server will be launched.
- Subnets - If applicable, specify a subnet of your Virtual Private Cloud (VPC).
- SSH Key - The SSH key that will be used by the server.
- Security Group(s) - Security group that will be used by the server.
- Associate Ephemeral Public IP Address - Select this option to assign a non-static public IP address to the server at launch. Certain subnet selections preclude this option, in which case this checkbox will be disabled. For example, EC2-Classic subnets require an ephemeral public IP address.
- IP Forwarding Enabled - Allow this server to send and receive traffic to act like a NAT instance when the source or destination is not itself.
- Private IP Address - Enter an IP address within the selected subnet CIDR range to specify a static private IP address for this server's primary network interface.
- Elastic IP Address - Select or create a new EIP for your sever.
- Placement Group - Placement Groups are logical groupings or clusters of instances in the selected AWS region. Placement groups are exclusively used for launching cluster compute instance types. Ignore this field for all other instance types.
- Machine Image - The AMI that will be used to build the machine. RightScale will only support instances launched with one of our RightImages. We recommend using ServerTemplates with RightImages.
- Ramdisk Image**** - Select a Ramdisk image of your choice. (optional)
- Kernel Image**** - Select a kernel image of your choice. (optional)
- Ec2 user data**** - This information is passed to the instance using the EC2 user launch data mechanism which is limited to 16KB of data. The best way to pass configuration data into instances is with RightScripts, but this user data field is sometimes useful for testing purposes.
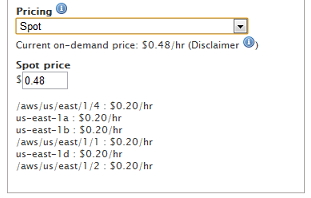
AWS Pricing
With an AWS server, you have the option to choose the type of pricing for your instance. The default is On-Demand, with the current On-Demand price listed right below. If you select Spot from the Pricing dropdown, the current spot prices will be viewable for each Availability Zone.
Azure
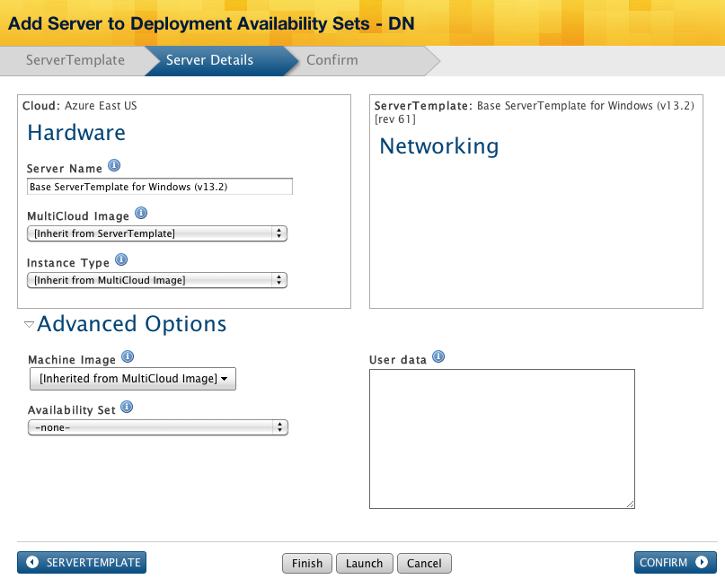
- Server Name - Provide a name for the server.
- MultiCloud Image - Select the MultiCloud Image to be used for the server. The default MultiCloud Image is inherited from the ServerTemplate.
- Instance Type - Specify the type (size) of instance to launch.
- Machine Image - The image that will be used to build the machine. RightScale will only support instances launched with one of our RightImages. We recommend using ServerTemplates with RightImages.
- Availability Set - Availability sets are used to indicate to Windows Azure that VMs in the availability sets are to be protected against single points of failure. When you assign multiple virtual machines to an availability set, Windows Azure ensures that the machines are assigned to different update and fault domains.
- User data - This information is passed to the instance. The best way to pass configuration data into instances is with RightScripts, but this user data field is sometimes useful for testing purposes.
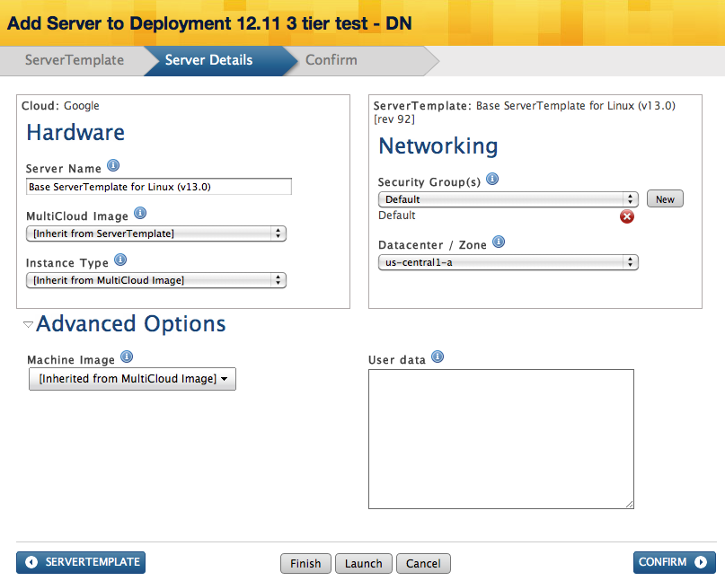
- Server Name - Provide a name for the server.
- MultiCloud Image - Select the MultiCloud Image to be used for the server. The default MultiCloud Image is inherited from the ServerTemplate.
- Instance Type - Specify the type (size) of instance to launch.
- Security Group - Security group that will be used by the server.
- Datacenter/Zone - The regional datacenter in the cloud (Datacenter and Zone are synonymous). A cloud will often have multiple Datacenters which can help when architecting a highly available Deployment.
- Machine Image - The image that will be used to build the machine. RightScale will only support instances launched with one of our RightImages. We recommend using ServerTemplates with RightImages.
- User data - This information is passed to the instance. The best way to pass configuration data into instances is with RightScripts, but this user data field is sometimes useful for testing purposes.
SoftLayer

- Server Name - Provide a name for the server.
- MultiCloud Image - Select the MultiCloud Image to be used for the server. The default MultiCloud Image is inherited from the ServerTemplate.
- Instance Type - Specify the type (size) of instance to launch.
- Datacenter / Zone - The regional datacenter in the cloud (Datacenter and Zone are synonymous). A cloud will often have multiple Datacenters which can help when architecting a highly available Deployment.
- Machine Image - The image that will be used to build the machine. RightScale will only support instances launched with one of our RightImages. We recommend using ServerTemplates with RightImages.
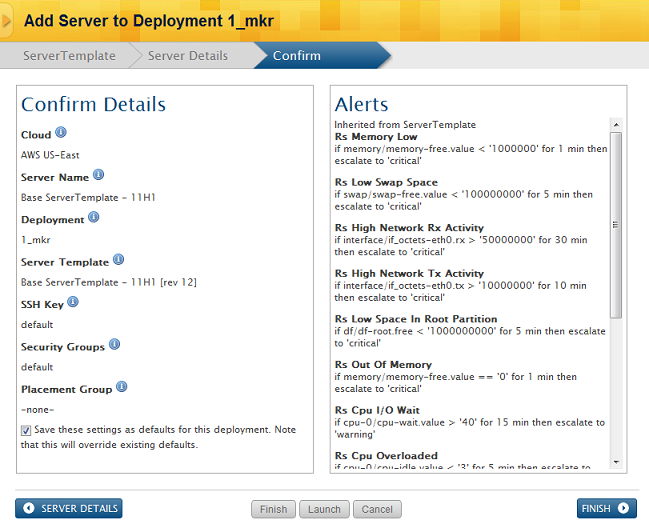
Confirm
The Confirm tab provides a detailed summary of the server you're about to create. If the ServerTemplate contains any predefined alerts, they will also be displayed in this view. If you are satisfied with your selections, click Finish to create the server/array.
You should only use the Launch option if you know all of the server's boot script inputs are defined.
(Optional) You also have the option to save these settings as default settings
for future servers used in that deployment. For more information, see Server Defaults.
Change the Category for an Input on a ServerTemplate
Objective
To change the input category for a script that has been added to a ServerTemplate and create a new category if desired.
Prerequisites
You must be working with an editable [HEAD] version of a ServerTemplate. You can create an editable version by cloning a ServerTemplate.
Overview
When you add a script to a ServerTemplate, it is automatically placed in the 'UNCATEGORIZED' category. You do not need to change the category but may want to do so if you are customizing a ServerTemplate extensively by adding scripts and need to categorize them for better tracking or organization.
Steps
Use the following steps to change the input category of a script.
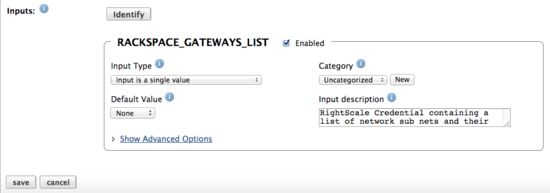
- Go to your deployment > ServerTemplate name > Inputs.
- Click the Show icon for the script that you are recategorizing.
- Click Clone.
- A confirmation message appears and the new script displays on the page with a new version assigned to it. If necessary, you can rename the script here by clicking on it.
- Click Edit and scroll down to the bottom of the page.
- Under Inputs, either select one of the RightScale categories from the drop-down menu or click New to create your own. Save your changes.
- Click Commit and add a Commit Message (required). Commit your changes.
- Delete the original script from the ServerTemplate.
- Click Add Script.
- Under Publisher, click Unpublished and find your script in the Search Results.
- Click your script to highlight it then and click Select.
- Commit the ServerTemplate using the Commit button at the top of the page.
- Add a Commit Message (required).
- Click the Inputs tab of your ServerTemplate to verify that your changes were executed successfully.
Change the ServerTemplate of a Server
Objective
To change the ServerTemplate of a created server.
Prerequisites
- 'designer' user role privileges
Overview
Once a server or instance is launched with a particular ServerTemplate, you cannot change its ServerTemplate to a completely different ServerTemplate (that has a different lineage). For operational servers, you can only change the revision of the selected ServerTemplate. However, for inactive servers or future instances that will be launched into an array you can select a completely different ServerTemplate. The following tutorial will explain how to change a server's or server array's ServerTemplate.
Steps
Inactive Server
To change which ServerTemplate will be used to launch the next server or instance into the server array, click the Edit button under the server array's show page or the Next
server. Changes will affect the next server that is launched.
In the Add Server Wizard, click on the ServerTemplate tab.
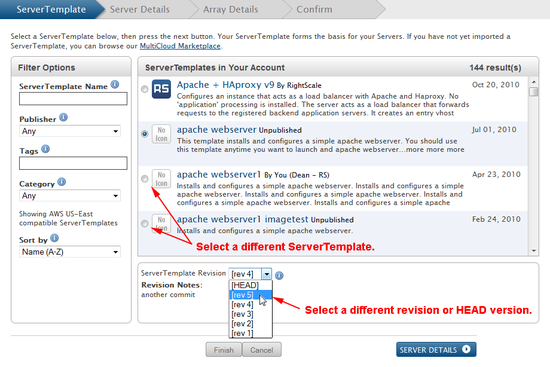
- Select a different ServerTemplate - use the Filter Options to find and select a completely different ServerTemplate. If there are multiple revisions of the new ServerTemplate, you will also need to select a specific revision or the HEAD version once you've selected the new ServerTemplate.
- Select a different revision of the same ServerTemplate - At the bottom, select a different revision of the currently selected ServerTemplate. You can select a previous revision or HEAD version. It's useful to select the editable HEAD version of a ServerTemplate, especially if you are actively developing the ServerTemplate.
A record of these types of changes will be displayed under the Next
server's Changes tab.
Active Server
If you already have an operational instance in the server array or a current
operational server, you can only change its ServerTemplate revision under the the Info tab. Click the Edit icon to select a different revision.
![]()

Clone a ServerTemplate
Objective
To clone a RightScale ServerTemplate for the purposes of making custom modifications
Prerequisites
- 'designer' user role privileges
Overview
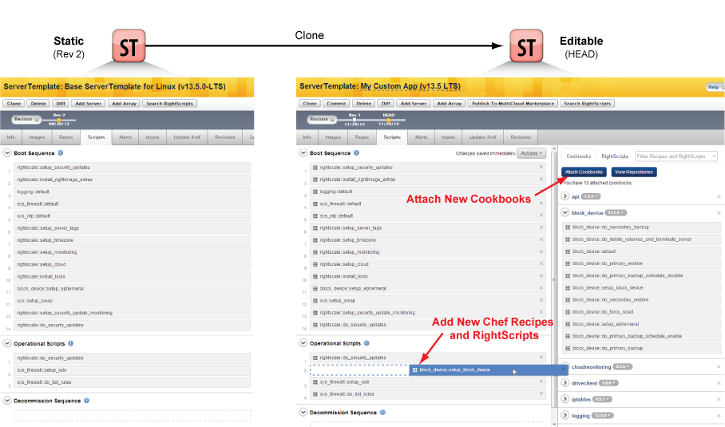
You cannot edit a published RightScale ServerTemplate that you imported from the MultiCloud Marketplace (Design > ServerTemplates > MultiCloud Marketplace) Because you cannot edit a published ServerTemplate, you must first clone it, which creates an editable copy in your 'Local' view. You are free to customize this version of the ServerTemplate as you see fit. (Note that RightScripts function the same way. You must first clone them before you can make any modifications.)
Steps
Select a ServerTemplate that you would like to clone. For example, you may have an uneditable ServerTemplate that you imported from the MultiCloud Marketplace.
When you click Clone, an editable (private) copy of that ServerTemplate is added to your 'Local' view.
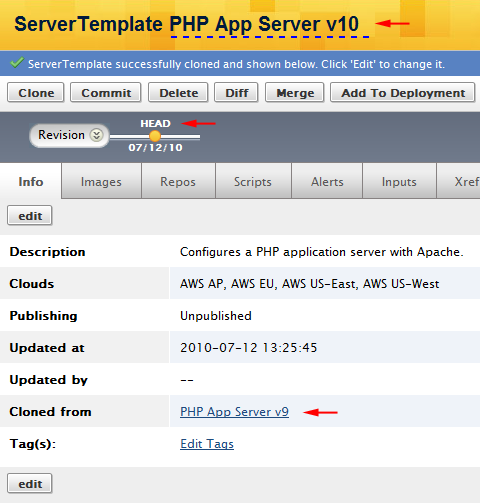
By default, a version is appended to the template's name to make it distinct from the original ServerTemplate (for example, v10). As a best practice, we recommend changing the name of the ServerTemplate to help better distinguish the template. If you are using one of the ServerTemplates published by RightScale, you might want to keep the original version number in the name so that it will be more apparent when a newer version of that ServerTemplate becomes available in the MultiCloud Marketplace. (for example, My PHP App Server v9 (clone)
)
Notice that you can also see which ServerTemplate it was cloned from (in this case, PHP App Server v9).
Commit a ServerTemplate
Objective
To create a history of ServerTemplate versions. For a conceptual understanding our version control system from a Lifecycle Management perspective, see ServerTemplate Versioning.
Prerequisites
- 'designer' user role privileges
Overview
You can now create multiple revisions of the same ServerTemplate. This feature provides a level of version control that is particularly useful for making changes to a ServerTemplate's RightScripts. Instead of cloning a ServerTemplate to make changes, simply click the Commit button to create a revision of the ServerTemplate.
As a best practice, once you have a functioning ServerTemplate, we recommend creating a revision of the ServerTemplate so that you'll have a version that you can revert back to if you run into problems. The versioning process allows you to annotate as you produce newer versions. (That is, you can create a custom message as you commit a ServerTemplate. These messages will show up under the Revisions
tab of your ServerTemplate.)
Steps
Create a ServerTemplate Revision
- Navigate to Design > ServerTemplates.
- Select an editable ServerTemplate.
- Click the Commit button.
You can only commit a [HEAD] version of a private ServerTemplate. The Head
version is always the version that you are allowed to edit.
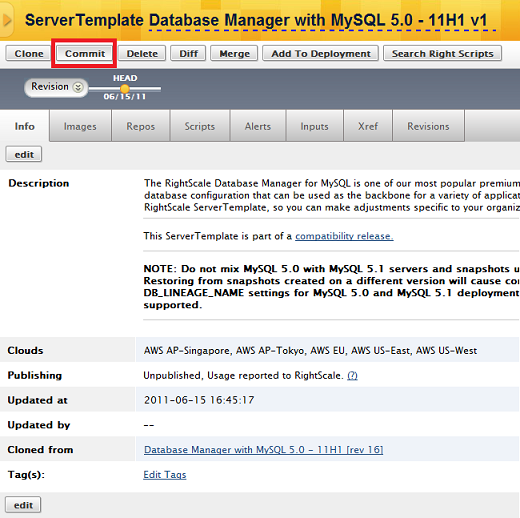
Be sure to include a helpful description and click Commit.
Commit a ServerTemplate with Changes
Let's say you've made some changes to the [HEAD] version of a ServerTemplate such as adding/removing/rearranging RightScripts or editing individual RightScripts, and want to commit the ServerTemplate and create a new revision.
Before you commit a ServerTemplate, you'll most likely want to commit any RightScripts that you've modified. If you don't commit all [HEAD] RightScripts, you risk future incompatibility issues because you'll be referencing a RightScript whose functionality could have changed since the last commit.
To ensure that all RightScripts are preserved in their current version along with the ServerTemplate, you should commit all RightScripts that have been modified. If you do not click the Commit [HEAD] RightScripts link before clicking the ServerTemplate's Commit button, you will be reminded on the next screen that any RightScripts with [HEAD] versions will be committed.
Click the Commit button of the ServerTemplate.
It's important to leave a detailed description of all of your changes. These messages will be visible under a ServerTemplate's Revisions tab.
Once again, if there are any RightScripts with [HEAD] versions, they will automatically be committed when you commit the ServerTemplate.
If there is a special scenario where you do NOT want to commit such changes, uncheck the Commit [HEAD] RightScripts
box.
Click the Commit button.
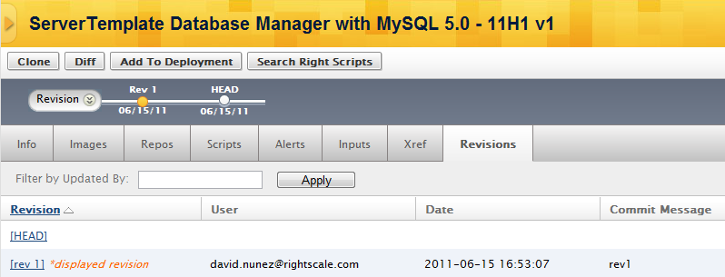
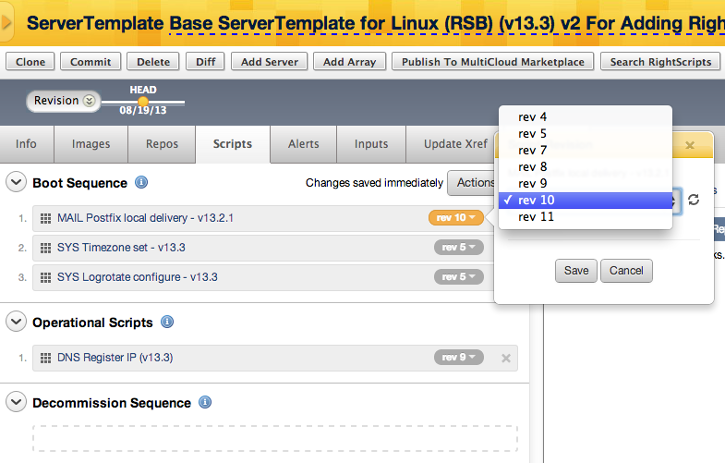
Change ServerTemplate Revisions
Once you've committed a ServerTemplate, you should see a timeline bar underneath the ServerTemplate's name. To change revisions, simply select a revision from the timeline.
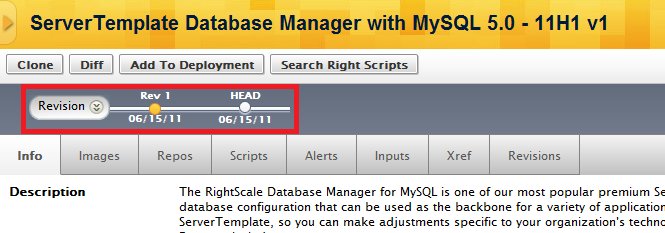
You can also click on the Revisions tab to see who created the ServerTemplate revision, when it was committed, as well as the change descriptions for each revision.
Post Tutorial Steps
Make a Previous Revision the new HEAD Revision
If you have a previously committed revision (e.g. rev 5) of a ServerTemplate that you would like to make your new HEAD version, you will need to clone that revision. Currently, that is the only way to revert back to an editable version of a committed template. Essentially, what you are doing with this procedure is creating a new branch of that ServerTemplate. This process ensures that revisions are always updated versions of the previous revision.
Create a New ServerTemplate
Objective
To create a ServerTemplate for launching new instances on one or more cloud infrastructures
Prerequisites
- 'designer' user role privileges
Overview
ServerTemplates are cloud-agnostic. However, each ServerTemplate references a single MultiCloud Image (MCI) object. It is the MultiCloud Image object that actually defines into which clouds you can launch a server instance. See MultiCloud Images for more information. When you add a server to a deployment from a ServerTemplate, you can only add that server to a cloud that the MultiCloud Image supports. When you create a ServerTemplate, you must either select an existing MultiCloud Image or create one on-the-fly
and specify at least one image for a particular cloud.
Steps
Go to Design > ServerTemplates and click New.
You will need to provide some basic information about your new ServerTemplate.
- Nickname – A short nickname that helps you recognize the ServerTemplate.
- Description – A short description of the ServerTemplate.
- MultiCloud Image – You can either select an existing MultiCloud Image or create a new MultiCloud Image at this time. If possible, we recommend using one of the default MultiCloud Images from RightScale or creating a custom MultiCloud Image beforehand. If you choose to create a New MultiCloud Image at this time, you will need to specify an image for a cloud. Later, you can add other clouds to the MultiCloud Image that you just created, under its Clouds tab ( Design > MultiCloud Images ).
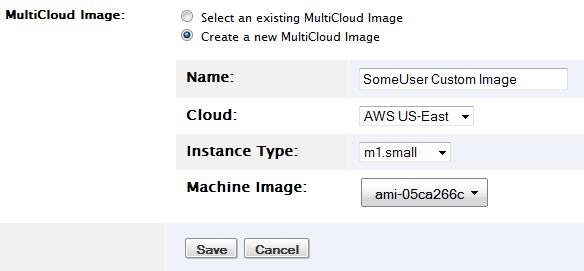
Click the Save action button.
Customize a ServerTemplate to be MultiCloud
Objective
To convert or change a ServerTemplate so that it can be used to create Servers and launch instances on one or more public/private cloud infrastructures that it currently doesn't support.
Prerequisites
- 'designer' user role privileges
- a ServerTemplate that you cannot use to create a Server in your desired cloud infrastructure
Overview
ServerTemplates are cloud-agnostic. It's the template's MultiCloud Images (MCIs) that technically controls which clouds a ServerTemplate supports. You'll find that most ServerTemplates are published with multiple MCIs, where each MCI typically references the same machine image across multiple clouds/regions.
When you Add a Server to a Deployment from a ServerTemplate, you will only be able to add a server in a cloud/region that the selected MultiCloud Image supports. Currently, most ServerTemplates published by RightScale include MCIs that reference copies of the same machine image in all supported AWS regions. For example, the RightImage_CentOS_5.4_i386_v5.6 - 11H1.b1
MCI references identical machine images (with the same name) across all supported AWS regions (us-east, us-west, etc.).
But for private clouds, it's impossible for RightScale to publish ServerTemplates that can be used as-is to launch instances into those private clouds because we don't know in advance where those images are located. In such cases, you will need to customize a ServerTemplate yourself by creating an MCI that can be used for your private cloud.
If you need to create an image for use in a private cloud, please contact your RightScale Sales Account Manager. If you do not have a RightScale Account Manager, please contact the sales department at sales@rightscale.com.
Follow the steps below to modify an existing ServerTemplate so that it can be used to create Servers for multiple public and private clouds.
Steps
Select a ServerTemplate
The first step is to find a ServerTemplate that you want to customize to support other clouds. You can either import and clone a published ServerTemplate from the MultiCloud Marketplace or modify a private ServerTemplate in your local collection.
Once you've found the ServerTemplate that you want to modify, make sure that's it's an editable HEAD version. If not, you will need to clone the ServerTemplate so that you can make changes to its configuration, namely its list of MCIs.
Modify the MultiCloud Image (MCI)
The next step is to modify the MCIs that are used by the editable ServerTemplate to support your additional private/public clouds. There are two options depending on whether you want to create a new MCI or modify an existing one. Complete the tutorial that best suits your needs.
Update the ServerTemplate's MCI List
Now that you have an MCI that can be used to find the appropriate image in your newly added cloud/region, you'll need to update the ServerTemplate.
Go to the editable HEAD version of the ServerTemplate and go to its Images tab.
The next step is to replace the MCI that you cloned and modified with the new MCI that you just created. Remember, when you clone a RightScale component (ServerTemplate, RightScript, etc.) it becomes a new object with its own distinct lineage. Therefore, you can't use the Edit (pencil) icon to select your cloned version of that particular MCI.
Click the Add MultiCloud Image button. Select and add the new cloned MCI that includes the added cloud support.
Delete the old MCI that the new one replaced.
Commit the ServerTemplate. (optional)
Congratulations! You now have a ServerTemplate that you can use to Add a Server to a Deployment for the newly supported cloud(s).
Detect Changes in HEAD ServerTemplate
Objective
To detect RightScripts in a HEAD ServerTemplate that have changes between the committed revision that's currently being used and its HEAD version (if available).
Prerequisites
The following are prerequisites for completing this tutorial:
- You should know how to run a diff (comparison) on RightScripts
- You should know how to commit RightScripts
- 'publisher' user role privileges
Overview
If you are developing new ServerTemplates or modifying existing ones, you may want to know if you are using the most recent version of a RightScript. Use the Detect changes in HEAD button to identify RightScripts where the revision that is currently being used in a HEAD ServerTemplate does not match the HEAD version of the RightScript. (i.e. The most recent version of the RightScript is not being used.) If you are developing a new ServerTemplate you might want to make sure that you're using the latest versions of all the RightScripts.
This procedure can be used to help publishers manage and keep their ServerTemplates and RightScripts up to date.
Blue spherical icons (![]() ) will be displayed next to a RightScripts if its HEAD version does not match the revision that is currently being used in a HEAD ServerTemplate.
) will be displayed next to a RightScripts if its HEAD version does not match the revision that is currently being used in a HEAD ServerTemplate.
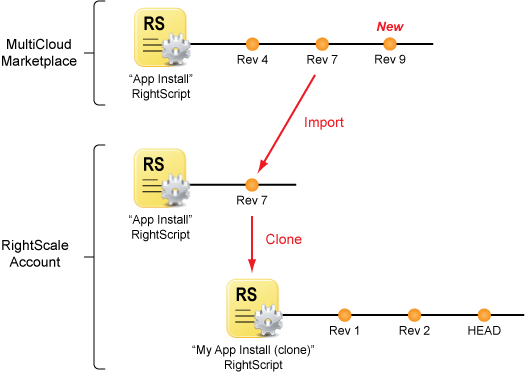
The orange and blue spheres will be displayed for different reasons. The diagram below demonstrates the most common user scenarios.
Depending on which RightScript revision a ServerTemplate is currently using, the following script notifications will be shown.
| Which RightScript is in the HEAD ServerTemplate? | Conditions | Notification Results |
|---|---|---|
| Rev 7 | Rev 9 is not available in the MultiCloud Marketplace | No icons |
| Rev 7 | Rev 9 is available in the MultiCloud Marketplace | |
| Rev 1 | Rev 2 is available; Rev 1 is not equal to HEAD | |
| Rev 2 | Rev 2 is equal to HEAD | No icons |
| Rev 2 | Rev 2 is not equal to HEAD |
Steps
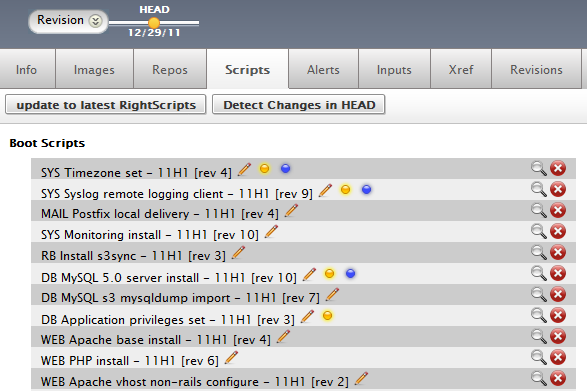
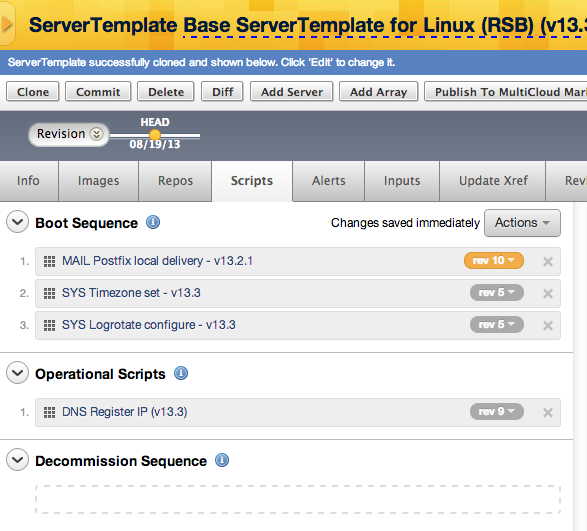
- Go to the Scripts tab of a HEAD ServerTemplate. Orange ball notifications will automatically be displayed.
- Click the Detect Changes in HEAD action button. Blue spherical icons (
 ) will be displayed next to a RightScript if its HEAD version does not match the revision that is currently being used in a HEAD ServerTemplate.
 - Click the blue sphere icon to view a differential between the current revision of the script that's being used and its HEAD version.
- Determine why a blue sphere icon appears next to a RightScript.
- If you are using the latest committed revision of the RightScript and there is a icon, you may want to commit the HEAD version of the RightScript so that the most recently committed revision of the script matches the HEAD version and then select the new committed revision.
- If you are using an older revision of the RightScript and a more recent committed revision exists in your RightScale account you may want to select the newer revision (which hopefully matches the script's HEAD version).
- If you are using the latest committed revision of the RightScript and there is a
Post Tutorial Steps
Note that when RightScripts within ServerTemplates have been updated, the associated icons (spheres) disappear. The content of the RightScripts themselves has in no way been changed, just which RightScripts the ServerTemplate uses changes.
Differentiate Two ServerTemplates
Objective
To differentiate between two ServerTemplates, revealing what has been added, removed or modified to produce their differences
Prerequisites
- 'designer' user role privileges
Overview
Similar to the way you can differentiate between two RightScripts, you can also run a diff to see the differences between two ServerTemplates. You select the two ServerTemplates in drop-down menu fashion. The output of your diff shows the two ServerTemplates in parallel, with colored text highlights of all added, removed, and modified attributes.
A common use case for this is when you want to see, in detail, the differences between two ServerTemplates after a new ServerTemplate release. Another possible use case is when you have cloned a ServerTemplate, spent some time working on it, then perhaps left it untouched for some period of time. Running a diff on the original and the clone will quickly catch you up to speed with respect to what has changed. You can also follow that up with running a diff on the two latest versions of your newer cloned ServerTemplate to pin point exactly what you had been working on most recently.
Steps
The following is a basic example of how to perform a diff on two ServerTemplates, including sample output.
Running a Diff
- Go to Design > ServerTemplates
- Select the ServerTemplate you wish to run a diff on (for example, PHP App Server v6) *
- Select the Diff action button
- Select the revision to compare against in the drop down menu
- Select the Diff action button in the drop down
- Alternatively, you can select the Diff action button here, and specify both ServerTemplates in the drop down menu. It is easier to have this filled out for you when selecting the ServerTemplate name however, particularly because the default version numbers are usually correct and you can often proceed by simply pressing the Diff action button.
Sample output
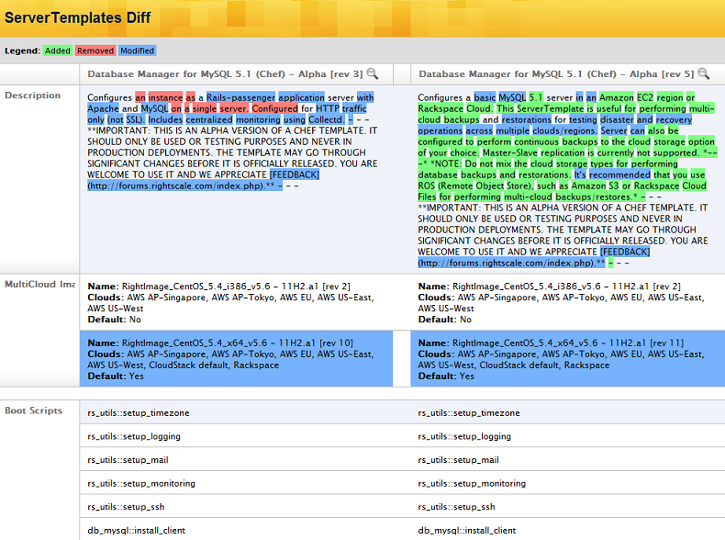
Example: Description and MCI
Example: Modified Cookbook
A cookbook change will be highlighted for the following reasons:
- A different version of the cookbook is attached to the ServerTemplate. (e.g. v12.1.0 => v13.5.0)
- The cookbook comes from a different repository location. In such cases, the name of the repository is listed underneath the cookbook name. Note: The cookbook's version may be unchanged.

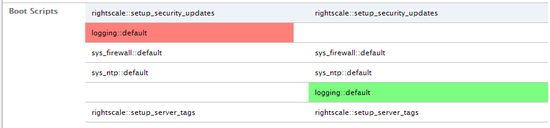
Example: Script Reorder
When a script is dragged up/down the list, it will be highlighted as removed and added in the differential markup.
Example: Modified RightScript
A RightScript will be highlighted as a change whenever a different revision is used.

Default Version Information
When you select a ServerTemplate name, the default versions in the drop down are usually correct, and what you would want to run a diff against. However, you can specify any existing revisions. The To
entry is the most recent non-Head version. The default From
entry is the version prior to that. For example, if your ServerTemplate has 5 revisions (rev 5 down to rev 1), the defaults would be:
- To: [rev 5]
- From: [rev 4]
Import a ServerTemplate
Objective
To import a ServerTemplate from the MultiCloud Marketplace so it becomes local
.
Prerequisites
- 'library' user role privileges
Overview
When you import a ServerTemplate, all of its associated RightScripts, MultiCloud Image, and RepoPaths are also imported over (unless they've already been imported or you don't have access to those published RightScale components).
Before importing the ServerTemplate:
- ServerTemplate is found in: Design > MultiCloud Marketplace > ServerTemplates
After importing the ServerTemplate:
- ServerTemplate is found in: Design > ServerTemplates > View Local
- Associated RightScripts are found in: Design > RightScripts > View Local
Because any ServerTemplate that you import over from the MultiCloud Marketplace will most likely be a committed revision, you will need to clone it in order to create an editable copy in your Local view.
Steps
- Go to Design > MultiCloud Marketplace > ServerTemplates
- Find and select the appropriate ServerTemplate. Browse by categories, perform a keyword search, or use the filter options to find the correct ServerTemplate.
- Click Import.
Once imported, the ServerTemplate and associated RightScripts are considered part of your local
collection.
Publish and Share a ServerTemplate
Objective
To publish and share a ServerTemplate.
Prerequisites
- 'publisher' user role privileges
Overview
You can only publish a private component that was originally created in your RightScale account. (i.e. It was either created from scratch or cloned.) You cannot publish a component that you imported from the MultiCloud Marketplace (MCM). A particular version can only be published once.
When you publish a ServerTemplate, any of its private RightScale components must also be published (unless they were previously published to the MCM). For example, if the ServerTemplate uses any cloned RightScripts or new MCIs that you created in the current RightScale account, all of those private RightScale components will also be shared with the ServerTemplate.
It's strongly recommended that you only share committed revisions of ServerTemplates where all of its referenced RightScale components are also committed revisions.
If you try to publish a ServerTemplate that references HEAD versions of RightScale components (e.g. RightScripts or MultiCloud Images), you will be prompted to commit any HEAD versions in order to create static, committed revisions. It's strongly recommended that you agree and let RightScale automatically create committed revisions of those HEAD versions. The ServerTemplate will automatically select and use the new committed revisions that were created instead of the HEAD versions.
Although you can publish a HEAD version of a ServerTemplate, it's not a recommended best practice unless you're an advanced user that's actively developing and testing it across multiple RightScale accounts. It's recommended that you only publish and share committed revisions of a component.
If you share a MultiCloud Image that has a reference to a privately owned Amazon Machine Image (AMI) (i.e. the AMI was created using your AWS credentials) and want to share the MCI with another RightScale account, you must also privately share the AMI with the other AWS account, otherwise the other RightScale account will not have access to use the referenced AMI.
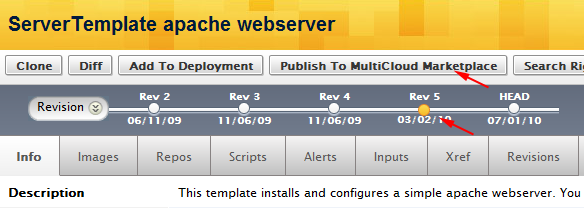
Steps
- Navigate to Design > ServerTemplates in the RightScale Dashboard.
- Select the ServerTemplate that you want to share.
- Select the committed revision that you want to share in the History Timeline Bar. (e.g. Rev 1)
- Click the Publish to MultiCloud Marketplace action button. For details on how to use the publishing wizard to complete the sharing process, see the Using the Publishing Assistant tutorial for details.
Resurrect a Deleted ServerTemplate
Objective
To resurrect (recover) a ServerTemplate that was previously deleted from your RightScale account's local collection by using the clone button.
Prerequisites
- 'designer' user role privileges
Overview
If you've defined a Server in the past using ServerTemplate 'X' and later delete it from the RightScale account, the Server will remain and continue to reference a deleted ServerTemplate. In such cases, if you attempt to view a deleted ServerTemplate, you will have the option of adding it back to your local collection, provided that you have the appropriate user role privileges and the ServerTemplate is still available to the RightScale account.
Steps
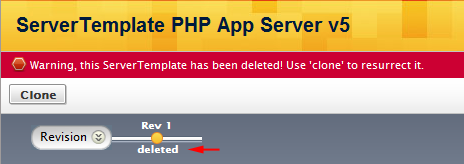
If you see the following error message (Warning, this ServerTemplate has been deleted! Use 'clone' to resurrect it.) when viewing a ServerTemplate's show page, click the Clone button to add the ServerTemplate back to your local collection.
Subscribe to a ServerTemplate
Objective
To subscribe to a privately shared, HEAD version of a ServerTemplate from the MultiCloud Marketplace.
Prerequisites
- 'library' user role privileges
Overview
Typically you will only import committed (uneditable) revisions of a ServerTemplate from the MultiCloud Marketplace (MCM). However, another RightScale account can privately share a HEAD (editable) version of a ServerTemplate with your RightScale account. In such cases, you will be able to subscribe to the HEAD version of the ServerTemplate in the MCM.
If you want to use a privately shared HEAD version in your RightScale account, you must subscribe, not import, the ServerTemplate, because you can inherit changes from its publisher at any time. For example, if the publisher makes changes to the HEAD version of their ServerTemplate in their own account they will have the option to republish the ServerTemplate to the MCM, which will update the copy in the MCM to reflect those changes. Any RightScale accounts that have subscribed to the HEAD version of that ServerTemplate will automatically inherit those changes when it's republished. Therefore, it's important to understand the implications of using and launching servers with a HEAD version of a ServerTemplate that you subscribed to from the MCM because you can inherit changes at any time.
If you are actively developing and testing a ServerTemplate across multiple accounts, you may want to inherit changes to the HEAD version. However, if you do not want to inherit changes because it could cause potential problems if imcompatible changes are inherited, you should clone the HEAD version of the ServerTemplate once you've subscribed to it from the MCM to create a separate component with its own lineage.You will have to determine which option makes the most sense for your use case.
Steps
- Navigate to Design > MultiCloud Marketplace > ServerTemplates
- Locate and select the appropriate ServerTemplate.
- Browse by categories, perform a search, or the filter options to find the correct ServerTemplate.
- Once found, click the Subscribe button to retrieve a copy of the HEAD version of the ServerTemplate and make it available for use within your RightScale account.
A Warning icon and/or message denotes a HEAD version of a ServerTemplate that you are currently subscribing to from the MCM.

Once subscribed, the ServerTemplate and its associated RightScripts are considered part of your local
collection.
Update a ServerTemplate Revision on Multiple Servers
Objective
To update the revision of a ServerTemplate that is being used on multiple servers at once.
Overview
The ServerTemplate's Update Xref tab allows you to view servers using that ServerTemplate and update them in bulk to a newer revision. When using this update feature, you will specify a revision of the ServerTemplate and view the revisions of MultiCloud Images (MCIs) available. A new revision of a ServerTemplate may be using different MCIs; in this case, you will have the option to specify which MCIs you will use. If this is performed on a running server, you will need to re-launch for the MCIs to be updated.
If new inputs are required by the new revision, you will not be prompted until the next time that server is launched.
Best Practices Prerequisites
This is a powerful feature that could have negative repercussions if done incorrectly in a production environment. For this reason, we recommend the following:
- Perform a Diff between old and newer revisions to know exactly which updates will be made.
- Try out the new revision by updgrading one server, testing and launching before performing an update in bulk.
- For server array instances, it is highly recommended that you launch one instance in the array to ensure your new changes will continue to grow and shrink the array accordingly.
Steps
- Choose the ServerTemplate you will update by navigating to Design > ServerTemplates.
- After selecting a ServerTemplate, click its Update Xref tab.
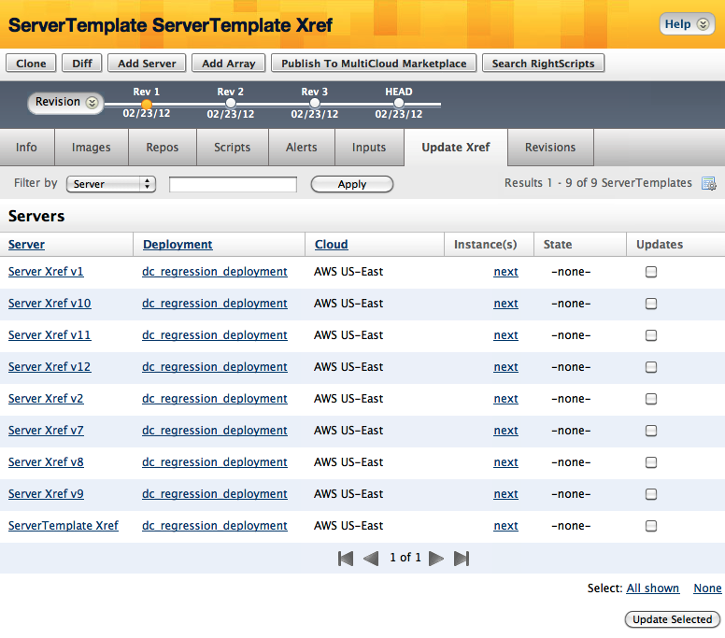
- You will see all the servers that are using the same version of ServerTemplate. Choose servers to update. You have the option to select
All shown,
meaning all the servers shown on the page. Under the Instance(s) column,next
indicates that the server is not running, and changes can still be made to that instance by clickingnext,
which will take effect the next time the server is launched.Current
under the Instance(s) column signifies a running server.
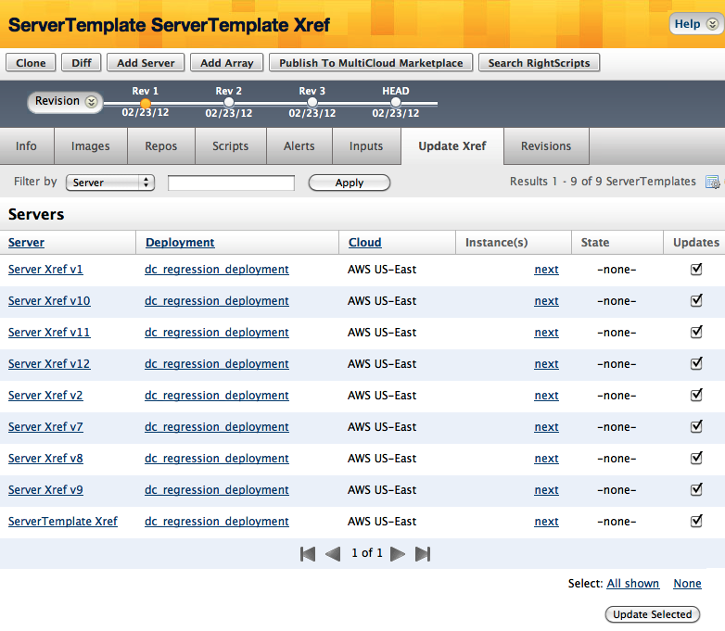
- After finishing the selection, click Update Selected to initiate the
Update ServerTemplate Revision
options.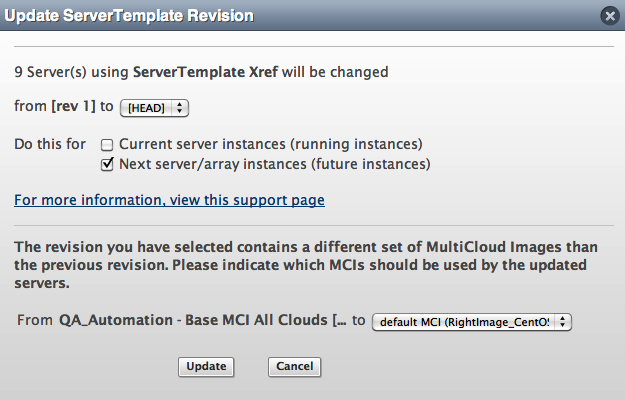
- The above dialog box will appear, allowing you to select a revision. You will have the option of executing these updates for
current
server instances (running) orNext server/array instances
(non-running, future instances). When performing this action on future instances, every update will take effect the next time it is launched. When performing this action on running instances, the instance will continue to run, but the MCI upgrades will not take effect until they are re-launched. Note that for running array instances, the behavior is similar to normal instances. But alerts will automatically be upgraded to coincide with the new revision, which may effect behavior of old alerts are no longer there. Check the inputs tab of the array to see if there are any new missing required inputs and also the alerts tab to see if anything has changed. Otherwise, the array may not spin up instances in accordance with your usual specifications, or they may strand due to unset required inputs. Thedefault
image selected is the image (or images) that are the default of the specified revision of the ServerTemplate, which may not be the equivalent MCI you were previously using (for example, if you were previously using a 32-bit instance type, the default MCI might be a 64-bit instance type). Make sure your MCI revision selection is in accordance with your desired specifications.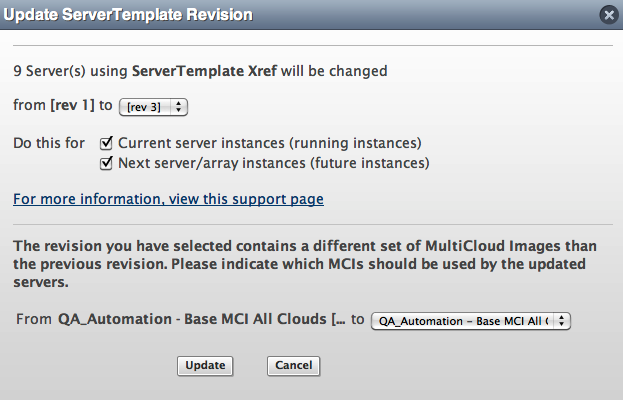
- Additional points:
- For revision selection, it is not recommended to use a HEAD revision for production, since this is a living revision. It is best to select a committed revision, which is static.
- If a new revision requires new input values, the next time the server is launched, these inputs will need to be specified
- if any scripts are run on the new revision, you will be prompted to set any inputs.
- When selecting a revision, you may choose older or newer revisions.
- For running instances, remember that your MCI selection is tied to a RightImage(s) for one or more clouds and you have the choice to keep the same MCI in use. If you do decide to update the MCI(s), these changes will only take effect when the server is re-launched.
When you are finished with your configuration, click Update.
Update the revision of a MultiCloud Image in a ServerTemplate
Objective
To update the revision of an existing MultiCloud Image of a HEAD ServerTemplate.
Prerequisites
- 'designer' user role privileges
Overview
If you are modifying a ServerTemplate, you may want to update its list of MultiCloud Images. There are two main reasons why you would update a ServerTemplate's MCIs.
- Add new cloud support
- Update the list of MCIs to use newer revisions
To help you know when a newer revision of a MultiCloud Image is available, orange notification balls are displayed. If a newer committed revision of an MCI is available within the RightScale account or in the MultiCloud Marketplace (MCM), a yellow-orange sphere icon will appear next to the MCI under the HEAD ServerTemplate's Images tab.
It's your responsibility to determine whether or not you should update the highlighted MCIs.
Orange ball notifications are only displayed if a newer committed revision of an MCI (with the same lineage) is available. If an MCI is cloned, it's a new object with a different lineage. The diagram below demonstrates the most common user scenarios.
Steps
Navigate to one of your ServerTemplates
- Design > ServerTemplates > [ServerTemplateName] > Images tab
- Go to the editable HEAD version of the ServerTemplate. If no HEAD version exists, you can clone it to create an editable copy.
Check for newer versions
Under the Images tab of a HEAD version of a ServerTemplate, you may see yellow sphere icons, which denote that a newer revision of an MCI is available. RightScale will check within your RightScale account for a newer revision as well as in the MultiCloud Marketplace. The yellow sphere icons are only designed to serve as a notification. If an MCI has a yellow sphere icon, it does not mean that you must update its revision. The spheres will only be displayed for HEAD versions of a ServerTemplate and not committed revisions because only HEAD versions are editable.
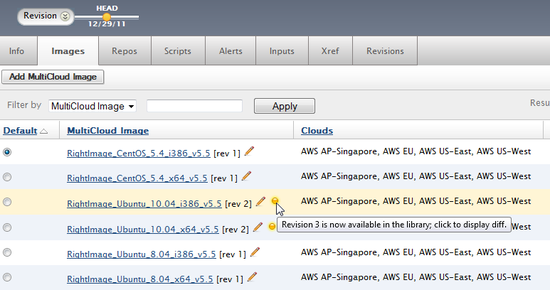
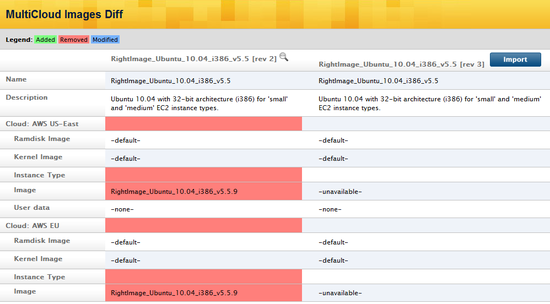
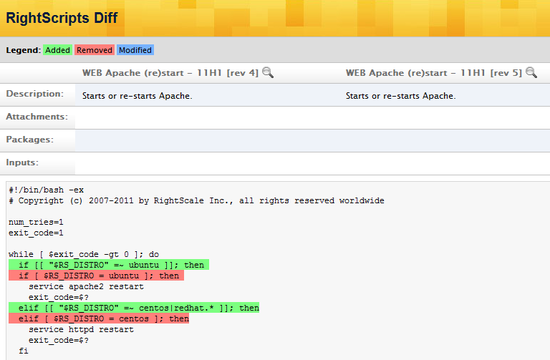
If you click on the icon, you will perform a differential (diff) between the current revision and the most recently committed revision that's available. Use the diff to compare the differences between the two revisions to determine whether or not you want to update the MCI to a different revision. In the example below, the differences between the revisions are highlighted for your convenience.
Next, you will need to determine whether or not you want to update the current RightScript revision.
Update a MultiCloud Image revision within a ServerTemplate
Once you have performed a differential between the two RightScripts and determined that you want to update the revision of a RightScript revision, you can follow one of the upgrade procedures below.
- If a newer revision of the MCI is available in the MultiCloud Marketplace and it was not previously imported, you will need to import it first before you can select the new revision. Click the
 icon and click the Import button. (Requires 'library' user role privileges) Or you can go to the MCM and manually import the newer revision. (Design > MultiCloud Marketplace > MultiCloud Images)
 - If a newer revision of the MCI already exists locally within your RightScale account, you do not need to import it.
Next, click the Select Revision
icon ![]() . The available revisions will be displayed in a drop-down menu. If the newer revision is not listed in the dropdown menu, you will need to import it from the MultiCloud Marketplace. Select the newer revision that you want to use.
. The available revisions will be displayed in a drop-down menu. If the newer revision is not listed in the dropdown menu, you will need to import it from the MultiCloud Marketplace. Select the newer revision that you want to use.
Repeat the steps above to manually update another individual MCI.
The orange ball icon will automatically disappear if you update the ServerTemplate to use the latest committed revision of a MultiCloud Image.
Test the ServerTemplate
If you make any changes to a ServerTemplate's list of MultiCloud Images, you should test the new images in their respective clouds. A user should be able to successfully launch a server with any of the MCI's images.
Publish the ServerTemplate
Once you have tested the ServerTemplate with the new MCIs, you may want to publish it to the MultiCloud Marketplace so that you can share it with other users.
Update to latest RightScripts in a ServerTemplate
Objective
To update RightScripts to newer versions within a HEAD ServerTemplate.
Upon completion of this tutorial, you should:
- Know how to recognize when there are newer RightScripts available for your ServerTemplate
- Update the version of the RightScript within the ServerTemplate, on either a individual or group (e.g. all newer RightScripts) basis
Prerequisites
The following are prerequisites for completing this tutorial:
- You should know how to run a diff (comparison) on RightScripts
- You should know how to commit RightScripts
- 'designer' user role privileges
Overview
If you are modifying a ServerTemplate, you may want to update its list of RightScripts to use the most recent committed revisions of those scripts. To help you know when a newer revision is available, colored notification balls are displayed. If a newer committed revision of a RightScript is available within the RightScale account or in the MultiCloud Marketplace (MCM), a yellow-orange sphere icon will appear next to the script under the HEAD ServerTemplate's Scripts tab.
It's your responsibility to determine whether or not you should update the highlighted RightScripts.
Orange ball notifications are only displayed if a newer committed revision of a RightScript (with the same lineage) is available. If a RightScript is cloned, it's a new object with a different lineage. The diagram below demonstrates the most common user scenarios.
Depending on which RightScript revision a ServerTemplate is currently using, the following script notifications will be shown.
| Which RightScript is in the HEAD ServerTemplate? | Conditions | Notification Results |
|---|---|---|
| Rev 7 | Rev 9 is not available in the MultiCloud Marketplace | No icons |
| Rev 7 | Rev 9 is available in the MultiCloud Marketplace | Orange icon |
| Rev 1 | Rev 2 is available | Orange icon |
| Rev 2 | No newer committed revision is available | No icons |
Steps
Navigate to one of your ServerTemplates
- Design > ServerTemplates > [ServerTemplateName] > Scripts tab
- Go to the editable HEAD version of the ServerTemplate. If no HEAD version exists, you can clone it to create an editable copy.
Check for newer versions
Under the Scripts tab of a HEAD version of a ServerTemplate, you may see yellow sphere icons, which denote that a newer revision of that script is available. RightScale will check within your RightScale account for a newer revision as well as in the MultiCloud Marketplace. The yellow sphere icons are only designed to serve as a notification. If a RightScript has a highlighted rev number in orange, it does not mean that you must update its revision. The actual content of the scripts is not checked, just the revision numbers. The orange highlight will only be displayed for HEAD versions of a ServerTemplate and not committed revisions because only HEAD versions are editable.
If you click on the icon, you will perform a differential (diff) between the current revision and the most recently committed revision that's available. Use the diff to compare the differences between the two revisions to determine whether or not you want to update the script to a different revision. In the example below, the differences between the revisions are highlighted for your convenience.
Next, you will need to determine whether or not you want to update the current RightScript revision.
Update RightScripts within a ServerTemplate
Once you have performed a differential between the two RightScripts and determined that you want to update the revision of a RightScript revision, you can update a single RightScript by clicking the highlighted rev for the RightScript and select the RightScript you would like to update to.
Using the Publishing Assistant
Objective
Publish a private (unpublished) RightScale component using the Publishing Assistant.
The Publishing Assistant may be used when publishing any RightScale component (ServerTemplate, RightScript, Macro or MultiCloud Image). However, EULAs only apply to ServerTemplates, not other components. The tutorial below uses a ServerTemplate as to include every step of the Publishing Assistant process.
Prerequisites
- Requires the 'publisher' User Role Privileges in the RightScale account
- All RightScale accounts can publish private components to the MultiCloud Marketplace (i.e. public sharing). Accounts that are premium or better can publish to private Account Groups (i.e. private sharing). (Standard or Free accounts cannot publish to private Account Groups.)
Overview
Using the Publishing Assistant is very intuitive. This tutorial will highlight the multiple phases of using the Publishing Assistant:
- Organization - First time publishers will need to provide information about their organization. (Only seen the first time you publish a component.)
- Sharing - Specify the target audience you want to share with.
- Descriptions - Enter the short and long descriptions.
- EULAs¹ - End User License Agreements. You can use an existing EULA or create a new one from within the assistant.
- Preview - Preview what a user would see prior to actually publishing to the MultiCloud Marketplace.
While transitioning through these phases of the Publishing Assistant, you are also free to navigate to the previous or next phase at any time. The phase arrows are also actionable (Shown in below diagrams for each phase.)
For more information about sharing, please see Sharing RightScale Components.
¹ Only applies when publishing ServerTemplates.
Steps
RightScale's Publishing Assistant wizard will walk you through the process of publishing your component(s).
Publish to MultiCloud Marketplace
The first step in the sharing process is to determine which RightScale component you want to publish to the MultiCloud Marketplace. Users will need to have access to the MultiCloud Marketplace ('library' user role privileges) in order to view and import/subscribe to a shared component. You can only publish private components to the MultiCloud Marketplace. (i.e. You cannot import a premium ServerTemplate that's published by a different account and then re-publish it to the MultiCloud Marketplace.)
- Go to the private component in your local collection that you want to share. (e.g. Design -> ServerTemplates -> View Local)
- Be sure to select the correct revision of that component that you want to share. As a best practice, you should only share committed (static) revisions of a component. Also make sure that you haven't previously published it. The component should be listed as
unpublished
under the component's Info tab. You should only share a HEAD version under certain circumstances. The ability to publish a HEAD version is only supported for RightScale accounts that are enabled for private sharing. You cannot publicly share a HEAD version of a component. When you publish a component to the MultiCloud Marketplace, only the selected revision or HEAD version will be published. (i.e. Previous revisions of that component will not be published.) - Click the Publish to MultiCloud Marketplace action button. Note: If this button is not displayed, you do not have the 'publisher' User Role Privilege in the RightScale account or if you are looking at a HEAD revision and your account does not support private sharing.
- You must read and agree to RightScale's EULA before continuing the publishing process.
- Next, you will need to specify the visibility of your component. This selection controls who can browse and find your component in the MultiCloud Marketplace. (In a later step you will specify which accounts have access to import the component.)
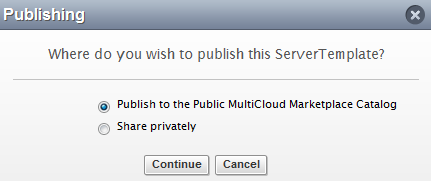
- Publish to the Public MultiCloud Marketplace Catalog - Make this component publicly visible to everyone in the MultiCloud Marketplace. Unless your account is enabled for private publishing, only committed revisions can be publicly shared. (Note: Components will be indexed by search engines.)
- Share privately - Make this component only visible in the MultiCloud Marketplace to specific RightScale accounts with whom you've granted access via Account Group Invitations. Users will be able to view the component in the MultiCloud Marketplace under Categories -> Shared. Note: You must have a Premium account (or better) for private sharing.
- You must read and agree to RightScale's Publishing Agreement before continuing the publishing process.
- Click the Sharing action button to proceed to the next step.
Organization
If you are publishing for the first time, you must provide the following information about your publishing organization. Later, you can edit this information under Design > Account Library > Your Publishing Organization.The 'Organization' tab appears the first time a user publishes from your account.
- Organization Name (required) - In the MultiCloud Marketplace, the organization name will denote who published the component. Each account can only have one defined publishing organization. Several characters are not allowed in the namespace: ; \ / > < & , .
- Organization Email (required) - When someone leaves a comment on one of your shared components, notifications will be sent to this email address (if enabled).
- Logos - Depending on the view in the MultiCloud Marketplace, large and small logos will appear next to the component.
- Support Information - Publishers are responsible for supporting their shared components. Be sure to provide helpful links and contact information that will be useful for your users. The provided support information will be displayed for each shared component regardless of the account group.
- Welcome Message - The welcome message will be shown when an Account Group Invitation is accepted.
Sharing
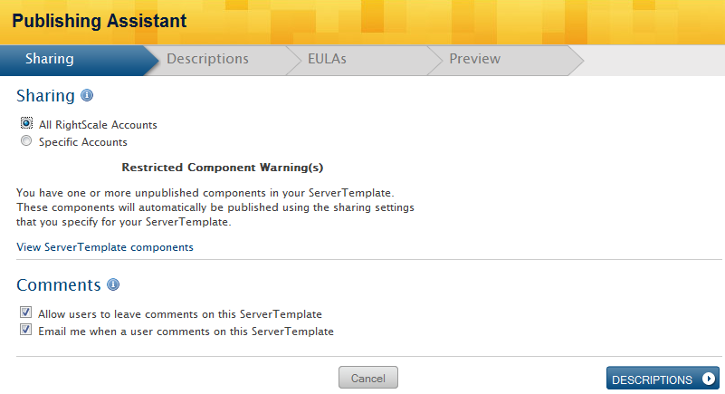
The Sharing
section allows you to control who can import your component.
Specify your sharing preferences. Remember, when you publish a ServerTemplate, any (unpublished) private RightScripts, MultiCloud Images, and RepoPaths that are used by the ServerTemplate are implictly shared to guarantee the usability of the template itself. Click the View ServerTemplate components link to see what other components will be implicitly published.
- All RightScale Accounts - The component can be imported into any RightScale account. Note: Public publishing must be enabled in the publishing account. Contact your RightScale account manager to enable public publishing for your account.
- Specific Accounts - The component can only be imported into specified RightScale accounts. You can either select an existing Account Group(s) or create a New Account Group. Note: You must select at least one Account Group, however it can be empty. (i.e. Specific RightScale accounts have not been added to the Account Group.)
- Publishing Only for RightScale Paid Accounts - If your account is enabled for private publishing, you can also select the
RightScale Paid Customers
Account Group which makes the component importable ONLY into paid RightScale accounts (Standard and above). Only users with credit cards on file are able to import ISV templates that require payment (contact your account manager or sales@rightscale.com for clarification). NOTE : Select this option if you are an ISV publishing a pay-per-use RightScale ServerTemplate unless otherwise instructed by your RIghtScale account contact.
- Publishing Only for RightScale Paid Accounts - If your account is enabled for private publishing, you can also select the
The Comments
section allows you to control the comment feature in the MultiCloud Marketplace.
- Allow users to leave comments on this ServerTemplate - If checked, users will be able to leave comments about your component in the MultiCloud Marketplace. Only users who are logged into the Dashboard can leave comments.
- Email me when a user comments on this ServerTemplate - If checked, an email notification will be sent to the provided Organization Email address. (Design -> Account Library -> Your Publishing Organization)
Click the Descriptions action button to proceed to the next step.
Descriptions
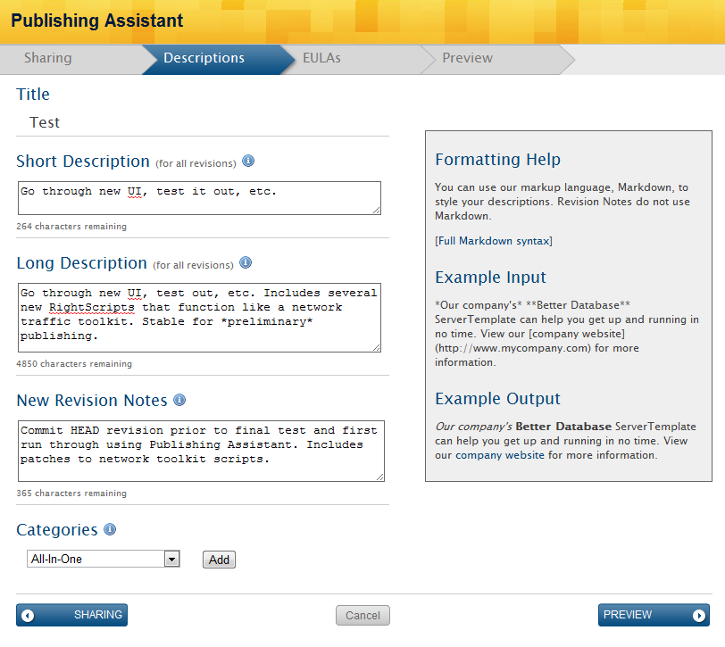
Fill out the Short and Long Descriptions for the component. For your convenience, both description fields are pre-populated with the ServerTemplate's current description. If you have published an earlier revision, the fields are pre-populated with the previously entered short and long descriptions. However, since these description fields will be saved in the MultiCloud Marketplace's database, you can actually provide different descriptions.
The provided descriptions will appear in the MultiCloud Marketplace for all previously shared revisions of that component.
You can update the New Revision Notes
as well, which are pre-populated with the component's Commit message for the selected revision.
Revision Notes are similar to commit messages in the Dashboard. They will be seen at the bottom of the shared component in the MultiCloud Marketplace. As a best practice, you should provide useful information about any changes, bug fixes, new features, especially if there's a previously published revision of that component in the MultiCloud Marketplace.
Categories allow users to more easily search for your publication in the MultiCloud Marketplace. The selected categories will be applied to all revisions of your publication. You can add multiple categories.
Notes:
- Markdown syntax is supported
- Hover over the blue information icon for additional help
- Character limitations are updated in real time as the fields are populated
Click the EULAs action button to proceed to the next step.
EULAs
EULAs currently apply to ServerTemplates only. This phase is not part of the Publishing Assistant when publishing other RightScale components (RightScripts, Macros or MCIs).
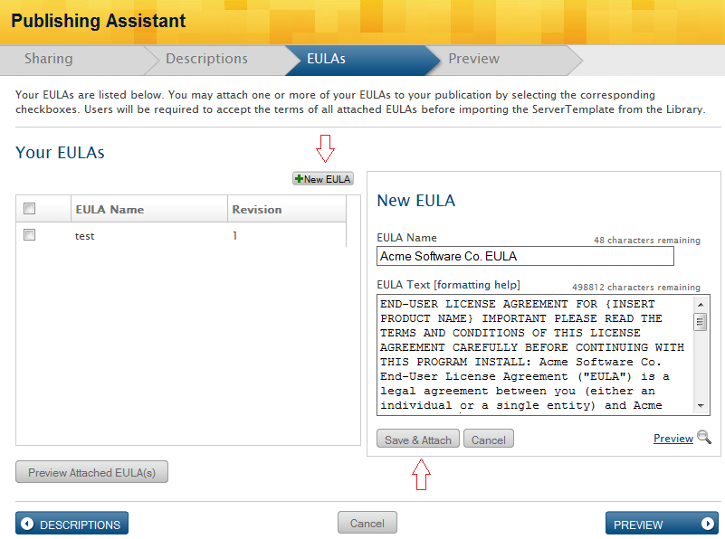
- EULAs can be managed outside of the Publishing Assistant. Simply select which EULA(s) should be attached to the ServerTemplate you are going to publish.
- You can also create and add a new EULA directly from within the Publishing Assistant.
- Click the New EULA action button
- Fill out the EULA Name and Text. Markdown Syntax is supported.
- Preview the EULA. Don't forget to select Save & Attach prior to continuing.
EULAs are not required when publishing RightImages, RIghtScripts, or Macros independently from a ServerTemplate.
Click the Preview action button to proceed to the next step.
Preview
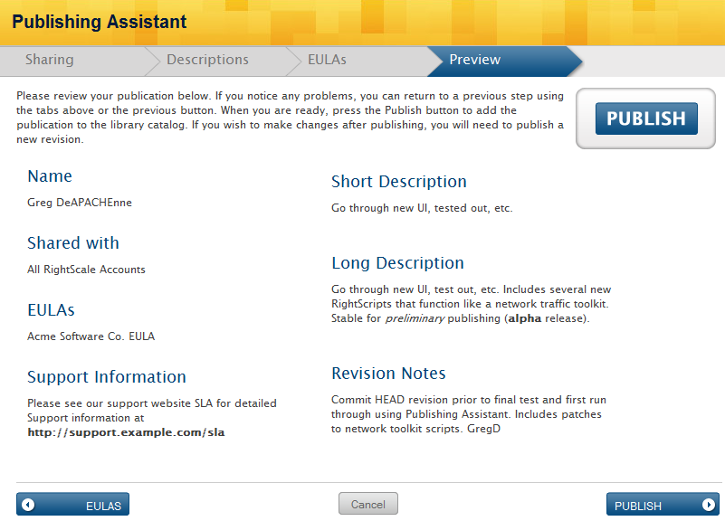
If everything looks correct, click the Publish action button.
Post Tutorial Steps
Categorize your ServerTemplate
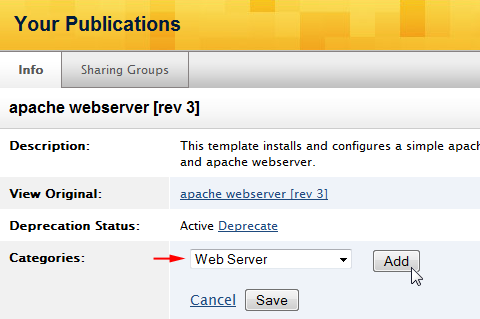
When you publish a ServerTemplate to the Public MultiCloud Marketplace Catalog, we highly recommend that you categorize the ServerTemplate so that it is easy to find by category in the MultiCloud Marketplace. Go to Design > Account Library > Your Publications. A component's categories can be managed under its Info tab. Click the Edit action link, then simply select a category from the pulldown and click the Add action button. Remember to click Save when done selecting categories. Although, you can add your component to multiple categories, please make sure that they are relevant for each topic.
Republish to MultiCloud Marketplace
- You can republish changes to a shared HEAD version that was previously published to the MultiCloud Marketplace. When you click the Republish to MultiCloud Marketplace action button any changes since the last time the HEAD version was published will be sent and updated in the MultiCloud Marketplace.
Manage previously published Components
- You can also manage components that were previously published under Design > Account Library > Your Publications.
View a ServerTemplate
Objective
View a ServerTemplate from either the local or MultiCloud Marketplace.
Background
You can view a ServerTemplate that is either local or in the MultiCloud Marketplace.
- local - Part of your
local
collection. ServerTemplates that are local have been either created new by you, or imported from the MultiCloud Marketplace. - MultiCloud Marketplace - Part of the MultiCloud Marketplace. View ServerTemplates published by RightScale, partners, or other users. You will also find any ServerTemplates that have been shared with the current RightScale account.
Steps
View Local
- Navigate to Design > ServerTemplates
- Any ServerTemplates that you either imported from the MCM or created from scratch will be displayed.
- Select the ServerTemplate you want to view.
- Use the
Filter by
options to narrow your search results.
View MultiCloud Marketplace
- Navigate to Design > MultiCloud Marketplace > ServerTemplates
- Select the ServerTemplate you want to view. Use the search and category options to narrow your search results.
- Search - Use the standard keyword search in the Dashboard's navigational menu to search for a ServerTemplate by name.
- Categories - Browse by category. ServerTemplates are grouped by function. Click
All
to view all ServerTemplates or click theShared
link to view the ServerTemplates that have been shared with the current RightScale account