Add New Cloud Support to a MultiCloud Image (MCI)
When a ServerTemplate is published, its MultiCloud Images (MCIs) are also published. Most ServerTemplates are published with multiple MCIs. However, there may be situations where the ServerTemplate cannot be used to Add a Server to a Deployment in the cloud of your choice because the template's MCIs do not support those clouds/regions. In such cases, you can either create a new MultiCloud Image from scratch or modify an existing MCI. This tutorial explains how to do the latter (i.e. clone and modify an existing MCI).
For this example, let's assume that you just imported a ServerTemplate from the MultiCloud Marketplace that uses MCIs that only support AWS regions. However, you want to use the same ServerTemplate to launch instances in another private/public cloud that RightScale supports.
Important! Be sure to add the appropriate RightLink tag to the new MCI, which is the last step of the tutorial otherwise, scripts will not be executed correctly on the Server.
Prerequisites
If you are adding an image for a private cloud, you must first upload the image to the private cloud itself before you can build an MCI that references it.
Steps
Go to the ServerTemplate's Images tab. Click on the MCI that you want to modify and add additional cloud support. The Clouds column shows all of the clouds/regions that are supported by a particular MCI. In the screenshot below, the MCI only supports the listed AWS regions.
Alternatively, you can also go directly to the MCI that you want to modify. (Design -> MultiCloud Images)

Clone the MCI
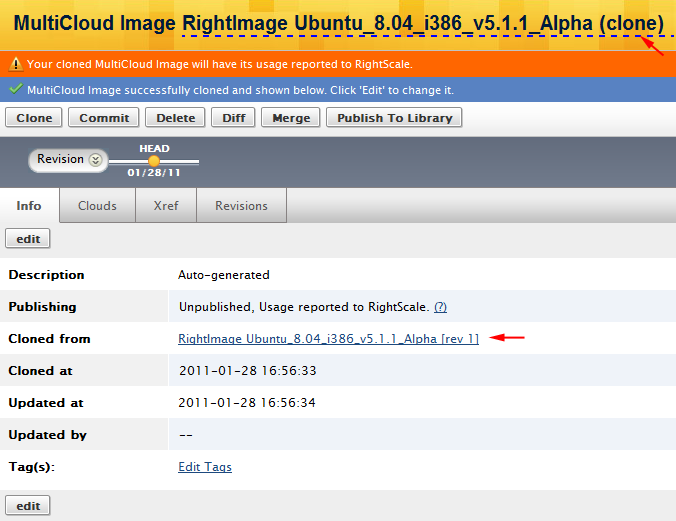
Since you cannot edit a committed revision of a MultiCloud Image, you must first clone it in order to create an editable version under Design -> MultiCloud Images. Click the Clone action button. Rename your cloned MCI. (optional)
Add an Image for Another Cloud
Click on the Clouds tab of the cloned MCI.
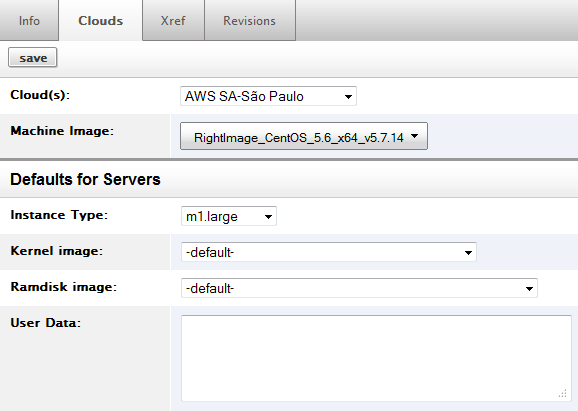
Click the Add button. Remember, as a best practice, each MCI should reference copies of the same underlying machine image. So, if you're adding an image for an MCI that's referencing RightImage_CentOS_5.4_x64_v5.6
images, you should only add a reference to an equivalent image in the newly added cloud. For example, it should have the same operating system (e.g. CentOS 5.4), system architecture (e.g. x64) and RightLink version (e.g. v5.6).
The information that's required to add an image will vary depending on the chosen cloud. Some examples are listed below.
AWS
As Amazon continues to launch new EC2 regions, you may want to update an existing MCI to include support for a newly launched region. RightScale often makes the latest RightImages available in the new EC2 region at launch time. If you cannot find an MCI that includes support for the new region, you can still modify an existing MCI and add support for the new region. If you cannot find the matching image in the new region you can create one yourself.

- Cloud - Select an AWS region.
- Machine Image - Select the appropriate machine image (e.g. RightImage) that will be used by the created Server. The selected image must be compatible with the selected instance type.
- Instance Type - Select the default instance type that will be used to launch the instance.
- Kernel Image - Select the appropriate kernel image that will be used to launch the instance.
- Ramdisk Image - Select the appropriate ramdisk image that will be used to launch the instance.
- User Data - Data to be passed into the instances at launch time. This field is rarely used but can be useful during development to pass configuration values into the instance.
Tag the MCI
After creating a new MCI, you must remember to add the following tag so that RightScale will be able to recognize and treat a launched instance appropriately.
Under the MCI's Info tab, add the following tag:
provides:rs_agent_type=right_link
Next Steps
Now that you've successfully modified your MCI to support another cloud/region, you can use the MCI in other ServerTemplates.
Clone a MultiCloud Image
You can clone a MultiCloud Image so that it becomes your own (Private) MCI that you can customize to suit your needs. You cannot edit a committed revision of a MultiCloud Image. You must clone it in order to create an editable version under Design > MultiCloud Images.
Steps
- Go to Design > MultiCloud Images. Select one of the available MCIs that you would like to clone.
- When you click the Clone action button, an editable copy of that MCI will be created.
- You may notice a warning message that the cloned object will have its usage reported to RightScale. This message is meant to convey the fact that RightScale is able to track the lineage of an object even if it's cloned.
By default, the version of an MCI will be incremented. For example, if you clone MCI v8
the new cloned version will be named MCI v9
. Therefore, we recommend changing the name of the MCI to help better distinguish the cloned MCI from its ancestor. Under the Info tab, notice that we always show where an MCI was cloned from.

Create a Custom RightImage for Faster Boot Times
You can modify a custom RightImage that will result in faster launch times. If you build a custom ServerTemplate that contains boot scripts that download large packages, you may experience very long server launch times (e.g. greater than 30 minutes). In such cases, you may want to include some of the large packages as part of the image in order to reduce overall server launch times. This tutorial describes the recommended steps for building a custom RightImages for optimal launch times.
Although it's a recommended best practice to use one of the base RightImages that were published with the ServerTemplate, there may be certain conditions (such as long boot times) that require you to build a custom RightImage. In such cases, it's strongly recommended that you follow the steps outlined below, which will make it easier to receive support from RightScale's Support team. It's difficult to troubleshoot a server that was launched with a custom RightImage because identifying all of the changes that were made to the underlying image can be difficult.
RightScale's RightImages create a root disk on the instance that's 10GB in size. Data that is stored in the ephemeral drive or in mounted voumes is not preserved and is included in a bundled image. Therefore, you cannot include an attachment that is 10GB in size. If you want to include a package that is larger than 10GB in size, you can use a snapshot that will create and attach a volume to the instance at boot time.
The instructions below apply to EC2 machine images.
Prerequisites
- 'actor' user role privileges
Steps for Linux
- Create a custom ServerTemplate that launches a fully configured server according to your specifications.
- Launch a few test servers using the ServerTemplate to record the average launch time.
- The next step is to clone the custom ServerTemplate, which you will use to create a custom RightImage. Name the ServerTemplate accordingly (e.g.
Image Builder
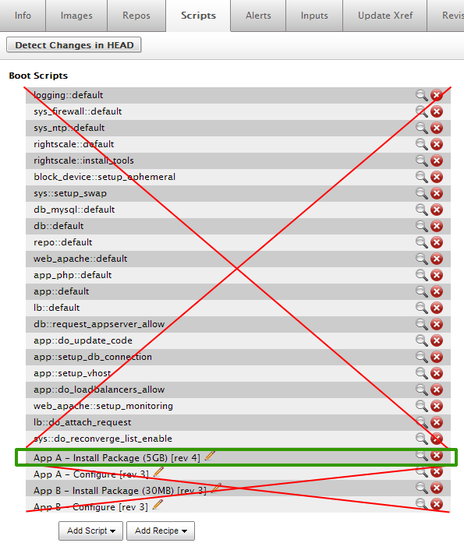
). - Under the cloned ServerTemplate's Scripts tab, remove all of the scripts from the Boot Script section EXCEPT for the custom RightScripts that install those large packages including the core set of RightScripts that are common to most ServerTemplates published by RightScale that set up monitoring, logging and timezone. In the example screenshot below, only the 'App A - Install Package (5GB)' script is kept in the boot list because it installs such a large package (5GB). If a script had to download 5GB of data each time a server is launched, it would take a long time to finish the boot script phase. Alternatively, you could also create a single script that will install and configure any applications and packages that you want to be permanently included at the image level.

- Use the
Image Builder
ServerTemplate to launch a server into the cloud/region where you want to build your custom image. (Remember, images are cloud/region-specific and can only be used to launch servers in the same cloud/region.) Clean the instance before you bundle a running instance and create a machine image of the VM. The clean-up process ensures that subsequent instance launches using the created image will be unique and not inherit previous SSH keys. For example, you will need to remove ssh keys, logs, rightlink state, etc. The commands may be different depending on the RightLink version.
SSH into the instance. For instances launched with a RightImage using RightLink v5.8+, switch to the 'root' user so that you can access and modify the directories below.
$ sudo -iRemove SSH Keys
# rm -vf /home/rightscale/.ssh/* (for RightLink v5.8+)Clear the Temp Directory
# rm -rvf /tmp/*Remove State
  # rm -rvf /var/cache/rightscale
  # rm -vf /etc/rightscale.d/*.js (for RightLink v5.7 or earlier)
  # rm -rvf /var/lib/rightscale (for RightLink v5.8+)
  # rm -rvf /var/spool/cloud/*
  # rm -vf /opt/rightscale/right_link/certs
Once the server becomes operational, click the Bundle button. Wait for the bundled image to be completed. The process can take several minutes (~20 min).
(Optional) If the bundled EC2 image is going to be used in a different RightScale account, you will need to also share the image with the other accounts.
Repeat steps 5-7 to create the same image in other clouds/regions.
Create a New MultiCloud Image (MCI) and add references to the custom images that you created across the different clouds/regions. Don't forget to tag the MCI with the appropriate RightLink tag.
Clone the original ST again, except this time you must remove the scripts from the Boot Script list that were used in the
Image Builder
ServerTemplate to build your custom image. Add the new MCI to the ServerTemplate and remove any other MCIs that you no longer want to be included. Make your new MCI theDefault
MCI for the ServerTemplate.Create and launch a server with the optimized ServerTemplate and compare the launch time against the original server. You should notice a significant reduction in the total launch time. Commit the ServerTemplate to save the changes or modify the
Image Builder
ServerTemplate to make further adjustments as necessary.
Create a New MultiCloud Image
This procedure describes creating a new MultiCloud Image. A MultiCloud Image is a RightScale component that functions as a map or pointer to images in specific clouds and/or AWS regions. Each ServerTemplate may reference one or more MultiCloud Images that define which image(s) (e.g. RightImages) should be used when a Server is launched in a particular cloud. ServerTemplates published by RightScale will use predefined and tested MultiCloud Images. However, if you are using custom images, you can create your own MultiCloud Image that will point to these other images. The reasons for creating your own MCI can vary. It could be possible that the ServerTemplate you would like to use doesn’t have an MCI that points to a RightImage in a new Amazon region or you might need to use your own image to comply with your company’s policy. The key benefit of the MCI is that you don't have to worry about selecting the appropriate image for each cloud/region when you create a Server. All you have to do is select the region and the MCI will automatically select the appropriate image for you.
You can either create a MultiCloud Image under the Design > MultiCloud Images or on-the-fly
when creating a ServerTemplate from scratch.
Be sure to add the appropriate RightLink tag to the new MCI, which is the last step of the tutorial otherwise scripts will not be executed correctly on the Server.
Prerequisites
- You must have 'designer' user role privileges
Steps
Typically, you will create an MCI that points to identical images in each cloud. If the images are different in any way (OS, system architecture, etc.) you should create a separate MCI for each type.
MCI Name and Description
In the CM Dashboard, go to Design > MultiCloud Images and click New.
First, you will need to provide some basic information about the new MultiCloud Image.
- Nickname – A short nickname that helps you recognize the MultiCloud Image.
- Description – A short description of the MultiCloud Image.
Select Images for each Cloud
Once the object has been created, you will be redirected to its Clouds tab where you must specify an image for each cloud or AWS region that the MultiCloud Image will support. The required information to complete the mapping will vary depending on the cloud.
AWS
You can only create a mapping to an image that's already available in the selected cloud. If you've created your own custom image that you want to use across multiple AWS regions, you will need to make a copy of the image available in each region that you want to launch an instance into.
If you are adding a reference to a private AMI (that belongs to your AWS account) and plan to publish and share the MCI with another RightScale account, you will need to first privately share the AMI with the other AWS account.

- Clouds – The cloud infrastructures (AWS US-East, AWS-EU, etc.) for which you are going to select an image. In order to create a MultiCloud Image, you must specify an image for at least one cloud. Remember, you can only specify a single image for each cloud. For example, you can't specify both a 32-bit and 64-bit image in the 'AWS US-East' cloud so that you can launch both small and large instance types with the same ServerTemplate. However, you can create multiple MCIs... for example, one with 32-bit images and small instance types for each cloud and another with 64-bit images and large instance types. A single ServerTemplate can reference multiple MCIs such as the the
small
andlarge
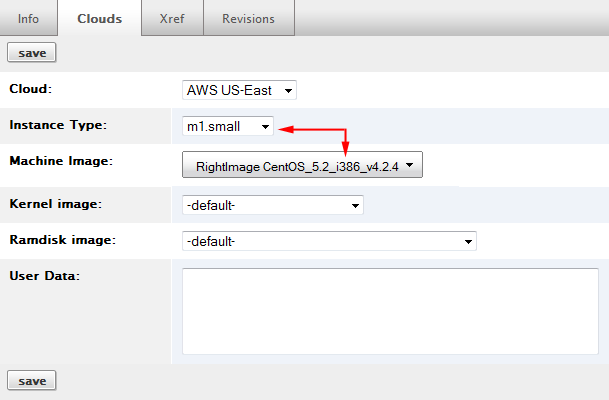
in our example. You will only be able to add and launch a Server into a cloud where the ServerTemplate's MultiCloud Image has an image specified. Therefore, if you want to use this MultiCloud Image to launch Server instances into both the 'AWS US-East' and 'AWS US-West' clouds, you will need to specify a single image for each cloud. Add additional clouds to the MultiCloud Image as needed. As you make your cloud selections, the drop-down will reflect which clouds you can still add MCIs for as you progress. (For example, if you're using AWS, the initial drop down could include AWS US-East, US-West and EU. If you select an image for US-East, the next time you add an image to that MCI only US-West and EU will be in the drop down menu.) - Instance Type – The type of cloud instance that will be launched by default. Instance types are cloud-specific. For AWS, EC2 instance types will be listed (e.g. m1.small, m1.large). Be sure to select the appropriate image that supports your default instance type. (e.g. m1.small, c1.medium instance types must use a 32-bit image (as shown above). Conversely, you will need to select a 64-bit image for any instance types that are larger than a medium (e.g. m1.large, m2.2xlarge, etc.). Be sure to check Amazon EC2 Instance Types for the latest instance types and charges. Note: It is not necessary to create a MCI for each instance type, only each architecture type (32-bit and 64-bit).
- Machine Image - Select the image that will be used to build and launch instances with this MultiCloud Image. When possible, it's recommended that you use the most recent version of our RightImagesTM. Warning: If you select a non-RightImage that has not been RightLink enabled, RightScale will not be able to provide any support for you and you will not be able to use any RightScripts of your own.
- Kernel image - The kernel that you want to use for your instance. (Optional)
- Ramdisk image - The ramdisk that you want to use for your image. (Optional)
- User data – Data to be passed into the instances using the EC2 user launch data (limited to 16KB). This field is rarely used but can be useful during development to pass configuration values into the instance at boot or runtime. (Optional)
Click the Save action button. Repeat the steps above to add additional images for other clouds.
Tag the MCI
After creating a new MCI, you must remember to add the following tag so that RightScale will be able to recognize and treat a launched instance appropriately and successfully execute scripts on the Server.
Under the MCI's Info tab, add the following tag:
provides:rs_agent_type=right_link
Delete a MultiCloud Image
You can delete a MultiCloud Image (MCI) from a RightScale account. When you delete an MCI, the component will be removed from the RightScale account and will no longer be visible under in the Dashboard under Design -> MultiCloud Images. You should only delete MCIs that you will no longer use in the future. When an MCI is deleted, all previous revisions and HEAD version will be removed.
You will only be allowed to delete an MCI that is currently not being used by any ServerTemplates in the RightScale account.
Prerequisites
- 'designer' user role privileges in the RightScale account
Steps
- Go to Design > MultiCloud Images. You can either delete an MCI at the index page or if you're viewing the show page for a selected MCI. Note: The Delete icon will appear next to each MCI in the index page regardless of whether or not it can be deleted.
- Remove all ServerTemplate dependencies. Before you can delete an MCI you must first remove any references to that MCI from any of the ServerTemplates in your local collection (Design > ServerTemplates). You can only delete a MultiCloud Image if none of its committed revisions or HEAD version are being referenced by a ServerTemplate. If you are viewing the MCI's show page, the Delete button will only be displayed when viewing the HEAD version of the MCI. If you attempt to delete an MCI that is being used by one or more ServerTemplates, you will receive the following error message:
Cannot delete as the MultiCloud Image (HEAD/committed revision) is being used by one or more ServerTemplates.
Use the MCI's Xref tab to see where it's being used. The Xref tab is revision-specific, so you will need to make sure that there are zero dependencies for each revision and HEAD version of the MCI. - Click Delete.
Publish and Share a MultiCloud Image
You can publish and share a MultiCloud Image (MCI) from the CM Dashboard. Typically MultiCloud Images are published and shared in the context of a ServerTemplate, however they can be published and shared individually. You can only publish a private component that was originally created in your RightScale account. (i.e. It was either created from scratch or cloned.) You cannot publish a committed revision of an component that you imported from the MultiCloud Marketplace (MCM). Note: A particular revision can only be published once.
Although you can publish a HEAD version, it's not a recommended best practice unless you're an advanced user that's actively developing and testing it across multiple RightScale accounts. It's recommended that you only publish and share committed revisions of a component.
If you share a MultiCloud Image that has a reference to a privately owned Amazon Machine Image (AMI) (i.e. the AMI was created using your AWS credentials) and want to share the MCI with another RightScale account, you must also privately share the AMI with the other AWS account otherwise the other RightScale account will not have access to use the referenced AMI.
Prerequisites
- 'publisher' user role privileges
Steps
- Navigate to Design > MultiCloud Images in the RightScale Dashboard.
- Select the MultiCloud Image (MCI) that you want to share.
- Select the committed revision that you want to share in the History Timeline Bar. (e.g. Rev 1)
- Click the Publish to MultiCloud Marketplace action button.
Update Imported MultiCloud Images
You can compare and/or import a newer revision of a MultiCloud Image that is available in the MultiCloud Marketplace (MCM). If you are using a MultiCloud Image that was imported from the MultiCloud Marketplace (or a slightly modified version that you created by cloning it), you may want to update the MultiCloud Image when a newer revision becomes available in the MCM.
Prerequisites
- 'designer' user role privileges
- 'library' user role privileges are required to import a newer revision from the MCM.
Steps
The steps required to update an imported ServerTemplate, RightScript, or MultiCloud Image are very similar.
The most common way to import the most recent revision of a MultiCloud Image is from the context of a ServerTemplate.