Overview
If you are following one of the end-to-end tutorials and building a 3-tier deployment for demonstration purposes, create a single security group that you can use for all servers in the deployment. Once you are successful setting up a 3-tier deployment using a single security group, you can set up more secure firewall permissions that would be more realistic for production environments.
Prerequisites
- 'security_manager' user role privilege
- An understanding of the Network Manager
Steps
- Go to Manage > Networks.
- Security Groups are cloud/region-specific. Select the network for the desired cloud/region into which you are going to launch servers (with the security group you are about to create). If an existing network is not available for use, you must first create a network. See Create a Network.
- Click the Security Groups tab.
- Click New Security Group. Provide the required information and click Save.
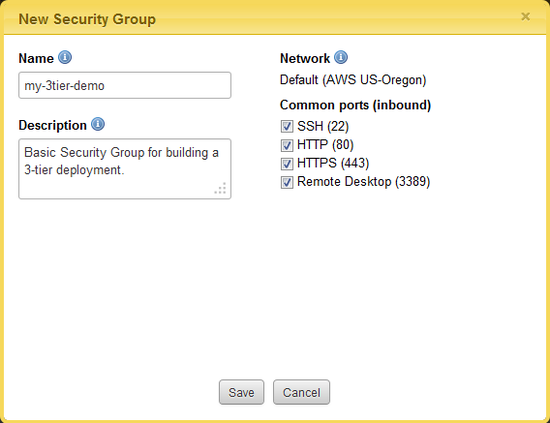
- Name - Enter a name for the new Security Group. (e.g. my-3tier-demo)
- Description (optional) - Provide a brief description about the security group.
- Network - The name of the network that the security group will belong to.
- Common ports (inbound) - Select any of the common ports for which you want to create firewall rules to allow ingress communication to instances launched with this security group. If a port is selected, a firewall rule will be created in the security group that will allow ingress communication from any IP address (0.0.0.0/0).
- Determine which additional firewall rules you need to create based upon the type of 3-Tier architecture you're going to build. See some of the examples below. Notice that some of the firewall rules use a more restrictive permission than 'any IP' (0.0.0.0/0) by adding the security group to itself. In the examples below, the security group is called '3tier'.
- HAProxy--IIS--SQL
- Inbound, TCP, 1433 , group:3tier (SQL Server)
- Inbound, TCP, 5022 , group:3tier (SQL Server)
- Inbound, TCP, 8000 , group:3tier (Web App)
- Inbound, TCP, 22 , 0.0.0.0/0 (any IP) (SSH)
- Inbound, TCP, 3389 , 0.0.0.0/0 (any IP) (RDP)
- Inbound, TCP, 80 , 0.0.0.0/0 (any IP) (HTTP)
- Inbound, TCP, 443 , 0.0.0.0/0 (any IP) (HTTPS) (Optional)
- ELB--IIS--SQL
- Inbound, TCP, 1433 , group:3tier (SQL Server)
- Inbound, TCP, 5022 , group:3tier (SQL Server)
- Inbound, TCP, 8000 , group:amazon-elb/amazon-elb-sg (Web App)
- Inbound, TCP, 3389 , 0.0.0.0/0 (any IP) (RDP)
- HAProxy--IIS--SQL
- Create any additional firewall rules, as necessary. Click New Rule. You can either create an IP-based or Group-based permission. You should have been able to select all of the required IP-based firewall rules when you created the security group. See the different example below to create all of the necessary firewall permissions for the 3-tier setup.
Example: IP-based Permission
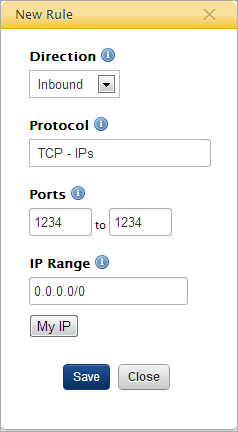
- Direction - The direction of the request, relative to the instance. Select Inbound.
- Protocol - Select the protocol(s) for the firewall rule.
- Ports - Specify a single port or range of ports for the firewall rule. (For a single port, put the number in both fields.)
- IP Range - Define the level of IP access using CIDR notation. For example, to allow any IP addresses (i.e. no IP restrictions), enter: 0.0.0.0/0.
Example: Group-based Permission
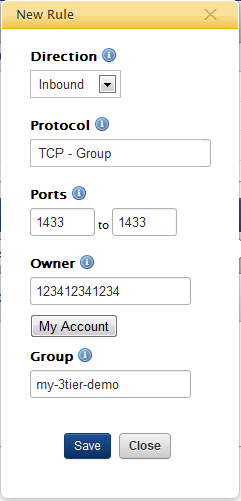
- Direction - The direction of the request, relative to the instance. Select Inbound.
- Protocol - Select the
group
protocol(s) for the firewall rule. - Ports - Specify a single port or range of ports for the firewall rule. (For a single port, put the number in both fields.)
- Owner - Specify the cloud account number of the security group to which you're going to allow access. For this example, you're going to add the security group to itself so that instances that use this security group will be able to establish connections on the private network (via a private IP address). Click the My Account button to auto-fill the field with the cloud account associated with the RightScale account.
- Group - Specify the name or ID of the security group for which you're creating the firewall rule. For a 3-tier example, enter the name of the security group itself. (e.g. my-3tier-demo)
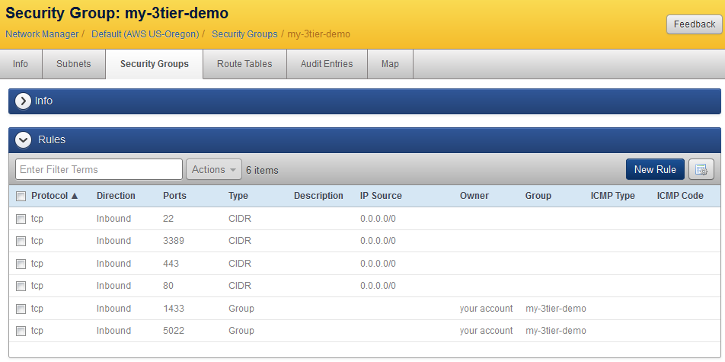
- Verify that you've created all of the necessary firewall rules correctly. The example screenshot below is a security group (called 'my-3tier-demo') that includes all of the required firewall rules for a basic 'HAProxy--IIS--SQL' deployment.
- (Optional) If you want to perform a basic ping test of your your servers after they become operational, you'll need to create an additional rule.
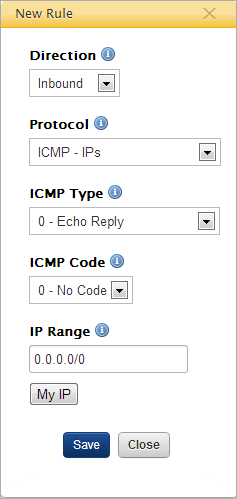
- Direction - Select Inbound.
- Protocol - Select ICMP-IP.
- ICMP Type - Select 0 - Echo Reply.
- ICMP Code - Select 0 - No Code.
- IP Range - Enter 0.0.0.0/0 or click My IP to use your own device's own public IP address for testing purposes.
- Congratulations! You now have a basic security group that you can use for all servers in a basic 3-tier deployment. Later you will want to consider using multiple security groups for more granular access controls.