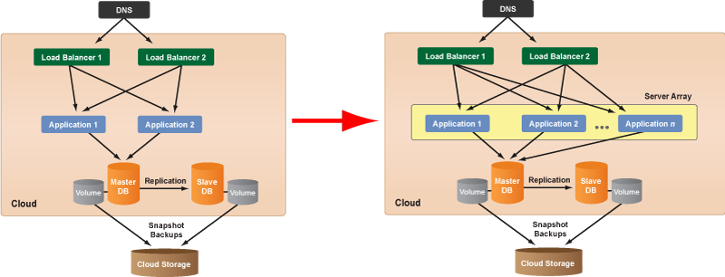
Add a Scalable Application Server Array to a Deployment
Objective
To add a scalable alert-based server array to a 3-tier deployment for autoscaling the application tier.
Prerequisites
- A running 3-tier deployment that was created by following one of the
3 Tier Deployment Setup
tutorials. - At least two operational application servers.
- 'designer' and 'actor' user role privileges
Overview
In this tutorial, you will perform the following actions:
- Create an alert-based, application server array.
- Add custom alerts for autoscaling purposes. (i.e. growing/shrinking the server array)
- Transition to a deployment that solely uses a server array for the application tier.
Steps
Create a Server Array
The first step is to create a new alert-based server array and associate it with your 3-tier deployment.
- Go to your 3-tier deployment's Servers tab. Go to the ServerTemplate that you used to create the application servers in the existing deployment. Since a server array is designed to launch identical instances with the same configuration, you will use the same ServerTemplate to launch and configure each instance into array.
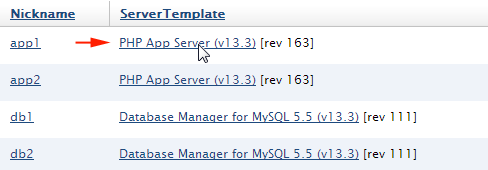
- Click the ServerTemplate's Add Array action button. Although you can use a HEAD version of a ServerTemplate it's strongly recommended that you use a committed revision of the ServerTemplate, especially for use in production environments. The use of a HEAD version of a ServerTemplate should only be used for certain development and staging environments.
- Select the compute Cloud into which the instances will be launched (e.g. AWS US-West) and your 3-tier Deployment. (Note: Once the cloud is selected for a server array, it cannot be changed.)
Server Details tab
Provide the required information under the Server Details tab.
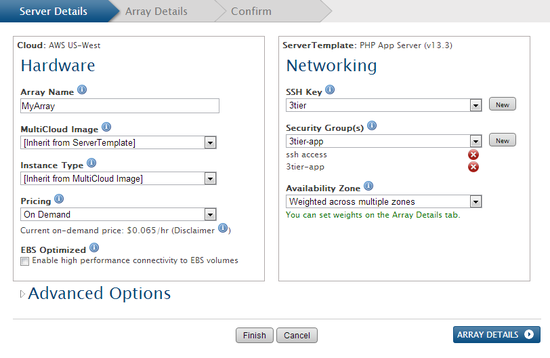
- Hardware
- Array Name - Enter a name for the server array. (e.g. MyArray)
- MultiCloud Image - Select the appropriate MultiCloud Image (MCI) based upon the desired operating system and distribution. If you do not have a preference, the MCI
- Instance Type - Select which instance type of the chosen cloud that will be used to launch new instances in the server array.
- Pricing* - Select which pricing option to use for launching new instances in the array. For example, AWS offers
on-demand
andspot
pricing options. - EBS Optimized* - (AWS only) Select this checkbox to use high performance connectivity to EBS volumes for supported instance types.
* Denotes cloud-specific options that may not be applicable based on the chosen cloud.
- Networking
- SSH Key* - Select the SSH Key that will be used to launch the instance.
- Security Group(s)* - Select which security group(s) will be used to launch the instance. Security groups are firewall settings that are enforced by the cloud provider. At least one security group must be selected. (Note: The specific firewall permissions of the security group can be modified at a later time.)
- Availability Zone* - The zone/datacenter into which the instances will be launched. If the cloud supports more than one zone/datacenter, it's strongly recommended that you use the 'Weighted across multiple zones' option to distribute instances in the array across multiple zones for high availability purposes.
* Denotes cloud-specific options that may not be applicable based on the chosen cloud.
Array Details tab
Provide the required information under the Array Details tab.
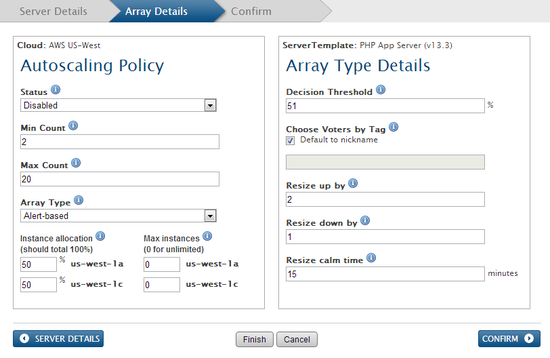
- Autoscaling Policy
- Status - Defines whether or not the array is active. It's strongly recommended that you keep the 'disabled' state until you have properly tested the array and confirmed that it will successfully launch instances that reach the operational state.
- Disabled - The array is inactive and will not be allowed to automatically resize based on its alerts.
- Enabled - The array is active and all of its preferences will take effect including min/max counts and resize policy (i.e. autoscaling)
- Min Count - The minimum number of instances that will be launched into the server array. If you are using a server array to launch all application servers in a deployment, it's strongly recommended that the minimum count is greater than one for high availability purposes. (e.g. 2)
- Max Count - The maximum number of instances that can be launched into a server array. (e.g. 20)
- Array Type - Select the Alert-based option since you are going to create alerts to trigger resize actions. (i.e. autoscaling up/down)
- Array Type Details
- Decision Threshold - Resize action (grow/shrink) will be based on a voting system where each application server has a voting tag based on whether or not any of the alert specifications defined for autoscaling exists. This parameter defines the percent of voting servers that must exist before a resize action can occur. The default setting (51%) ensures that a majority of the servers must vote for the same scale up/down action in order to trigger a resize of the array (i.e. autoscaling). See Understanding the Voting Process for details.
- Choose Voters by Tag - Defines the tag that RightScale's elasticity daemon will check for to determine who is a
voter
for this particular server array. You must make sure that each server array has a different voter tag otherwise you may have servers in a different deployment that are voting and causing resize actions for an incorrect server array. If you do not have a strong preference for a voter tag, it's recommended that you simply use the default option, which uses the server array's nickname as the voter tag. (e.g. MyArray) (Important: The voter tag is case sensitive.) - Resize up by - Defines how many new instances you want to launch when you grow (i.e. scale up). When a decision is made to
grow an array,
we recommend launching at least 2 servers in order to ensure that a significant impact will be made to your setup. Remember, if your deployment needs more server resources, it's better to overcompensate than under-compensate. Similarly, if you have larger setups or you have a predictable scaling pattern (ex: 5 servers at a time), you also have the flexibility to scale in bulk. (e.g. 2) - Resize down by - Defines how many new instances you want to launch when you grow (i.e. scale up). (e.g. 1)
- Resize calm time - The calm time defines how long you want to wait before you repeat another action. Since it takes a few minutes for a new server to be launched and become fully operational, you'll want to give yourself a buffer before another action can be taken. For normal situations, we recommend using a calm time of 15 minutes. (e.g. 15)
- Click Confirm.
- Review your choices and click Finish.
Add Alerts for Autoscaling
The next step is to add custom alerts for autoscaling purposes. It's important to remember that any voting
server must have the same set of custom alert specifications. For example, if you have any application servers that you created and launched in the context of the deployment (i.e. servers listed under the deployment's Servers tab), you must make sure each of them have the same alerts as the server array.
In this example, you're going to replace the current application servers in the deployment with a scalable server array of application servers, which will allow your application tier to grow
by launching additional application servers or shrink
by terminating existing application servers that are no longer needed to handle the current work load. Therefore, you can add the alerts at the server array level (under the server array's Next Alerts tab), so that any new instances launched into the array will be configured with the same alerts. Another option would be to add the alerts at the ServerTemplate level, but then it would be difficult to use the same ServerTemplate in a different context because it would contain deployment-specific alerts.
- Go to the server array's Next Alerts tab.
- Create an alert specification for growing the array. Click New.
- Name - Enter a name for the alert. (e.g. Grow Array)
- Description - Enter a brief description. (e.g. Launch additional instances into the server array.)
- Condition - Enter the condition under which an alert will be triggered for a 'grow' action. The condition consists of a specific metric, threshold, duration for which the condition must exist, and the desired voting action (grow/shrink) that will be taken. The tag will dynamically change on the server when an alert is triggered. Instead of associating the alert specification with an alert escalation, you're going to set a tag on the server that will be used for voting for a resize (autoscaling) action.
- metric : 'cpu-0/cpu-idle'
- threshold : < 30%
- duration : 5 minutes
- vote : vote to 'grow' server array by setting the voter tag 'MyArray' (RightScale's elasticity daemon will evaluate the number of voters for a resize action by finding all servers with the matching voter tag.)

- Click Save when ready
- Create an alert specification for shrinking the array. Click New.
- Name - Enter a name for the alert. (e.g. Shrink Array)
- Description - Enter a brief description. (e.g. Terminating servers that are no longer needed.) Note: The oldest instance (i.e. the one with the earliest launch time) will be terminated first.
- Condition - Enter the condition under which an alert will be triggered. You will most likely want to use the opposite condition as the
grow
alert specification_._ - metric : 'cpu-0/cpu-idle'
- threshold : > 70%
- duration : 5 minutes
- vote : vote to 'shrink' server array by setting the voter tag 'MyArray'
Configure Inputs
Since you already defined values for the inputs that are required by the application
ServerTemplate at the deployment level when you created the 3-tier deployment, you should not have to define any inputs prior to launching a test instance. However, if there are any missing inputs that need to be defined, it's strongly recommended as a best practice that you define all inputs related to the server array under the deployment's Inputs tab.
The Input confirmation screen that you are typically used to seeing in the dashboard when you launch a single server in a deployment, is not displayed when an instance is launched in a server array either manually or automatically (because of a resize action). Therefore, it's important that all required inputs have correct values set otherwise the instance may become stranded in booting.
- Go to the deployment's Inputs tab and provide values for any missing inputs that are required by any boot scripts.
Test the Server Array
As a best practice, you should always manually launch a single instance in a server array to verify your configuration settings.
- Go to the server array and click the Launch action button. If you have configured your inputs correctly, the server will reach the operational state. If the server becomes
stranded in booting,
terminate the server and check your inputs again.
Enable the Server Array
Once a server array is enabled (i.e. active) it's allowed to autoscale by either resizing up or down based on the predefined alert conditions. Minimum and maximum server count settings will also take effect.
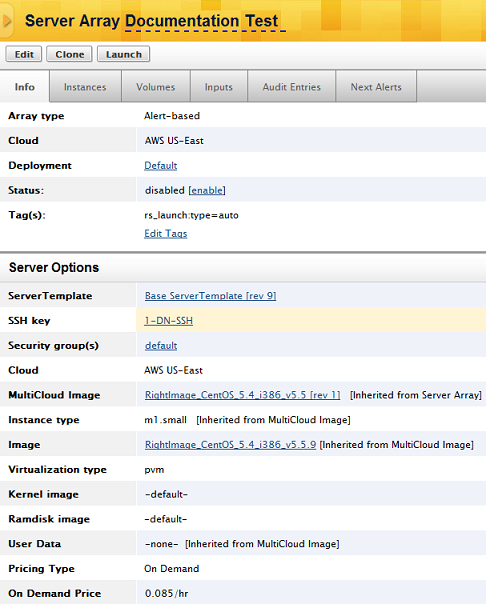
- Go to the server array's Info tab and click the enable text link for the
Status
field. If the server array does not have enough running servers to meet the minimum server count (e.g. 2), RightScale's elasticity daemon will evaluate the number ofoperational
servers in the server array and launch enough new servers to satisfy the minimum server count. Note: Onlyoperational
servers will satisfy the array's minimum instance count.
Clean-up Application Server Tier
Most users find it useful to simply use a server array for managing the entire application tier instead of managing dedicated application servers in a deployment, as well as a server array. For example, if you want at least two running application servers at all times, you can simply set the application server array to have a minimum server count of two. Remember, any server that needs to be a voter
for an autoscaling action needs to inherit the correct alert specifications for voting for a grow/shrink resize action of the array. In this tutorial, you added the alert specifications to the server array so that any new servers launched into the array will inherit the same alerts for autoscaling. If there are any running application servers in the deployment, you may want to terminate them because they do not have the proper alerts for autoscaling and are therefore unable to vote for a scaling action.
- If the server array has a minimum server count of two and you have at least two operational application servers in the array that are properly connected to the load balancer tier and master database server, go to the deployment's Servers tab terminate any running application servers.
- Once the servers are terminated, delete the servers from the deployment.
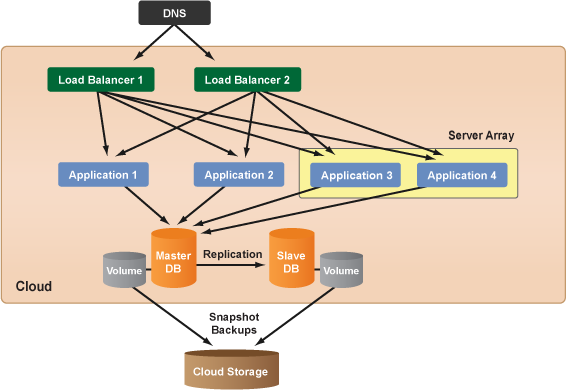
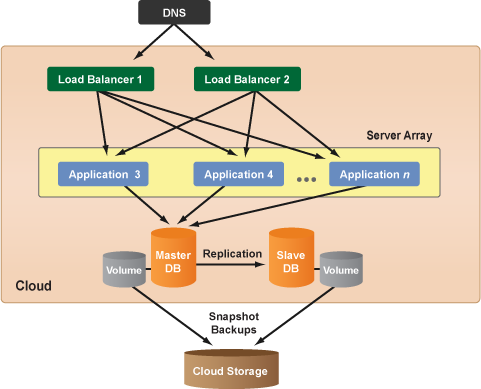
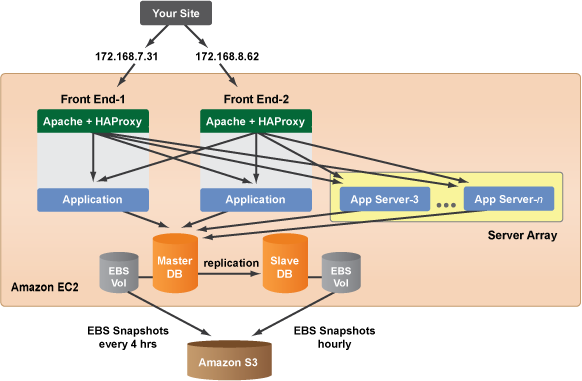
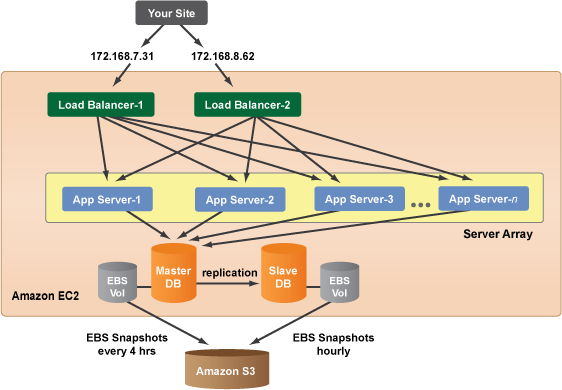
The deployment should now have a reference architecture similar to the following diagram.
Post Tutorial Steps
Test the Server Array for Autoscaling (Optional)
Use the following tutorial to perform an autoscaling test on the alert-based server array to verify that the alerts and resize actions are occurring as expected.
Add Server Array Assistant
Overview
Adding a server array to a deployment is done through a flow of selecting a ServerTemplate, configuring the Server Details, Array Details and then reviewing your selections for confirmation. On the Confirm tab, you have the option of saving your settings as defaults for adding future servers to that specific deployment. Be sure to take advantage of the information offered in the tooltips throughout the add server array flow. Just hover over a tooltip to view additional information about that specific component.
Choose a Cloud
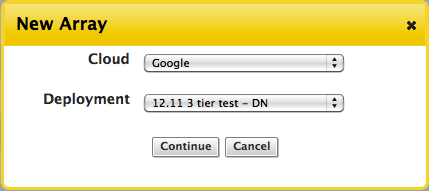
You may add a server array from the array index page by navigating to Manage > Arrays. There, you can view all of your active and inactive servers arrays with the option of adding a new server array by clicking New Array.
After clicking New Array, you will be prompted to choose a cloud and specify a deployment to add your server array. After making these selections, you will then be taken through the add server array flow to configure the rest of your settings. You also have the ability to add a server array directly from your desired deployment by navigating to Your Deployment > Add Array.
Add a New Array
There are several different ways to get to the Add Server Array Assistant in the Dashboard.
- Manage > Deployments > Deployment_Name > Add Array
- Manage > Arrays > New Array
- Design > ServerTemplates > ServerTemplate_Name > Add Array
Choose a Cloud
When you click the Add Array button you will be prompted to make a cloud selection. Select the cloud where you will eventually launch the array. (Servers are cloud-specific.)
If you are adding a server array through the Design > ServerTemplate route or through the Manage > Arrays > New Array route as shown above, you will need to specify a cloud and deployment.
If you are adding the array directly from a deployment, the Deployment
row will be hidden and you will only need to specify a cloud.
Note: You will only be able to create a server in the chosen cloud if one of the ServerTemplate's MultiCloud Images supports that cloud.
Make your selections and click Continue.
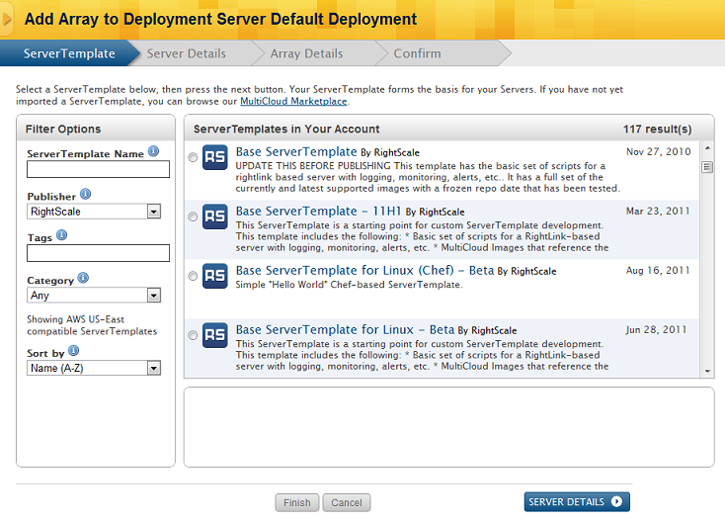
Choose a ServerTemplate
The next step to add a server array to a deployment is to select a ServerTemplate. Available to you are the ServerTemplates that exist in your account. There are multiple ways to find the ServerTemplate of your choice by using the Filter Options on the left. Enter the name of the ServerTemplate or sort the list by using one or several of the Filter Options including Publisher, Tags, Category, and Name or Date. After choosing a ServerTemplate, select its revision you would like to use and proceed to Server Details.
Finish takes you to the show page of your server array where you can edit settings and launch your server if you have the minimum of required components. Cancel will cancel your selections and take you back to the Server Array index page or the Servers tab of your deployment. Confirm will take you to the Confirm tab and allow you to review your settings while also giving you the option to make these settings your Server Defaults.
Configure Server Details
The Server Details tab allows you to configure your server array by making selections under Hardware and Networking. Server Details will show particular fields and options depending on which cloud you chose to launch your server array. The Hardware section shows the basic settings of your server array tied to the ServerTemplate you chose in your previous step. Here, you can change the name of your server array and select a MultiCloud Image and Instance Type. The Networking section displays the security and network options for your server array. Each cloud also offers different Advanced Options, available below the Hardware section.
Each Server Details tab looks has different fields depending on which cloud was chosen. For more detailed information on the Server Details of each cloud, see below.
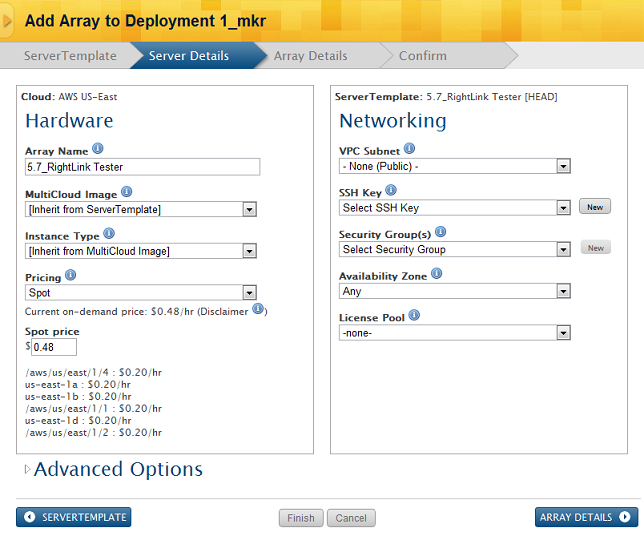
AWS

- Array Name - Provide a name for the server array.
- MultiCloud Image - Select the MultiCloud Image to be used for the Server Array. The default MultiCloud Image is inherited from the ServerTemplate.
- Instance Type - Select the type of instance that will be launched. By default, the instance type is specified by the chosen MCI, however it can be overwritten if you want to launch a smaller or larger instance type.
- Pricing - Choose either Spot or On Demand for your instances.
- EBS Optimized - Check the box if you want to launch instances that use optimized EBS volumes for better performance. Note: Additional charges from Amazon do apply.
- VPC Subnet - If applicable, specify a subnet of your Virtual Private Cloud (VPC).
- SSH Key - The SSH key that will be used by all servers in the server array.
- Security Group(s) - Select one or more security groups that will be used by all servers launched in the server array.
- Availability Zone - Specify which availability zone(s) new server instances should be launched into.
- Use the 'any' option if you want the cloud provider to choose which zone the server will be launched. There is no guarantee that the instances will be launched evenly across all zones. For example, all instances could be launched into the same zone. Therefore, if you want instances to be evenly distributed across all zones, you should use the 'weighted' option instead.
- If
Weighted across availability zones
is chosen, you will see a green message:You can set weights on the Array Details tab.
There, you can set probability percentages of instance allocation that total 100% and specify a max number of instances for each availability zone.
- Machine Image - The AMI that will be used to build the machine. RightScale will only support instances launched with one of our RightImages. We recommend using ServerTemplates with RightImages.
- Ramdisk Image - Select a Ramdisk image of your choice. (optional)
- Kernel Image - Select a kernel image of your choice. (optional)
- Ec2 user data - This information is passed to the instance using the EC2 user launch data mechanism which is limited to 16KB of data. The best way to pass configuration data into instances is with RightScripts, but this user data field is sometimes useful for testing purposes.
AWS Pricing
With an AWS server, you have the option to choose the type of pricing for your instance. The default is On-Demand, with the current On-Demand price listed right below. If you select Spot from the Pricing dropdown, the current spot prices will be viewable for each Availability Zone.
Google Compute Engine
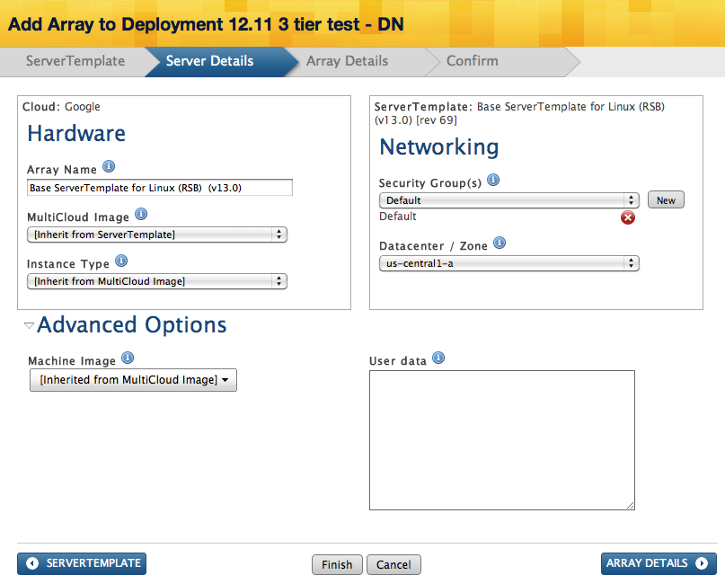
- Array Name - Provide a name for the server array.
- MultiCloud Image - Select the MultiCloud Image to be used for the Server Array. The default MultiCloud Image is inherited from the ServerTemplate.
- Instance Type - Specify the type (size) of instance to launch.
- Security Group - Security group that will be used by all servers in the server array.
- Datacenter / Zone - The regional datacenter in the cloud (Datacenter and Zone are synonymous). A cloud will often have multiple Datacenters which can help when architecting a highly available deployment.
- If Weighted across availability zones is chosen, you will see a green message:
You can set weights on the Array Details tab.
There, you can set probability percentages of instance allocation that total 100% and specify a max number of instances for each availability zone.
- If Weighted across availability zones is chosen, you will see a green message:
- Machine Image - The image that will be used to build the machine. RightScale will only support instances launched with one of our RightImages. We recommend using ServerTemplates with RightImages.
- User data - This information is passed to the instance. The best way to pass configuration data into instances is with RightScripts, but this user data field is sometimes useful for testing purposes.
Configure Array Details
Alert-based Arrays
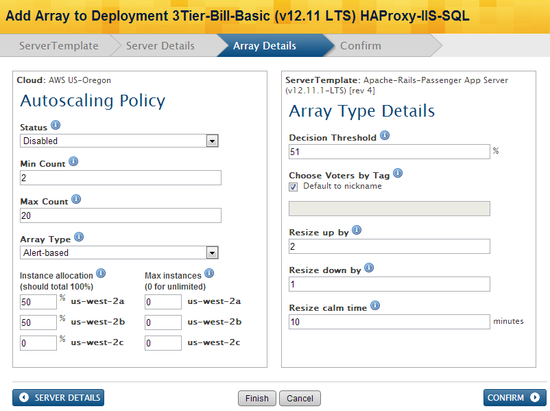
- Status - The status of the server array. If active, the server array is enabled for scaling actions. For alert-based arrays, if you disable an array with running instances, the server array will no longer be able to scale up or down, but the instances will continue to run until they are manually terminated. It's recommended that you keep the server array disabled until you have manually launched and tested instances into the array because you do not want to enable an array with a minimum count of 10 and have 10 servers strand in booting because there was an error in the configuration.
- Min Count - The minimum number of active servers that must exist at all times in the server array. If you are setting up a multi-tier deployment, it's strongly recommended that you have a minimum count of two (2) for redundancy purposes.
- Max Count - The maximum number of active servers that must exist at all times in the server array.
- Array Type - Specify alert-based or queue-based arrays. Secondary options will change accordingly.
- For Weighted Arrays - If
Weighted across availability zones
was chosen in the previous Server Details tab, you can set probability percentages of instance allocation that total 100% and specify a max number of instances for each availability zone. It's strongly recommended that you distribute the instances in the array across multiple zones (if available) to protect against a single zone failure from affecting the entire application tier.
- For Weighted Arrays - If
- Decision Threshold - Percent of votes that must be made by all application servers in order to trigger an alert escalation and resize the server array. Typically, you will want to specify that a majority of your application tier is experiencing a problem before you want a scaling action to occur. If you set the threshold too low, you may experience premature and unnecessary scaling actions.
- Choose Voters by Tag - The Voters Tag that RightScale will use in order to determine when to scale up/down. For example, the elasticity daemon will look for all servers with the specified tag (e.g. MyArray) when counting the number of votes for a scale/up action. When the number of votes for a particular scaling action (e.g. grow) exceeds the decision threshold, the server array will automatically scale based on the specified resize parameters. By default, the name of the server array will be used as the voter tag, however you can specify a different string if desired. If you use the nickname of the server array as the voter tag, it's recommended that you use a simple string. (e.g. my-tag)
- Resize up by - Number of servers that should be added from a server array when a resize action occurs. Typically, you will want to use a more agressive value for scaling up and a more conservative value for scaling down.
- Resize down by - Number of servers that should be removed from a server array when a resize action occurs.
- Resize calm time - Time (in minutes) that must pass before another action can be taken on the server array. The calm time prevents an array from being resized too frequently. Be sure to allow enough time for the server to become operational and start taking load. You should always test the server array and determine the nominal launch time for your configuration in order to determine the appropriate calm time for your application. Clouds, instance sizes, and the time required to complete all the boot scripts are all factors that should be taken into consideration.
Queue-based Arrays (EC2-only)

- Status - The status of the server array. If active, the server array is enabled for scaling actions.
- Min Count - The minimum number of active servers that must exist at all times in the server array.
- Max Count - The maximum number of active servers that must exist at all times in the server array.
- Array Type - Specify alert-based or queue-based arrays. Secondary options will change accordingly.
- Elasticity Function - Defines how the server array should grow/shrink. (size or age)
- Items per Instance - Max number of items in queue per operational instance.
- Indicator Queue - Select the input SQS queue that contains all of the job tasks.
- Audit Queue - Select the audit SQS queue that will store audit entries.
Confirm Settings
The Confirm tab for adding a server gives a summary of details for your server array, as well as a list of Alerts that are inherited from the ServerTemplate you selected. The selections listed in the Confirm Details section summarize the settings for your server array. You have the option of saving these settings as defaults for future servers arrays used in that deployment. For more information, see Server Defaults.
Clone a Server Array
Objective
To clone an existing server array and all of its components.
Overview
When you clone a server array, you create an exact copy of its configuration as well. Your new array will be identical, but with a new name and disabled by default. The server array clone will use the same ServerTemplate, SSH key, security group in the same cloud in the same deployment.
Steps
Go to Manage > Arrays > array name.
Click Clone. The nickname of the array is automatically changed from 'Server Array' to 'Server Array v1' or from 'Server Array v1' to 'Server Array v2' etc. You will be redirected to the info tab of the cloned server array.
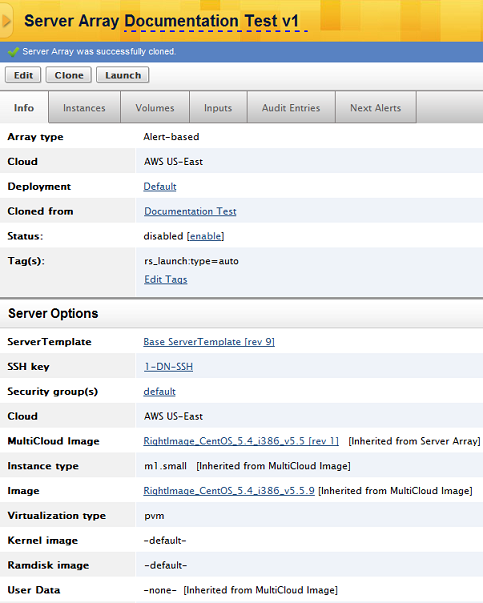
The following parameters are applied to the new array:
- The schedule gets cloned.
- Only alerts on the ServerTemplate get cloned, and not alerts defined on the server array.
- If you set a vote alert on the ServerTemplate, then you need to specify a custom value. The corresponding voter tag value then must be set on each server array as well.
- The cloned array does not vote for the old server array. The cloned server array does not inherit any such custom voter tag value. Instead it will use its generated nickname as the voter tag value.
- The tag(s) of the server array will also be cloned and included in the cloned array.
- Voter alert specs get cloned that match the new nickname.
Copy Alerts to All Instances in an Array
Objective
To apply the alerts in a server array from 'Next' to current instances.
Prerequisites
- Requires 'actor' user role privileges to use this feature.
Overview
This feature allows you to apply the alerts from 'Next' in a Server array to all the current instances. Any edits or new alerts added to the Next Alerts tab of your server array can be merged into the current running instances with bulk selection and update. Also, you may delete alerts from an array in bulk with this action reflected on all active instances without having to relaunch the instances or delete the alerts from each instance individually.
Steps
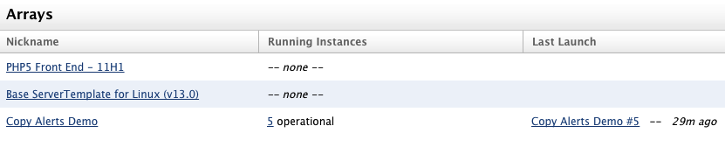
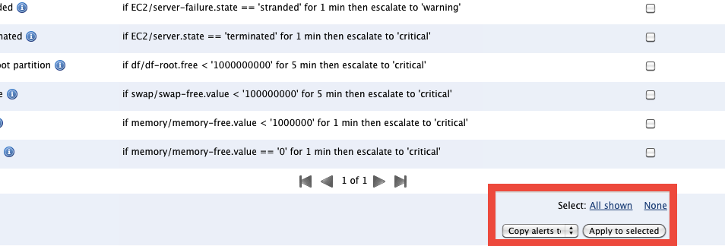
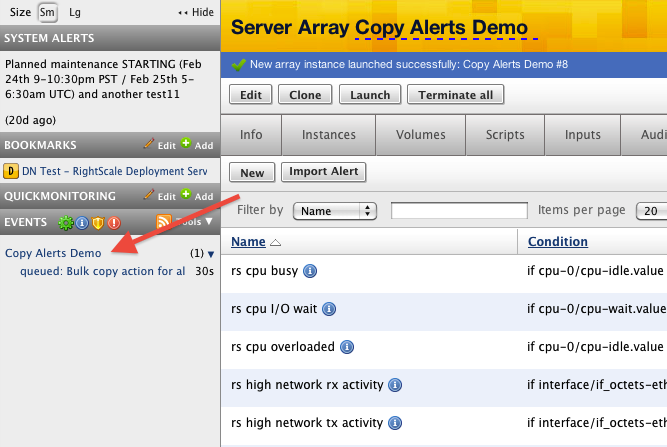
Navigate to your array ( Manage > Arrays > Your Array). The Arrays page is shown here.
Click on the Next Alerts tab, where your alert specifications are listed. This is the list of alerts specified in your ServerTemplate and/or added by you. Any alerts imported or created for this array will automatically be included in future instances launched in this array. However, if you would like to apply these alerts to current running instances in your array, you can select which alerts you want to copy to the running instances, select
Copy alerts to all array instances
and click Apply to selected.
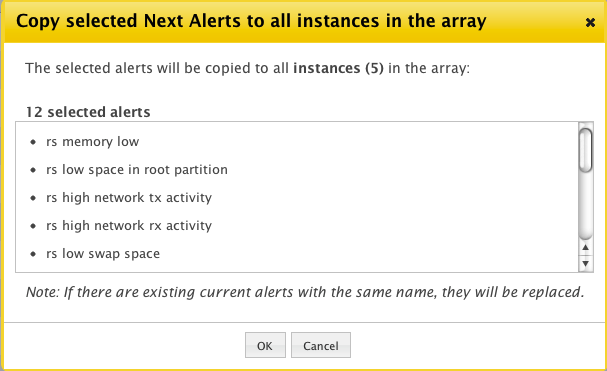
- A confirmation will display, listing all of the alerts that you selected and the number of instances that will be updated. Click OK to confirm.
- Click Audit Entries to view a summary of your action.
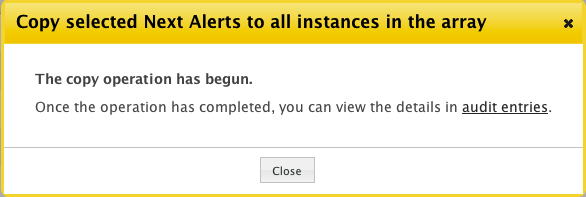
Or Check the events pane to track the status of your action.
Create a New Alert-based Server Array
Objective
To create an alert-based server array.
Overview
Alert-based server arrays are typically used to set up an application tier for autoscaling purposes.
Steps
To create a server array, go to Manage > Arrays. You will need to select the cloud infrastructure or region where the server array instances will be launched. Instances that are launched in an array must exist in the same region, but can be dispersed across multiple availability zones within the same region. You will add the server array through the Add Server Array Assistant.
Provide the following information:
ServerTemplate Tab
ServerTemplate - Choose the template that you would like to use in order to scale your deployment. This ServerTemplate will be used to create the new servers that will be added to the server array. Since you are scaling the number of application servers, you will need to select the latest version of the appropriate (PHP/Rails/Tomcat) application ServerTemplate, not a frontend ServerTemplate. (If you need to make changes to the template, you will need to clone it.)
Note: Make sure that the Inputs for the ServerTemplate are properly configured and that they will boot correctly.
Server Details Tab
- Cloud - Each array must be associated with a cloud or cloud region.
- SSH Key & Security Group - Specify the appropriate SSH key and Security Group(s) that will be attached to the array (if required by the cloud provider).
- Datacenter/Zone or Availability Zone - Choose a datacenter/zone or availability zone within your cloud (if required by the cloud provider). If weighted across... is chosen, you may then fill in the Instance allocation fields and Max instances for each in the Array Details tab.
Array Details Tab
AutoScaling Policy
- Status - The status of the server array. If active (enabled), the server array is allowed to respond to triggered alert conditions and autoscale. For alert-based arrays, if you disable an array with running instances, the server array will no longer be able to scale up or down, but the instances will continue to run until they are manually terminated. If you are setting up the server array for the first time, you may want to manually launch a few application servers into the array to make sure that the configurations are correct before you enable the server array. For example, you do not want to enable a server array with a minimum count of 10 and have all of the servers strand in booting because of a bad configuration.
Warning! If a server array is enabled and an instance strands in booting and does not become operational, additional instances will be launched into the array until there are enough operational servers that meet the minimum count or the maximum count is reached. Therefore, it's strongly recommended that you test the array's configuration and manually launch a few servers into the array before you enable it and make it active.
- Min Count - The minimum number of active servers that must exist at all times in the server array. If all of your application servers are going to be launched into the server array, you should set the minimum count to two (2) where each server is launched into a different zone (if supported by the cloud) so that your site will remain functional if one of the application servers goes down.
- Max Count - The maximum number of active servers that must exist at all times in the server array.
- Array Type - Specify alert-based or queue-based arrays. Secondary options will change accordingly.
- Instance Allocation * - Give the percentage probability you would like for a new instance to land in the given datacenter / zone or availability zone.
- Max instances * - Maximum number of instances that may be launched in the given datacenter / zone or availability zone.
*For Weighted Arrays - If Weighted across availability zones
was chosen in the previous Server Details tab, you can set percentages of instance allocation that total 100% and specify a max number of instances for each availability zone.
Array Type Details
- Decision threshold - The elasticity decision threshold is the percentage of servers that must agree in order to trigger an alert before an action is taken. Each server can vote once for a particular alert. Default = 51%. We recommend setting this value to 51% or larger in order to ensure that the majority of your servers agree before action is taken. The decision threshold prevents unnecessary
scale ups
because of one outlier server that is out of control. This is what we mean when we say that we scale democratically. - Choose voters by tag - The Voters Tag that RightScale will use in order to determine when to scale up/down. For example, the elasticity daemon will look for all Servers using the specified tag (e.g. MyArray) when counting the number of votes for a scale/up action. When the number of votes for a particular scaling action (e.g. grow) exceeds the decision threshold, the server array will automatically scale based on the specified resize parameters.
- Resize by - The resize parameter defines how many servers you want to launch when you scale. When a decision is made to
grow an array,
we recommend launching at least 2 servers in order to ensure that a significant impact will be made to your setup. Remember, if your deployment needs more server resources, it's better to overcompensate than under-compensate. Similarly, if you have larger setups or you have a predictable scaling pattern (ex: 5 servers at a time), you also have the flexibility to scale in bulk.- Resize Up by: Number of servers to scale up by
- Resize Down by: Number of servers to scale down by
- Note: Typically, you will want to resize down more conservatively than how you resize up so that you don't accidentally terminate too many instances that would either degrade your site's performance or immediately result in a resize up action.
- Resize calm time - The calm time defines how long you want to wait before you repeat another action. Since it takes a few minutes for a new server to be launched and become fully operational, you'll want to give yourself a buffer before another action can be taken. For normal situations, we recommend using a calm time of 15 minutes.
Click Save.
Test the Server Array
Before you enable the server array and make it active, it's important to first test the configuration of the server array.
- Go to the server array and click the Launch button to manually launch a single instance into the array.
- If the server becomes operational, it's probably safe to enable the array. If the server becomes stranded in booting, you should troubleshoot the problem by looking into its audit entries. Terminate the instance and fix the array's configuration. Repeat the steps above until you are able to successfully launch a single instance.
!!info*Note:* If you are using load balancing service and are setting up the deployment for the first time, you should not enable the array until you have created your CLB.
Create a New Queue-based Server Array
Objective
Create a queue-based application server array.
Prerequisites
- Amazon SQS Queues must be enabled on the AWS account. See Sign-up for Additional Cloud Services.
- Requires a paid edition of RightScale. To upgrade, contact sales@rightscale.com
Overview
A Server Arrays is made up of identical servers running in the cloud. Queue-based arrays are commonly used for performing batch processing tasks, where each server is a worker instance that's used to process items (work units) in an SQS input queue. Instances that are launched into an array must exist in the same region (e.g. AWS US-East), however you can control into which availability zones within that region that instances will be launched. Additional availability zone data transfer costs may apply.
You can use the RightScale Cloud Management Platform to monitor the number of items and scale up the number of instances in the server array accordingly. Currently, a server array can be configured to scale up based on the number of items in the queue or the age of the items in the queue. However, you are ultimately responsible for determining how to scale down the array. Since each application is unique, you must determine when an instance is no longer needed and expendable. There are several different ways that you can scale down your array.
- Manually terminate instances
- Create and configure a self-terminating script on each instance
- Use an external resource/instance to monitor instance usage in the array and determine which instance can/should be terminated.
Steps
There are two types of queue-based server arrays. They are both addressed in below.
Based on the amount of jobs in the queue
To create a server array, go to Manage > Arrays and click New Array. You will add the server array through the Add Server Array Assistant.
Provide the following information:
ServerTemplate
ServerTemplate - Choose the template that you would like to use in order to scale your deployment. This ServerTemplate will be used to create the new servers that will be added to the server array. Since you are scaling the number of application servers, you will need to select the latest version of the appropriate (PHP/Rails/TomCat) application ServerTemplate, not a front-end ServerTemplate. (If you need to make changes to the template, you will need to clone it.)
Make sure that the Inputs for the ServerTemplate are properly configured and that they will boot correctly.
Server Details
- Cloud - Each array must be associated with a cloud or cloud region.
- SSH Key & Security Group - Specify the appropriate SSH key and Security Group(s) that will be attached to the array.
Server Options
- Cloud - Each array must be associated with a cloud or cloud region.
- ServerTemplate - Select the ServerTemplate that will be used to create the worker instances in the server array. (If you need to make changes to the template, you will need to clone it.) Note: Make sure that the Inputs for the ServerTemplate are properly configured and that they will boot correctly. Before making an array active, you might want to launch a test instance into the array to verify that a functional instance can be launched.
- SSH Key & Security Group - Specify the appropriate SSH key and Security Group(s) that will be attached to the array.
Array Details
- Status - The status of the server array. If active, the server array is enabled for scaling actions.
- Min Count - The minimum number of active servers that must exist at all times in the server array.
- Max Count - The maximum number of active servers that must exist at all times in the server array.
- Array Type - Specify alert-based or queue-based arrays. Secondary options will change accordingly.
- Elasticity Function - Defines how the server array should grow/shrink. (size or age)
- Items per Instance - Max number of items in queue per operational instance.
- Indicator Queue - Select the input SQS queue that contains all of the job tasks.
- Audit Queue - Select the audit SQS queue that will store audit entries.
Queues
- Elasticity function - Defines how the server array should grow/shrink. Select sqs_queue_size.
- Elasticity params - Defines the elasticity parameters that will be used to determine when a server array should be resized.
- Items per instance - Defines the ratio of worker instances per items in the queue. Ex: If there are 50 items in the queue and
Items per instance
is set to 10, the server array will resize to 5 worker instances (50/10). Default = 10
- Items per instance - Defines the ratio of worker instances per items in the queue. Ex: If there are 50 items in the queue and
- Indicator - Select the input SQS queue that contains all of the job tasks.
- Audit - (optional) Select the audit SQS queue that will store audit entries.
- Audit entry analysis - If checked, it will populate a Statistics tab for your array. If unchecked, no Statistics tab will appear.
Example 1
If there are 100 jobs in the queue and there are already 8 servers running, the server array will only add 2 additional worker instances.
- Items per instance: 10
- Default max count: 20
Example 2
If there are 1000 jobs in the queue and there are already 10 servers running, the server array will only add 10 additional worker instances, because the maximum server count is set to 20 worker instances.
- Items per instance: 10
- Default max count: 20
Based on the amount of time a job is in the queue
To create a server array, go to Manage -> Arrays and click a New button.
Provide the following information:
General
- Nickname - Provide a Nickname for the server array. (e.g. MyFirstArray)
- Array Type - select Queue -based as the type of server array. (The secondary configuration options will change accordingly.)
- Deployment - Each server array must be associated with a particular deployment. Although you can attach more than one server array to a deployment.
- Active - Leave the
Active
checkbox unchecked until you are ready to make the array active. WARNING: If checked, the array will be enabled after it is saved. New instances may be launched.
Server Options
- Cloud - Each array must be associated with a cloud or cloud region.
- ServerTemplate - Select the ServerTemplate that will be used to create the worker instances in the server array. (If you need to make changes to the template, you will need to clone it.) Note: Make sure that the Inputs for the ServerTemplate are properly configured and that they will boot correctly. Before making an array active, you might want to launch a test instance into the array to verify that a functional instance can be launched.
- SSH Key & Security Group - Specify the appropriate SSH key and Security Group(s) that will be attached to the array.
Server Allocation Policy
- Default min count - The minimum number of worker instances that must be operational at all times in the server array. You can set this value to zero to avoid idle server usage costs. But, if you have time-sensitive tasks that need to be processed immediately, you might want to use a value of at least one worker instance. Default = 1.
- Default max count - The maximum number of servers that can be operational at any given time in the server array. Default = 20. Amazon will not let you launch more than 20 servers unless you submit a form request to increase this limit.
- Availability Zone - Defines into which availability zone(s) new servers of your array will be launched. You can either select a specific zone or select the
Any
orWeighted
option to disperse servers across multiple availability zones. By dispersing your servers across multiple availability zones, you are hopefully preventing all of your array servers from suddenly disappearing if an availability zone ever failed. TheWeighted
option allows you to control the ratio of server dispersion across all of the zones. For example, if you wanted to launch a majority of servers into a particular zone (us-east-1a), you can give 'us-east-1a' a larger weighted value than the other zones. Any positive integer is sufficient. Note: Associated cross-zone data traffic rates do apply.
Queues
- Elasticity function - defines how the server array should grow/shrink. Select sqs_item_age.
- Elasticity params - defines the elasticity parameters that will be used to determine when a server array should be resized.
- Max age - defines the threshold (in seconds) before a resize action occurs on the server array. (i.e. If an item's age is greater than or equal to the
max age,
a new instance will be launched.) An item's age is determined by the Algorithm variable (max_10 or avg_10). - Regexp - each job task receives a timestamp when it's added to the queue. The timestamp is used to determine an item's
age
in the queue. It needs to contain a parenthesized sub-expression that, when matched, can be parsed as a date/time. The age is calculated by finding the difference between a timestamp specified in the body of the message and current time. The system finds this timestamp by matching a regular expression against the body of the message. We recommend that you create a field, created_at: with a UTC timestamp when creating a work_unit. You would specify the following regex string excluding the quotescreated_at: (\d\d\d\d-\d\d-\d\d \d\d:\d\d:\d\d **XXX** )
where XXX is GMT or UTC depending on your machine. You would then specify the following for the elasticity function to determine the scaling event: - If you are using UTC, copy and paste created_at: (\d\d\d\d-\d\d-\d\d \d\d:\d\d:\d\d UTC) into the field.
- To verify that your regex expression matches the format of the timestamp in your work_unit go to Clouds > AWS Global > Queues and click on your input queue. Go to the Messages tab and click
View Top Item
link. You should now be able to see the format of the timestamp as it appears in the work_unit. - Algorithm - defines how an item's age will be determined, either by the average age or max (oldest) age. Default:
avg_10
- max_10 - the maximum age of 10 items in the queue. It will look for the oldest item in the sample.
- avg_10 - the average age of 10 items in the queue.
- Resize by - the number of instances that should be added/removed from a server array when a resize action occurs. Default = 1
- Resize calm time - the time (in minutes) that must pass before another action can be taken on the server array. This variable helps prevent an array from being resized too frequently. Default = 5
- Max age - defines the threshold (in seconds) before a resize action occurs on the server array. (i.e. If an item's age is greater than or equal to the
- Indicator - Select the input SQS queue that contains all of the job tasks.
- Audit - (optional) Select the audit SQS queue that will store audit entries.
- Audit entry analysis - If checked, it will populate a Statistics tab for your array. If unchecked, no Statistics tab will appear.
Example 1
Currently, only one worker instance is running. A set of jobs was just added to the SQS input queue. Based on the elasticity parameters below, the server array will add 2 additional servers once an item (out of a sample of 10) has been in the SQS input queue for 30 seconds or longer. After 2 new servers have been launched, the server array must wait 10 minutes before it's allowed to resize again.
Max age: 30
Algorithm: max_10
Resize by: 2
Resize calm time: 10 min
Example 2
Currently, there are 5 worker instances running. Based on the elasticity parameters below, the server array will add an additional server if the average age of 10 items in the SQS input queue is equal or greater to 2 minutes. After a new server is launched, the server array must wait 5 minutes before it's allowed to resize again.
Max age: 120
Algorithm: avg_10
Resize by: 1
Resize calm time: 5 min
Create a New Server Array with Spot Instances
Objective
Create an application Server Array using Spot Instances.
Overview
Server Arrays are identical servers running in the cloud. The RightScale Cloud Management Platform can monitor and scale up (or down) the number of servers in a Server Array to meet application demands based on alerts or queues (Grid-based Server Arrays). This tutorial uses Spot Instances for the servers in your Server Array. Since hourly rates for Spot Instances are usually lower than On-Demand prices, there is potential for cutting costs. You can set the max price that you're willing to pay for your Spot Instances and even view the recent history of your chosen type of instance to be able to get a good idea of what to set as your max price. Prices for Spot Instances vary based on supply and demand.
Steps
To create a Server Array, go to Manage > Arrays. You will need to select the cloud infrastructure or EC2 region where the Server Array instances will be launched. Instances that are launched in an array must exist in the same region (e.g. AWS US-East), but can be dispersed across multiple availability zones within the same region.
Having now set up your Server Array to use Spot Instances, you can finish this tutorial depending on which Server Array you've selected:
Delete a Server Array
Objective
To delete a server array.
Prerequisites
- An existing Server Array
- 'actor' user role privileges
Overview
When you delete a Server Array, you're only deleting the Server Array object or metadata.
You can delete a Server Array regardless of whether it's active (enabled) or inactive (disabled). You can also delete a Server Array regardless of whether or not it has any running instances. As a best practice, you should only delete Server Arrays that are inactive. If you delete a Server Array that's active and contains running instances, it can become very difficult to locate all of the running instances of an array once it's been deleted.
Important! Instances that are currently running in a Server Array are NOT terminated when an array is deleted. The reason why an array's instances are not automatically terminated is because some of the instances could be hosting active user sessions. If you delete a server array that contains running instances, you must manually delete each instance in the array. Go to Clouds > AWS Region > EC2 Instances and search for all instances of the Server Array. (Tip: Use the Filter by Nickname
option and perform a keyword search using the Server Array's Nickname.
A deleted Server Array will no longer be allowed to scale. RightScale's alert daemon ignores a deleted Server Array. For example, if you delete an 'enabled' Server Array that contains running instances (5) and has a minimum instance count configuration (e.g. 2), and later you terminate all running instances of that array, the Server Array will not automatically launch the minimum count of instances (e.g. 2).
Steps
- As a best practice, you should make sure you've taken the necessary precautionary steps before deleting a Server Array.
- Disabled the server array
- Terminated any running instances (Server Array's Instances tab)
- Go to Manage > Arrays.
- Click the Delete action icon next to the array that you want to delete. (Note: You cannot delete a Server Array from the array's show page.)
Enable or Disable a Server Array
Objective
To enable a Server Array so that it's allowed to automatically scale up/down (grow/shrink) based on the queue-based or alert-based triggers.
Prerequisites
- 'actor' user role privileges
Overview
The state of the Server Array determines its autoscaling properties. Regardless of the array's state, instances can still be launched and terminated manually.
The array can have one of the following states:
- Enabled (active) - The server array will be monitored by RightScale's alert daemon and permitted to autoscale. Voting servers and thresholds will be monitored appropriately. When the decision threshold has been exceeded for either a resize up/down action, the appropriate scaling event will occur.
- Disabled (inactive) - The server array is not monitored by RightScale's alert daemon and is not permitted to autoscale. Voting servers and thresholds will be ignored. No running instances will be affected, and if you want to terminate active array instances, you can use the 'Terminate all' button.
As a best practice, you only want to enable a Server Array once you're confident that everything has been configured properly and that there are no missing inputs. Be sure to test a server array manually, before enabling it for autoscaling. For example, before you enable an array, you may want to test it by using the Launch button (on the Server Array's show page) to manually launch a test instance to make sure that it will be launched and configured successfully. You do not want to enable an array that will launch instances that will strand in booting and never become operational.
Steps
- Go to Manage > Arrays.
- Click the Enable text link next to the array that you want to make active. You can also click a similar Enable text link on a Server Array's show page.
Run a RightScript on Servers in a Server Array
Objective
Run a RightScript on potentially many Servers in a Server Array.
Overview
Instead of manually executing a RightScript on each individual Server in an array, you can run a RightScript on one or all Servers in an array. There are a couple different ways that you can execute RightScripts:
- Run RightScript on the oldest Server in the array
- Run RightScript on Remaining Servers
- Run RightScript on All Servers
Scenario A: You want to update all of your application servers to pull from the latest code from your SVN repository. After updating your ServerTemplate so that all new servers will be launched into the array with the updated software branch, you also need to update the existing application servers that are currently operational.
Scenario B: You have a server array that has application servers that were launched with different ServerTemplates. You need to run a script on all servers that are using ServerTemplate A. Or you need to run a script that's used in both ServerTemplates (A and B).
Just like at the Deployment and Server levels, you can also use the 'Any Script' option to run any RightScript in your RightScale account's local collection.
Steps
Run a Script on a Server in the Array
Go to Manage > Arrays. Select an active server array that has running instances on which you would like to execute a script. Under the Scripts tab, you will see a list of scripts that you can run on the server instances.
Select a script and click its Run button.
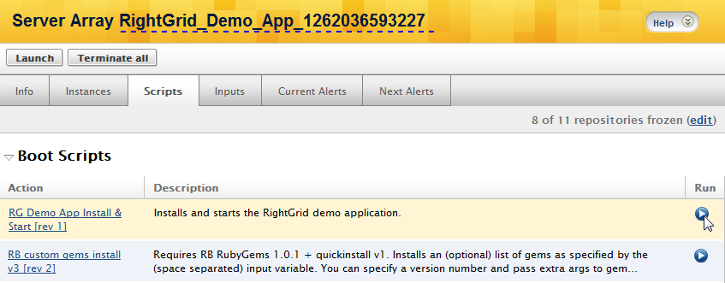
A list of all ServerTemplates in the array that contain that script will be listed. Typically, server instances in an array will use the same ServerTemplate.
Select which ServerTemplate(s) you would like to run the script on and the choose whether or not you want to run the script on one or all servers in the array.
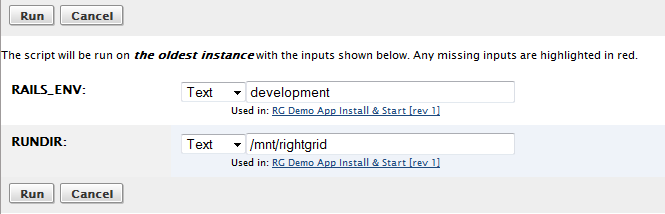
If you want to test the script before running it across all servers in the array, you can use the run on oldest option, which will execute the script on the oldest
server in the array. You can track the progress of the script's execution in the Events pane.
If you choose the run on all option, the the script will be executed on all servers in the array.

Before a script is actually run, you will have a chance to verify the input parameters that will be used during the script's execution.
If you choose the run on oldest option and run the script on one server, you will see another option, run on remaining , which will run the script on the remaining servers.
Note: When you run on remaining, it will run on the remaining servers that are in the array when you click the button. If your array scales-up or down between the execution of both actions, the number of instances listed may not be accurate.
Set up Autoscaling using Voting Tags
Objective
To add scale-up and scale-down alerts for horizontal autoscaling of an alert-based server array, which is commonly used for autoscaling an application tier of a multi-tier deployment.
Note: The ability to set up autoscaling using Alert Escalations will be eventually be deprecated. (Set up Autoscaling using Alert Escalations?) Please use this tutorial for autoscaling purposes.
Prerequisites
- Requires 'actor' user role privileges
- An existing Deployment that you want to set up for alert-based autoscaling.
Overview
Once you've set up a typical website deployment you'll most likely want to configure it for autoscaling. Autoscaling is the ability to launch additional server resources automatically based upon different alert conditions you've predefined. For example, you can set up a server array so that additional servers are launched into the array (grow) when a majority of the servers are being overworked (e.g. cpu-idle < 30% for 15 min or longer) and then scale back down (shrink) when traffic decreases and underutilized application servers can be safely terminated. This tutorial explains how to set up horizontal scaling where additional servers are launched to help overworked servers, whereas vertical scaling involves increasing instance sizes where you're upgrading existing machines with more powerful counterparts.
Horizontal scaling is configured by using a RightScale concept called Voting Tags. These server tags are used specifically for the purpose of setting up a scalable, alert-based server arrays. The following steps will explain how to set up autoscaling using Voting Tags. To learn more about how server votes are counted, see Understanding the Voting Process.
Even if you don't think you'll need to autoscale in the near future, it's always a good idea to prepare your Deployment for such events. The ability to autoscale is one of the key benefits of cloud computing. If you've been following the Deployment Setup tutorials, you already have a typical 4-server Deployment. This tutorial explains the few extra steps that you need to take in order to properly configure a Deployment for horizontal scaling.
Steps
Create a Server Array
The first step is to create the server array. Although you can define your alert specifications first, the process of setting up a scalable server array is less prone to error if you start by creating a server array first. When you create the server array, be sure to associate it with the desired deployment. Remember, this server array will be used when servers in the deployment require additional server resources. Be sure to note the Voter Tag that you specify for the array (Choose voters by tag
). Later on in the tutorial you will need to make sure that you use the same voting tag when you create your alert specifications. For this tutorial, simply use the default Voting Tag, which uses the Server Array's nickname (e.g. MyArray) and make sure that the array is disabled as you're not ready for autoscaling.
Create an Alert Specification
Now that you've created a Server Array and specified which Voting Tag RightScale should use to evaluate when a Server Array should autoscale, you are now ready to configure your alert specifications. Before you can create an alert specification, you must first answer the following questions:
- Which metric(s) should be used for autoscaling?
- Who should be allowed to vote for a scaling action?
Which metric(s) should be used for autoscaling?
Although, it's typically sufficient to scale up/down based on a single metric (e.g. cpu), you can set up an array where multiple metrics can trigger scaling actions. Let's say you want to set up a scalable array of PHP application servers. Since your application can be both memory and cpu intensive at times, you need to set up alert specifications where both of these key metrics are monitored. Additionally, you want the server array to scale up/down based upon both of these metrics. Remember, for each metric that you want to use for autoscaling, you have to create two alerts: one for scaling up and one for scaling down.
Who should be allowed to vote for a scaling action?
Next, you will need to determine who should be allowed to vote for a scale up/down action. The answer to this question, as well as the architecture of your deployment will impact how you configure your pool of voting Servers. Basically, you need to make sure that each Server that you want to be allowed to vote for a scaling action has the appropriate alert specifications. Remember, a Server can inherit its alerts from multiple sources, so you must choose the best place to define your alerts. Alert specifications can be defined at the Server, ServerTemplate, or Server Array levels. As a best practice, you should only configure them at the ServerTemplate or Server Array levels as it's difficult to keep configurations at the Server level consistent. The following guidelines can be used to help guide your decision.
- If your application is only being served by Servers in your Server Array, you can either specify them at the Server Array or ServerTemplate levels. This way, all new Servers that are launched into the array will inherit the correct alert specifications. Note: A Server will inherit alerts from its ServerTemplate and Server Array. So, it's important that you define an alert in one of those places and not both. Otherwise, your Server may have a duplicate alert that could affect a Server's aggregated vote.
- If your application is being served by Servers in your Deployment (not just in a Server Array), you will need to add the same alert(s) in multiple places. For example, if you have two FrontEnd servers that are serving your application, they should be allowed to vote for a scaling action. Therefore, you'll need to add the alert specifications to those Servers' ServerTemplates (e.g.
PHP FrontEnd v9
). You will also need to make sure that Servers in your Server Array also be allowed to vote since they will be dedicated application servers. Therefore, you'll need to add the same alert specification at either the Server Array level or to the ServerTemplate that's being used to launch new instances in the Server Array.
Once you've answered those prerequisite questions, you're ready to define those alert specifications. In this example, we'll be defining them at the ServerTemplate level.
Create an Alert Specification to grow
and shrink
For this example, let's define the following alert specifications at the ServerTemplate level. Locate the ServerTemplate(s) that will be used by all voting Servers. If you're using FrontEnd servers or application servers in your Deployment and you want them to be able to vote for growing/shrinking an array, you will also need to add the same alert specifications to those ServerTemplates as well. Remember, in order to add an alert specification to a ServerTemplate, it must be an editable HEAD version, so you may have to clone the ServerTemplate. If an alert specification's condition exists for longer than the defined threshold, an alert is triggered.
- If 'cpu-0/cpu-idle' is < 30 percent for 15 minutes, then vote to 'grow' the server array by setting the 'MyArray' voter tag.
- If 'cpu-0/cpu-idle' is > 80 percent for 45 minutes, then vote to 'shrink' the server array by setting the 'MyArray' voter tag.
Important!
The voting tags must match! Voting Tags are NOT case-sensitive.

Remember, the Voter Tag that you specify when creating an alert specification must match the tag that you previously set at the Server Array level, otherwise autoscaling will not work properly.
Server Array: MyArray
Servers' Voting Tag: rs_vote:MyArray=none
See Create an Alert Specification.
Launch a Test Server
Before you enable the array for autoscaling, it's always a recommended best practice to launch a test server into the server array. Go to the Server Array's show page (Manage > Arrays > MyArray) and click the Launch action button. Make sure that the new Server has the proper Voting Tags. Check the Server's Info tab and make sure under the Tag(s) section it has the following tag: rs_vote:MyArray=none
Enable the Server Array
If the test Server was launched and configured properly, you can now enable the array for autoscaling. Under the Server Array's Info tab, click the Enable text link under Status. The Server Array is now active and will autoscale accordingly.
Next Steps
If you are following the Deployment Setup tutorials and just added a scalable server array to your 4-server setup, you may be curious about the next steps in the lifecycle of your Deployment.
As your site continues to grow, you may need to consider transitioning to a 3-tiered architecture where you have two dedicated load balancers, where the entire bandwidth/cpu/memory of the FrontEnd is used for load balancing purposes only so that it's no longer responsible for also serving the application. If you typically, only need around 6 servers to handle a majority of your load 90% of the time, you might want to let the FrontEnds continue to serve your application. However, if you anticipate a large scaling event in the future or if you plan to manage more than these 6 servers on a regular basis, you might want to migrate from the standard 4-server setup. See Transition from a 4-Server to 6+ Server Setup.
Test a Server Array
Objective
To launch a sample server instance in the server array for testing purposes.
Overview
Before you enable an array and make it active so that triggered alert conditions can cause scale-up actions that launch new instances in the array, you may want to perform a few precautionary tests to ensure that any new server instances will boot correctly and be properly configured with the correct inputs.
Steps
Go to Manage > Arrays and select your server array. Click the Launch action button to launch a single server into the array. You can manually launch a new server instance into the array regardless of whether or not the array is active (enabled).
Warning! Your existing frontends or load balancers will send traffic to the server instance once it becomes operational, so it's best to perform this test in a staging environment or during non peak time to minimize any customer facing errors.
Under the Server Array's Instances tab you'll find your test server instance that you just launched.
Once the server becomes operational, click on the Server's link to view more information.
Click the server's Public DNS name link under the Server's Info tab to test its functionality. Check the Inputs tab to make sure it's connecting to the correct frontend / load balancer. Test to make sure that the server is properly communicating with the database. Remember, if you find configurations that need to be changed, you will need to make them at the ServerTemplate or Server Array level so that the change will persist and be inherited by future server launches in the server array. If you make such changes, you should terminate the existing server instance and launch a new one.
If you are satisfied that newly launched server instances are being properly configured, it is reasonably safe to assume that you can now enable the server array and make it active.
Update Inputs of Multiple Instances in a Server Array
Objective
To update the inputs of running instances in a server array. current input values of multiple running servers within a deployment.
Overview
Inputs for new instances launched into a server array are set at launch time. You can check the server array's Inputs tab to verify which values will be set, according to the input inheritance rules. However, you may want to change an input that will affect all current and future running instances. For example, you may be using a server array for your application tier and push out new application code from a different repository. In such cases, you will need to update the appropriate input under the Server Array's Inputs tab, as well as change the same input for all running instances. But, what if there are 20 running instances in the server array? In such cases, instead of editing the Inputs tab of each running instance, you can change the input on some or all running instances by using the bulk set inputs feature. See the steps below for details.
Steps
Select running servers to update
- Under the Server Array's Instances tab, select the running instances that you want to update. Since you will most likely want to apply the change to all running instances, use the
Select All
text link shortcuts. - Select the Set Inputs option from the dropdown menu selector and click the Apply to selected action button.
Specify new input values
Under the Bulk Inputs Update
screen, provide the new input values that you want to apply to the selected instances. Use the dropdown menu to specify how the input will be set. You can either inherit the input value from one of the component levels or set it manually.
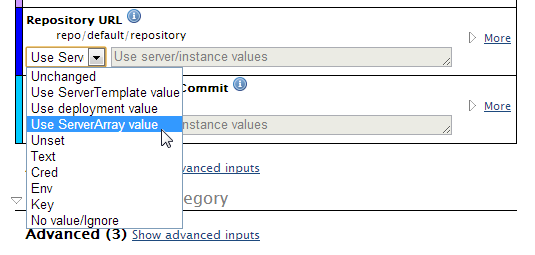
- Unchanged - Do nothing
- Use ServerTemplate value - Use the value specified under the ServerTemplate's Inputs tab.
- Use deployment value - Use the value specified under the Deployment's Inputs tab.
- Use ServerArray value - Use the value specified under the Server Array's Inputs tab.
- Unset - Change to no value. Note: If you attempt to run a script that requires a value for this input, you will need to specify a value for the input before the script can be executed.
- Text - Enter new text value.
- Cred - Change to a credential (Design > Credentials).
- Env - Change to an environment variable.
- Key - Change to an SSH key.
- No value/Ignore - Select to ignore value for input.
Click Save.
Verify Inputs for Running Instances
Go to the Inputs tab of one of the updated instances in the server array and verify that the input was changed accordingly.