Overview
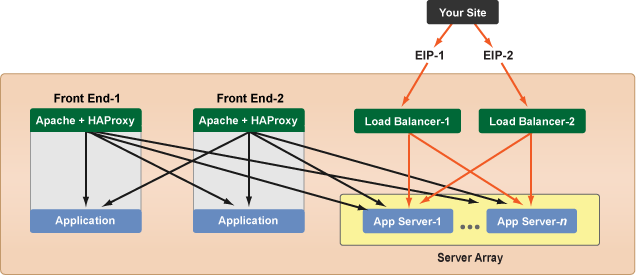
Your original site started as a basic 4-server setup where the FrontEnds served as both the load balancer and application server. But, now your site has grown and now you need to have FrontEnds that are dedicated load balancers. This tutorial will walk you through the steps of how to migrate from the 4-server setup to a 6+ server setup.
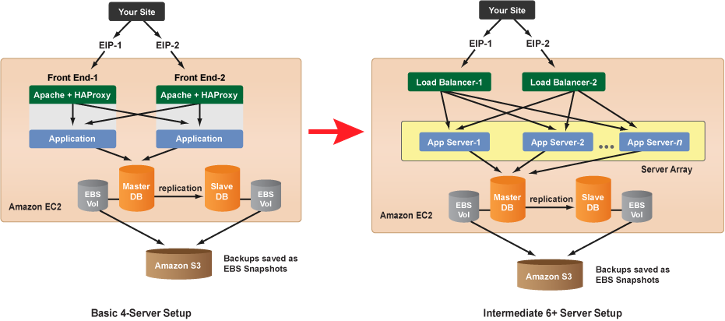
This tutorial below assumes that you're going to use a server array to serve as the application level for your Deployment. Similarly, you can also have a Deployment with two application servers and a server array that's ready to scale-up when necessary. But, one of the advantages of having all application servers inside of a single server array is that you now have one place where you can manage and update all of your application servers. Be sure to configure your server array to have a minimum instance count of two at all times.
Prerequisites
This tutorial assumes you have a running 4-server setup in production with Elastic IPs assigned to the FrontEnd servers.
Steps
- Create a server array for your application servers and associate it with the Deployment. See Create a New Alert-based Server Array. If you already have a server array, verify that it's properly configured (see below) and go to Step 2.
- Configure your application server array to have a minimum of two running instances. (Default Min Count = 2)
- The server array should be configured to use an
application
ServerTemplate (e.g. PHP App Server, Rails App Server, etc.) to launch additional server instances. - The server array should be
enabled
so that the server array can scale-up or down as necessary.
- Your web application is now being served by the two FrontEnds and the 2+ instances in your application server array.
- (Recommended) Eventually, you may want to replace your FrontEnds with servers that are specifically designed for load balancing. As a best practice, a server should only have applications that are actually required for its function. Import the
LB Apache+HAproxy
ServerTemplate from the Library. Clone the ServerTemplate if you expect to make modifications to it. - Add two new Servers to the Deployment using the ServerTemplate you just imported/cloned. These Servers will become your new dedicated load balancers.
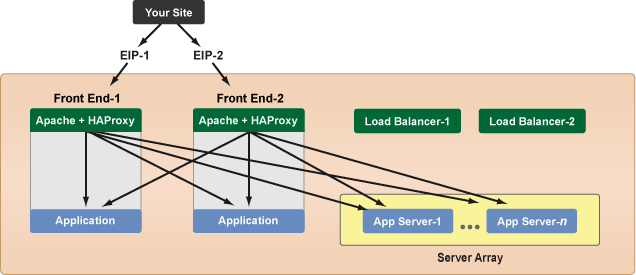
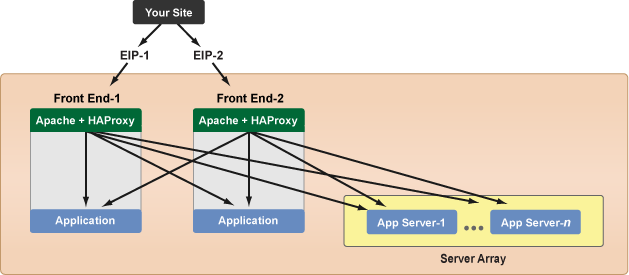
- Next, you will launch and test each load balancer individually. Launch one of the load balancer servers and wait for it to become operational.
- Under the Server Array's Inputs tab, change the LB_HOSTNAME input parameter to point to the public DNS name or public IP Address of one of the new load balancers. (e.g. ec2-184-72-2-123.us-east-1.compute.amazonaws.com or 184.72.2.149)
- Go to the Server Array's Scripts tab and run the
LB app to HA proxy connect
operational script on all currently running instances in the array. The application servers in the array will now be connected to both the FrontEnds and dedicated load balancers. Notice that the new dedicated load balancer is NOT connected to the FrontEnds because they will be terminated at the end of this tutorial.
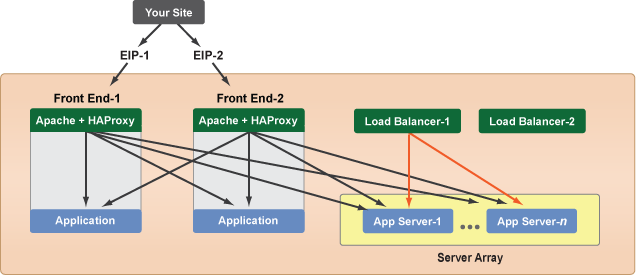
- Normal user traffic is still hitting your Elastic IPs, so content is still being served through the old FrontEnds. Before you continue to the next step, you should test the new load balancer to make sure that it is properly serving content from the application servers in the array. Simply hit the public DNS of the load balancer a couple of times to verify that content is being served correctly.
- Repeat steps 5-8 for the other load balancer server.
- Under the Server Array's Inputs tab, change the LB_HOSTNAME input parameter back to the original value (e.g. www.mysite.com) to ensure that any new instances that are launched during the migration will still connect to the old FrontEnds with the EIPs.
- Now that you verified that the new load balancers are properly serving content, the next step is to switch the Elastic IPs and assign them to the new load balancer servers so that any new incoming traffic will no longer be sent to the old FrontEnds. See Transfer an Elastic IP to a running instance. Any active sessions prior to the switch will be maintained, but any new requests will be served by the new load balancer. In such cases, existing users may be asked to reactivate their session and log in again.
- A recommended clean-up task would be to ensure that all application servers in the array are connected to the new load balancer servers. Go to the Server Array's Scripts tab and run the
LB app to HA proxy connect
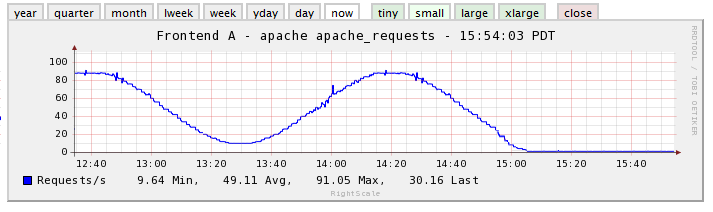
operational script one more time on all currently running instances in the array. - The old FrontEnds are no longer being used to serve incoming user requests. Use the monitoring graphs to check the number of incoming Apache requests. After about 15 minutes, both FrontEnds should no longer be receiving anymore incoming requests.
 Once you've confirmed that the site is 100% stable, you can safely terminate the old FrontEnds.
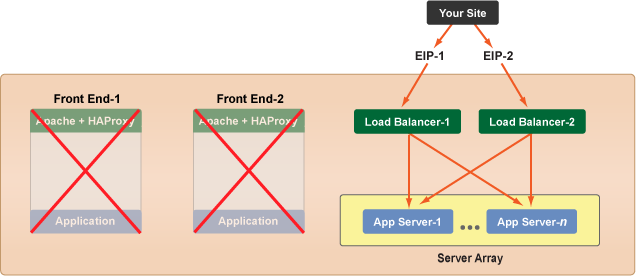 Congratulations! You now have an upgraded server setup with dedicated load balancers and a scalable array of application servers.