Attach an EBS Snapshot to an Instance
Overview
When you attach an EBS Volume to an instance, what you're really doing is creating a volume from that snapshot and attaching the volume to the instance. Technically speaking, you cannot attach an EBS Snapshot to a running instance. If you want to attach an existing volume, see Attach an EBS Volume to an Instance. The advantage of attaching a snapshot
to an instance is that you don't have to worry about creating the volume in the correct availability zone. Instead, a volume will be created from the snapshot in the same availability zone as your instance. Another advantage is that by default, the created and attached volume will be deleted when the instance is terminated. If you were to attach an existing volume the old way (instead of attaching a snapshot) the volume would persist and not be deleted.
There are two ways you can attach an EBS Snapshot to an instance:
Steps
Attach an EBS Snapshot to a Running Instance
- Go to the Volume's tab of the running server. Click the Attach Snapshot button.
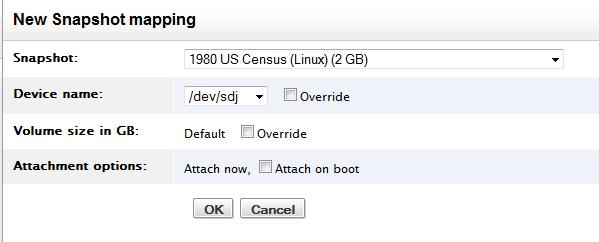
- Snapshot - Select the EBS Snapshot that you want to attach to the running server instance.
- Device name - Select the device name to which the created volume will be attached. Click the
Override
box to specify a different value. - Volume size in GB - The size of the volume to be created from the snapshot. By default, the size of the volume will match the size that's specified by the snapshot (e.g. 2 GB). To create a larger volume, click the Override button and specify the desired size in GB. (e.g. 10)
- Attachment options - A volume will be created from the snapshot and attached to the instance. By default, the attached volume will be detached and deleted when the instance is terminated, so if you want this snapshot to also be attached on subsequent server launches, select the
Attach on boot
option.
Attach an EBS Snapshot to a Server at Boot Time
- Go to Clouds > AWS Region > EBS Snapshots and select the EBS Snapshot that you want to attach to a server at boot time. You can also attach a snapshot to a stopped server or
Next
server (of a running server) under the Volume's tab. - When you configure a server to attach an EBS Snapshot, a volume will be created and attached to the server the next time that it is launched/relaunched.
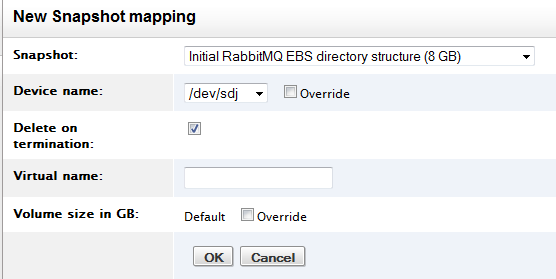
- Snapshot - Select the EBS Snapshot that you want to attach to the server the next time it is launched/relaunched.
- Device name - Select the device name to which the created volume will be attached. Click the
Override
box to specify a different value. - Delete on termination - By default, the created and attached volume will be deleted when the instance is terminated.
- Virtual name - The virtual name for the volume that will be created. (optional)
- Volume size in GB - The size of the volume to be created from the snapshot. By default, the size of the volume will match the size that's specified by the snapshot (e.g. 8 GB). To create a larger volume, click the Override button and specify the desired size in GB. (e.g. 10)
Create a Bootable EBS Snapshot
Overview
In December 2009, Amazon introduced the ability to boot instances directly from Amazon EBS snapshots (EBS-based AMIs). An EBS-based AMI is an alternative to the S3-based AMI. In addition to faster boot times, one of the key advantages of bootable EBS snapshots is that you can start/stop the instance because the root partition of the instance is created on an Amazon EBS volume instead of on the instance itself, which allows you to preserve data that's saved to the volume. When an instance is stopped, you are no longer being charged for instance usage. However, you will be charged for the volume while it still exists. You can also modify some of its properties while it's in the stopped state such as instance size or kernel image. Another advantage is that the AMIs and root partitions are no longer limited to 10GB, but can be up to 1TB in size, which allows you to have more complex images.
Use the procedure outlined below to create a bootable EBS Snapshot.
Steps
Find a Bootable EBS Snapshot
If you plan to launch a Server using an EBS-based AMI, import a MultiCloud Image from the MultiCloud Marketplace.
- Navigate to Design > MultiCLoud Marketplace > MultiCloud Images
RightScale publishes MCIs that reference EBS-based RightImages. The MCIs will include 'EBS' in the name. (e.g. RightImage_Ubuntu_14.04_x64_v14.2_HVM_EBS)
If you are looking for just an EBS-based AMI and not an MCI, they can also be found in these locations since they are both an EBS Snapshot and an AMI:
- Clouds > AWS Region > Volume Snapshots
- Clouds > AWS Region > Images (screenshot below)

Bootable EBS snapshot (EBS-based AMI) will be denoted as having an 'ebs' root device.
Create an EBS Standard Volume from an EBS Snapshot
Overview
Amazon's Elastic Block Storage (EBS) allows for block level storage to be created for use with Amazon EC2 Instances. With an EBS volume, you can create a snapshot to reference a particular point in time of a volume.There are several scenarios where you might need to create an EBS volume from a snapshot. One is because you might need the data on the volume to be accessed by more than one Server instance. Currently, you can only mount an EBS volume to one instance at a time. Another is if you are moving your application's permanent storage from S3 to EBS.
There are two EBS volume types: Standard and Provisioned IOPS. A Standard volume is best suited for boot volumes and provides roughly 100 IOPS (Input/Output Per Second) on average. Provisioned IOPS volumes are designed to provide predictable, high performance I/O workloads that range up to 4000 IOPS and are best suited for database workloads. This tutorial shows you how to create an EBS Standard Volume from a Snapshot. For information about creating an EBS Provisioned IOPS from a Snapshot, see Create an EBS Provisioned IOPS Volume from an EBS Snapshot.
EBS volumes and snapshots are EC2 region-specific. You cannot use a volume/snapshot that you created in EC2-US in a different region like EC2-EU. This tutorial assumes you are creating an EBS volume from a snapshot in the EC2-US region.
Use the procedure outlined below to create an EBS Standard Volume from an EBS Snapshot.
Prerequisites
- A snapshot created from an EBS Standard volume stored in an accessible S3 bucket.
Steps
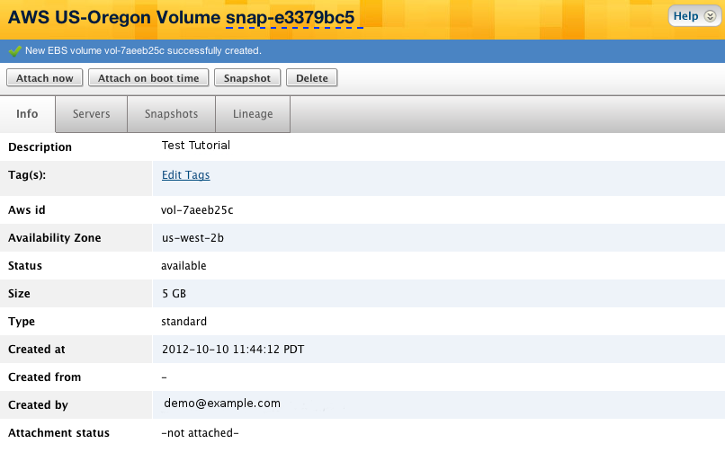
- Go to Clouds > AWS Region > Volume Snapshots and select a snapshot. Click the Create Volume from Snapshot button from a Snapshot's homepage.
- By default, the nickname of the volume will be identical to the name of the EBS Snapshot. Be sure to specify the availability zone where you want to create the new volume.
You will not be able to change the volume's availability zone once it's been created.
- If you leave the
Size in GB
field blank, the minimum file size that is needed to create the volume will be used (1GB - 1TB).
[
When you select Standard volumes, you are charged by the amount you provision in GB per month until you release it. For more information about EBS pricing, see Amazon Elastic Block Store (EBS) Pricing.
- Click the Create button.
A confirmation window will display some basic information about the new volume and also allow you to attach it to an instance.
[
Delete an EBS Snapshot
Overview
Many deployments use EBS as their permanent storage solution, while keeping regular snapshots on an S3 bucket. This is crucial in avoiding permanent data loss.
Although the steps to delete a snapshot are extremely simple, make sure you really want to delete the snapshot. Reckless removal of snapshots can result in permanent data loss!
Use the procedure outlined below to delete an EBS Snapshot.
Steps
- To delete an EBS Snapshot, go to Clouds > AWS Region > Volume Snapshots. The UI provides several means to delete a snapshot, including:
- Select an individual snapshot's Delete action icon
- Select several snapshots via their checkbox, then select the
delete selected
action link.Select all
andclear all
action links are also provided in the event you want to delete the majority of your snapshots. Be very careful using theselect all
anddelete selected
action links in unison.
Migrate an EBS Snapshot to a Different AWS Region
Overview
An EBS Snapshot is a cloud resource that's AWS Region specific. (i.e. An EBS snapshot in AWS US-East can only be used to create EBS volumes in the same AWS region.) However, you may need to migrate an EBS snapshot to a different AWS region. Perhaps, you're changing your cloud architecture to a different region for cost/performance reasons. This tutorial will walk you through the process of migrating a snapshot to a different region.
Use the procedure outlined below to replicate an EBS Snapshot to a different AWS region.
Prerequisites
- Running server with the EBS volume attached
- 'actor' user role privileges
Steps
In this example, you're going to migrate an EBS Snapshot from Region A to Region B. (e.g. US-East to US-West)
Remember, data transfer charges do apply!
- In AWS Region A (e.g. US-East), launch a server with an EBS volume that was created from the EBS snapshot you want to migrate.
- In AWS Region B (e.g. US-West), launch a server with a blank volume that's of the same (or larger) size as the volume that's attached to the server in Region A.
- OPTIONAL: Instead of creating a blank volume on the new Region B server, consider using our EBS Toolbox or Database Manager scripts 'DB EBS Create Stripe Volume' or 'EBS Create Stripe Volume' which will create, format and mount one or more volumes for you. These volumes will then also be compatible with the remainder of our EBS/DB tools, such as backup scripts, restore scripts, automated backups, etc.
- Format the volume on the Region B server accordingly.
- Ensure you have your public and private keys setup on both Region A and Region B servers. This includes
/root/.ssh/id_rsa(if running the rsync command as root) as well as the public launch key on the source (region A) server. - Additionally, ensure that you have port 22 open to the public IPs in necessary security groups to facilitate rsync's communication. Public IPs are required because we will be migrating between cloud regions.
- SSH into the Region B server
- Run a UNIX command similar to the following on the Region B server in order to
rsyncthe data from the A server to the B server:
rsync -avz -i <ssh_private_key_file> root@<from_server_ip>:/mnt/ebs/ /mnt/ebs/
- Wait for all of the data to be migrated to the new volume.
- Once the data on both volumes is in-sync, take a snapshot of the volume on the Region B server. If you installed our DB or EBS tools, you can run the operational script
DB EBS Backup
orEBS Backup
or the recipedb::do_primary_backup
etc.
Share an EBS Snapshot
Overview
You can share an EBS snapshot with another user or the public so that they can create an EBS volume based on your snapshot in their account. Use the following procedure to accomplish this.
Prerequisites
- To share an EBS snapshot with another user, you must know their AWS Account Number and have 'actor' role privileges on the RightScale account.
Steps
Navigate and Select
The way you share an EBS snapshot is similar to how you share other EC2 resources such as AMIs.
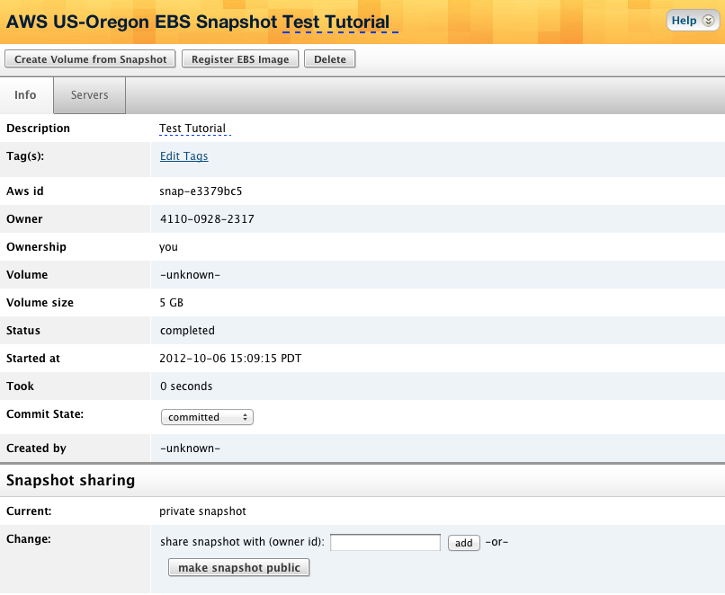
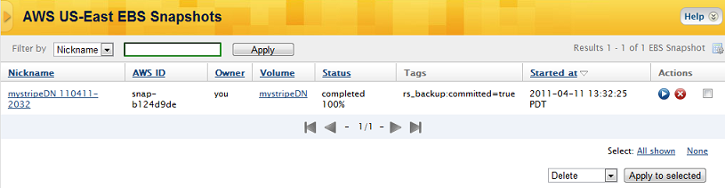
- Navigate to the list of EBS snapshots using Clouds > AWS Region > Volume Snapshots. Notice the Owner column in the table.
- amazon - Amazon provides a number of EBS snapshots that are available to the public.
- you - EBS snapshots that have been created by the RightScale account you are currently viewing. Remember, EBS snapshots are associated with an AWS Account, not an individual RightScale user. You can only share private EBS snapshots that are
owned
by the account. - [AWS Account Number] - EBS snapshots of that AWS account that are shared with the public or specifically with your account.
This feature was first released in October 2009. Do not be alarmed if you see additional EBS snapshots. You should see your own, some public snapshots from Amazon, and possibly public snapshots from others. Eventually, you will also see snapshots that were explicitly shared by others with your (AWS) account. You can always filter by owner=you
in the filter drop down to remove any extra clutter. Also note that you have additional privileges in the Actions column associated with your own snapshots. For example, you can delete your snapshots, but not others.
Select an EBS snapshot (owner = you) that you want to share. Users will see all EBS snapshots that are available to them. As a result, it can be difficult for a user to find a particular shared snapshot.
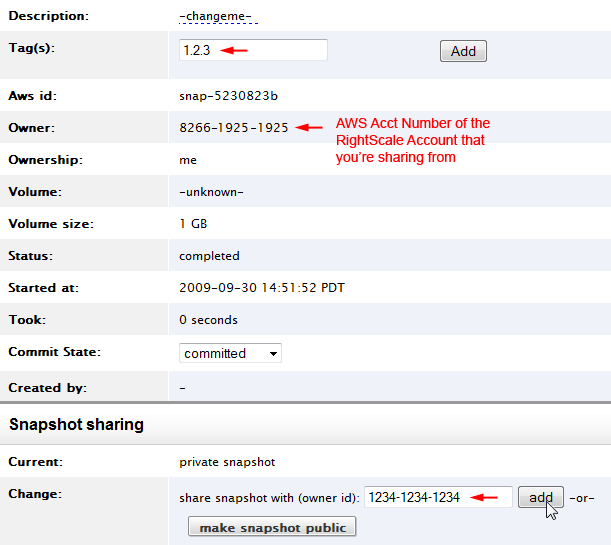
It's recommended that you add a descriptive tag or nickname so that the snapshot will be easier to find. Otherwise, you can provide them with the AWS Account Number associated with the RightScale account from which you're sharing the snapshot and they can filter by owner and enter the AWS Account Number (e.g. 1925-1925-1925). The AWS Account Number of the RightScale account is also listed as a convenience.
Share a Snapshot
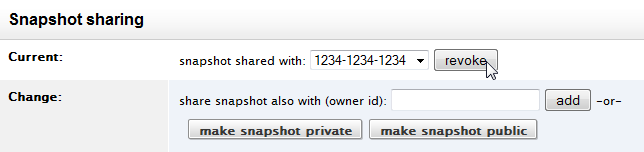
- Under the
Snapshot Sharing
section, enter the AWS Account Number of whom you want to share the snapshot with (e.g. 1234-1234-1234). Once you click the Add button, the snapshot will automatically appear in the recipient's list of available EBS snapshots of that EC2 region. (EBS Snapshots are EC2 region specific.) They can either use the filter to search for your snapshot by using either a nickname, tag, or your AWS Account Number. The recipient will be able to use the shared EBS snapshot to create EBS volumes. - To make the snapshot available to the public, click the make snapshot public button.
Revoke a Shared Snapshot
To unshare a previously shared snapshot, you can either click the make snapshot private to revoke all sharing privileges or select a specific account you wish to remove access from and click the revoke button.