Create a New EBS Volume
Overview
When creating an EBS volume, there are three EBS volume types to be aware of: Standard, Provisioned IOPS, and General Purpose (SSD). A Standard volume is best suited for boot volumes and provides roughly 100 IOPS (Input/Output Operations Per Second) on average. Provisioned IOPS volumes are designed to provide predictable, high performance I/O workloads that range up to 4000 IOPS and are best suited for database workloads. General Purpose (SSD) volumes are a good choice for small and medium databases, development and test environments, and boot volumes with an initial burst allocation of up to 3,000 IOPS for 30 minutes.You can either create an EBS Volume from scratch or create an EBS Volume from an existing EBS Snapshot. This tutorial focuses on creating an EBS volume from scratch.
When you create an EBS Volume, you should carefully consider where it should be created. The first question you should ask yourself is Where is my instance?
Remember, you can only attach a volume to an instance in the same availability zone. Once you create a volume and specify its location, you will not be able to change its availability zone. To launch a volume into a different Availability Zone you need to Create an EBS Standard Volume from a Snapshot or, if you're creating a Provisioned IOPS, see Create an EBS Provisioned IOPS Volume from a Snapshot.
EBS volumes and snapshots are EC2 region-specific. You cannot use a volume/snapshot that you created in EC2-US in a different region like EC2-EU. This tutorial assumes you are creating an EBS volume for EC2-US.
Use the procedure outlined below to create a new EBS Volume.
Steps
Create an EBS Volume from Scratch
- To create an EBS Volume from scratch, go to Clouds > AWS Region > Volumes.
- Click the New button.
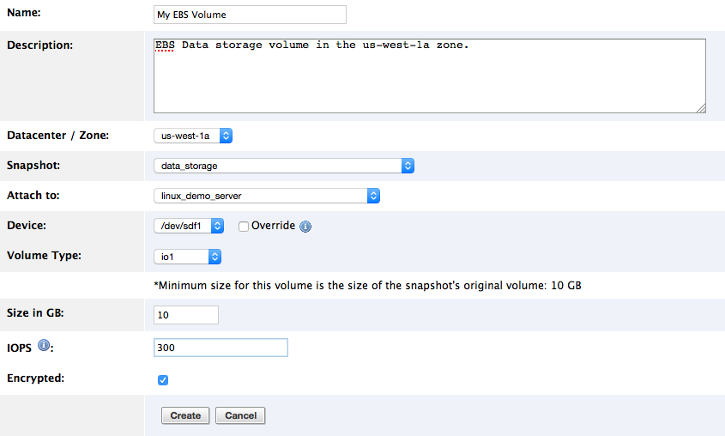
- Name - Specify a Name for your volume. You can change the name at any time, but it will still be associated with the correct snapshot. Note: Amazon will create a unique AWS ID for each volume (ex: vol-6052E7b23).
- Description (optional) - Provide a short description that explains the purpose of the volume. You can change the description at any time.
- Datacenter/Zone (required) - Specify the Availability Zone where you would like this volume to be placed. Remember, you can only attach a volume to an instance in the same Availability Zone.
- Snapshot - Since you are creating a volume from scratch, leave this value as
-none-.
- Attach To (optional) - Select a running server you want the volume to attach to. Since you are creating a volume from scratch in this exercise, leave this value as
-select-.
- Device - Select a device node identifier.
- Volume Type - The type of EBS volume. Either
Standard
,io1
, orgp2
can be selected. A Standard volume is best suited for boot volumes and provides roughly 100 IOPS (Input/Output Per Second) on average. Provisioned IOPS volumes (io1) are designed to provide predictable, high performance I/O workloads that range up to 2000 IOPS and are best suited for database workloads. General Purpose (SSD) volumes (gp2) are a good choice for small and medium databases, development and test environments, and boot volumes with an initial burst allocation of up to 3,000 IOPS for 30 minutes. - Size in GB - Specify the desired size of the volume. (The minimum size is 1GB, the maximum is 1TB. One terabyte is 1000 gigabytes, so you the maximum you can enter in this field is 1000.) $0.10/GB per month.
- IOPS - This field will appear if
io1
is chosen as a Type. The IOPS to volume size ratio can be a maximum of 30 IOPS/GB. Therefore, if the Size in GB is 10GB, the highest the IOPS value can be set to is 300. The range to create a Provisioned IOPS volume is is 300 IOPS and 10GB up to 4,000 IOPS and 133GB. - Encrypted (optional) - Enable this checkbox if you need your volume encrypted.
When you select Provisioned IOPS volumes, you are charged by the amount you provision in GB per month as well as the amount you provision in IOPS. For more information about EBS pricing, see Amazon Elastic Block Store (EBS) Pricing.
- Click Create when ready.
Next Steps
Now you're ready to attach your EBS volume. See Attach an EBS Volume to an Instance.
Post Tutorial Steps
Once you create an EBS Volume, you will no longer be able to make changes to its size or availability zone, etc. You will only be able to change what's inside the volume. However, there is a procedure for growing an EBS volume.
As with any procedure involving sensitive data, the procedure should be completed with great care by those who know what they are doing.
Attach an EBS Volume to an Instance
Overview
You can only attach an EBS Volume to a Server in the same availability zone, and to only one Server at a given time. Therefore, if you want to automatically attach an EBS Volume to an instance when it is launched, you cannot use the -any-
option for a Server's availability zone. Be sure to specify the same zone as the volume.
Once you've created an EBS Volume, the next logical step is to attach it to an instance. There are two ways you can attach an EBS Volume to an instance. Both attachment options are covered in this tutorial.
- Attach now - Attach the EBS volume to a running instance
- Attach on boot - The next time that the Server is launched, attach this particular EBS volume to the instance (at boot time). For example, if the current running Server is relaunched, or terminated and launched, the volume that you're creating at this time will be preserved and attached to the new instance at boot time. If this option is selected, the Volumes tab for the
Next
Server will reflect this change. If you do not want this volume to be attached to the next Server that is launched, you will need to manually remove this volume association under theNext
Server's Volumes tab.
You cannot attach an EBS volume to a locked instance. It will fail.
If you manually attach a volume to an instance, none of its attached volume(s) will be deleted when the Server is terminated. You will need to manually terminate each volume once it's been detached from the instance.
Steps
Attach an EBS Volume to a Running Instance
- Go to Clouds > AWS Region > Volumes and click the nickname of the EBS Volume that you want to attach to a running instance.
In order to attach a volume to a running instance, they must both be in the same availability zone. Once a volume is created, you cannot change its availability zone. Similarly, once an instance has been launched, you cannot change its availability zone. Also, you cannot attach the same volume to multiple instances. In order to attach the same volume to multiple instances, you must take a snapshot of the original volume and then create multiple volumes from the same snapshot. A volume's status will be available
if it is currently not attached to a running instance. Otherwise, a volume's status will be in-use.
- Click the Attach now button.
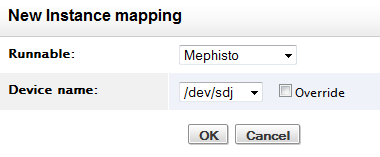
- Next, you will need to select which running instance the volume will be attached to, as well as the device location where the volume will be mounted. Choose an
/dev/sd
device name for Linux instances or anxvd
device name for Microsoft Windows instances.
If attaching more than 4 volumes, you will need to use the Override checkbox and specify a new, unused device name according to the operating system used (per above).
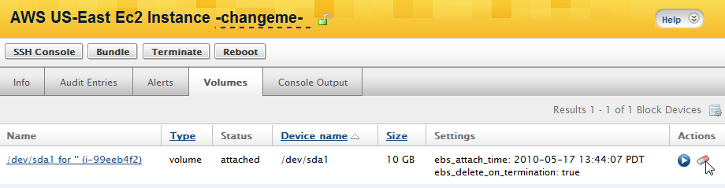
- Click Attach. The EBS volume will become available for use when the volume's status is listed as
attached
.

Verify the Volume was Attached
To verify that the volume was attached, you can SSH into the instance and run the following command:
cat /proc/partitions
You should notice that the volume was attached to the specified mount device (e.g. sdj).
    major minor #blocks name
       8 1 10485760 sda1
       8 16 156352512 sdb
       8 3 917504 sda3
       8 144 1048576 sdj
This can also be achieved by the command, fdisk -l which is usually an easier way to verify the disk sizes.
Detach the Volume
- To detach the volume, click the
eraser
action icon under the Actions column.
If you terminate the Server, the attached volume(s) will not be deleted. You will need to manually terminate each volume once it has been detached from the instance.
Attach an EBS Volume when an Instance is Launched
You can also configure an EBS Volume(s) to automatically be attached to a component when it is launched. It's important that you specify that the new instance be launched in the same availability zone as the EBS Volume. If the server's availability zone is set to -any-
or to a different availability zone, you will not be able attach the volume to the instance.
If there is an availability zone mismatch between a volume and an unlaunched server, you will receive the following warning message: Volume and server are in different availability zones. Force server to same zone as volume?
If you click OK, the unlaunched server will be reconfigured to launch in the same availability zone as the attached volume.
An EBS Volume can either be attached to an instance at the Server Level or at the Volume Level.
Server Level
- Go to a server's homepage and click the Volumes tab. Click Attach Existing Volume on Boot.
- Attach Volume - Select the volume attachment.
- As Device - List of common (Xen/Linux) device names to which the volume will be attached.
- Select the
Override
option to specify a different value not in the list. - Choose a
/dev/sd
device name for Linux instances running on an EC2-patched kernel, or anxvd
device name for Microsoft Windows instances. Note: For Xen native kernels (used by images such as Ubuntu (official) and Debian) the device is utilized by the kernel of the instance withxvd
instead ofsd
, e.g. attaching as /dev/sdk is accessible on the instance with /dev/xvdk. - Click Schedule
Volume Level
- Go to Clouds > AWS Region > Volumes and click the nickname of the EBS Volume that you want to attach to an instance. Click the Attach on Boot button.
- To Server - Select the server that the volume will be attached to.
- As Device - List of common device names. Choose an
/dev/sd
device name for Linux instances or anxvd
device name for Windows instances. Select theOverride
option to specify a different value not in the list. - Click Schedule.
Create an EBS Provisioned IOPS Volume From a Snapshot
Overview
Amazon's Elastic Block Storage (EBS) allows for block level storage to be created for use with Amazon EC2 Instances. With an EBS volume, you can create a snapshot to reference a particular point in time of a volume. There are several scenarios where you might need to create an EBS volume from a snapshot. One is because you might need the data on the volume to be accessed by more than one Server instance. Currently, you can only mount an EBS volume to one instance at a time. Another is if you are moving your application's permanent storage from S3 to EBS.
When creating an EBS volume, there are two EBS volume types to be aware of: Standard and Provisioned IOPS. A Standard volume is best suited for boot volumes and provides roughly 100 IOPS (Input/Output Per Second) on average. Provisioned IOPS volumes are designed to provide predictable, high performance I/O workloads and are best suited for distributed filesystems, database workloads and various other enterprise applications. This tutorial shows you how to create an EBS Provisioned IOPS Volume from a Snapshot. For information about creating an EBS Standard from a Snapshot, see Create an EBS Standard Volume from an EBS Snapshot.
EBS volumes and snapshots are EC2 region-specific. You cannot use a volume/snapshot that you created in EC2-US in a different region like EC2-EU. This tutorial assumes you are creating an EBS volume from a snapshot in the EC2-US region.
Use the procedure outlined below to create an EBS Provisioned IOPS Volume From a Snapshot.
Prerequisites
- A snapshot created from an EBS Standard volume stored in an accessible S3 bucket.
Steps
- Go to Clouds > AWS Region > Volume Snapshots and select a snapshot. Click the Create/Attach Volume Now button.
- Enter a Name and Description for the new IOPS volume.
- Specify the Availability Zone where you want to create the new volume.
You will not be able to change the volume's availability zone once it's been created.
- Open the Snapshot dropdown and select the snapshot to create the volume from. This setting defaults to the snapshot you selected above.
- Using the Attach To dropdown, choose the running server you want to attach the new IOPS volume to.
- Select an appropriate Device mount point for the new volume. Use the Override option if necessary to enter a different moint point.
- Select 'io1' as the Volume Type.
- Enter the size for the new volume. The Size in GB of a Provisioned IOPS volume must be at least 10GB in size. When the Volume Type is set to 'io1', the IOPS field displays. This option defines the Input/Output Per Second rate that you would like to provision for the volume. The IOPS provisioned ratio of IOPS to the volume size can be a maximum of 30 IOPS/GB. Therefore, if the Size in GB is 10GB, the highest the IOPS value can be set to is 300. The range to create a Provisioned IOPS volume is 100 IOPS and 10GB up to 4,000 IOPS and 133GB.
- In the IOPS field, enter the input/output operations per second the new volume supports.
- Select the optional Encrypted option if desired.
When you select Provisioned IOPS volumes, you are charged by the amount you provision in GB per month as well as the amount you provision in IOPS. For more information about EBS pricing, see Amazon Elastic Block Store (EBS) Pricing.
- Click the Create button. Once the new volume is created you are taken to the Info tab for then new volume which displays some basic information about the volume and also allows you to attach/detach it to/from an instance, or even create a snapshot.
Delete an EBS Volume
Overview
Although deleting an EBS Volume and all its associated data may seem a bit ominous, it is not if you have been diligent to create snapshots. The data is what is important, so keeping reliable snapshots on S3 is the key.
When an EBS volume is deleted, any references to that volume will also be deleted, including any Servers that have been configured to attach that particular volume at launch time. As a precautionary step you should also check to see which servers are referencing the volume.
Use the procedure outlined below to delete an EBS Volume.
Prerequisites
By default, you cannot delete an EBS Volume that is currently attached to a running instance. Be sure to detach an EBS volume from the running instance before trying to delete an EBS Volume.
Although not technically a prerequisite, before deleting an EBS Volume we strongly recommend you create an EBS Snapshot as a final backup.
Steps
- Go to Clouds > AWS Region > Volumes and select the volume that you want to delete. Under the Servers tab you'll see if the volume is currently attached to a running server or if any other servers are configured to attach the volume at boot time.
- To delete an EBS volume, go to Clouds > AWS Region > Volumes and click on a volume's Delete action icon.
Detach an EBS Volume from an Instance
Overview
You must use caution when detaching an EBS volume from a running instance in order to ensure that no data is lost or corrupted. How you detach a volume will depend largely on the function of the volume. For example, if you are performing writes to the volume (i.e database or sys-log server), it's imperative that you freeze the file system before detaching the volume. However, if the volume is storing static data, freezing the file system may not be necessary.
By default, when an instance is terminated, any attached volumes will automatically become detached
from the running instance.
As a best practice, you'll always want to create one last snapshot of a volume if you plan to delete it. You can either take the snapshot before you detach the volume or after it's been detached. If you are using Servers that were launched using one of RightScale's published MySQL EBS
ServerTemplates, volumes will automatically be detached and deleted. Therefore, if you want to create one last snapshot before you detach (and possibly delete the volume), you should take one last backup EBS snapshot.
How you take the final snapshot will largely depend on how the volume is currently being used.
- If you have a running instance where some application is writing data to the volume, you must first freeze the filesystem and then take the snapshot in order to ensure that no data is lost or corrupted. In such cases, you should ONLY take a snapshot by running the
**EBS volume backup**
script from theEBS Toolbox
ServerTemplate. This script will perform an XFS freeze on the filesystem and then take a snapshot. Once the snapshot is 100% complete, you can safely detach the volume. DO NOT create a snapshot of the volume by using the Snapshot action button from the volume's page because it will not stop writes to the volume prior to the snapshot being taken, which may result in lost or corrupt data. - If no data is being written to the volume, you can either follow the same steps as above or detach it at either the Server or Volume level. (see below) If a volume is detached, you can safely use the Snapshot action button at the Volume level. (Clouds > AWS Region > Volumes > Select Volume)
Use the procedure outlined below to detach an EBS volume from an instance.
Prerequisites
- A running instance with an attached EBS volume.
Steps
Before you Detach an EBS Volume
- Freeze the volume (if supported by the file system)
- Make sure that all files are closed and that there are no pending writes to the disk.
Manually detaching an EBS Volume
There are two different ways you can detach an EBS Volume from a running instance:
- Detach at the Server Level
- Detach at the Volume Level
Detach at the Server Level
- To detach an EBS Volume from an instance, go to the Volumes tab of an instance and click the Detach button and confirm the action.
Detach at the Volume Level
- Under Clouds > AWS Region > EBS Volumes, click on the Detach button of a volume. (You can also click the Detach button from the homepage of a selected volume.)

Grow the Size of an EBS Volume
Overview
An EBS volume cannot be resized once it is created.
However, when you create a new EBS volume, you can specify the size of the volume upon creation or when you restore an EBS snapshot. The default size of an EBS volume is equal to the size of your current database plus 5GB.
Since the size of the volume does not resize on-the-fly,
at some point you may need to expand the EBS volume to compensate for a growing database. To grow an EBS volume with almost no site downtime in a production environment you need to perform the operations on the slave instance and then promote it to a master.
Use the procedure outlined below to grow the size of an EBS volume.
Prerequisites
- An EBS volume that has been determined to be too small. The example below includes a deployment that uses an EBS volume to house its master/slave database setup.
This article describes how to manually increase the size of a single EBS volume used to store your database contents. Use the EBS Stripe volume grow and restore
or, in the case of a MySQL database, the DB EBS slave init and grow stripe volume
RightScript, which handle both striped and single EBS volumes, to automate this task.
It is highly recommended that you become familiar with this process and practice growing the size of an EBS volume in a staging environment before attempting to perform this procedure in your production environment.
Steps
Lower your DNS TTL
Before you begin you should log into your dynamic DNS Provider (e.g. DNS Made Easy) that you're using to manage the DNS records for your Master/Slave database setup and make sure you have a low TTL for your database master's A-record. If you are using RightScale's MySQL database ServerTemplates and following best practices, you should be using a TTL <= 120 seconds. (You might want to use an even lower TTL like 60 seconds.) So when you promote your slave to master, it will only take a few minutes for DNS to refresh. After a couple minutes, nslookup should return the new master's IP address.
During this promotion your application servers will not be able to properly reach the new master.
Example: DNS Made Easy
After logging into your account:
- Go to Managed DNS > Records (for your domain name) > Select your master DB A Record name
- Change the TTL to 60 (Note: Make a note of what you change it from. You will want to change it back later.)
- Select the Continue action button.
Also, if you are using Rails you will need to restart your Mongrels because it cache's the IP addresses of the database.
SSH into the Slave and Stop Database Services
- SSH into the slave and run the following command to stop MySQL and unmount the file system.
    df # Check disk/mount paritions before and after the umount
    service mysqld stop
    umount /dev/sdk
    df
Detach the EBS Volume from the Slave
- Go to Clouds > AWS Region > Volumes
- Locate the Slave's EBS volume. To confirm you have the correct one, make sure that:
- The Server column =
Slave DB
(or similar nickname you used for your slave Server) - The Device column = /dev/sdk
- The Status column =
in-use (attached)
- The Server column =
- Click the correct eraser action icon to detach the EBS volume from the slave
Restore snapshot
Restore your most recent database snapshot and give it a much larger volume size. The nickname will be something like: prefix-slave-20091281500, where prefix is the lineage name of your snapshots that you've already specified in your server input and 20091281500 is the timestamp of when the snapshot was taken.
- Navigate to Clouds > AWS Regions > Volume Snapshots
- Select the play action icon on your most recent snapshot in order to create a new EBS volume
- Database size - You do not need to change anything except the database size.
- Description - Although not mandatory, it is often useful to add some tracking information in the Description field. (For example, Doubled EBS volume size from 20 to 40GB on 1/1/2010.)
- Select the Create action button when ready
Attach the New EBS Volume to the Slave
Once the volume is created, you are ready to attach it to your slave. (Depending on the size of the database, it may take some time to become 100% complete.)
- Select the Attach action button and select the same slave instance that the volume was previously attached to. You will be presented with a multi-pane window. Select YourDeployment > YourSlaveServer
- Make sure the device is set to: /dev/sdk
- Check the Attach now option (Do not check the Attach at boot option since we only need to attach it this time only.)
- Select the Ok action button when ready. This operation could take a minute or two to complete. Follow the progress via the Events and/or Audit Entries. The
status
should progress fromattaching
toin-use (attached)
.
Mount and Grow the Filesystem
Once the EBS volume is attached you can mount it to your slave and grow the filesystem and verify the new size. Then start mysqld and verify the slave is replicating and the database is intact. Perform the following command from an SSH window on your slave:
    mount /dev/sdk /mnt/mysql # mount
    df # check the size
    xfs_growfs -d /mnt/mysql # grow the filesystem
    df # Verify the increase in volume size
    service mysqld start # Start up database services
    mysql
    show databases; # make sure you see your databases
    show slave status \G # Should show slave status, in sync with the master, waiting for new events
Promote Slave to Master
The last entry of the show slave status
mysql command (above) reveals the number of seconds the slave is replicating behind master. (For example: Seconds_Behind_Master: 0) Once the slave is fully caught up synchronizing with master you can promote it to master.
- Go to your slave's Scripts tab
- Run the
DB EBS Promote to Master
operational script (select its Run action icon) - Recall you can monitor the scripts progress via Events and/or Audit Entries. You are looking for
completed
andsuccess
Events. - Once completed, verify the
old
slave is now yournew
master database Server. From theold
slave's SSH window, rerun the following mysql command:show slave status \G# Should be the empty set nowshow master status \G# Should reveal your old slave is now the master
Remember to rename your old
slave to your new
master. (For example: NEW Master DB) This is such a simple task, yet not naming your Servers clearly can be very confusing and produce incorrect user actions with devastating results.
Restart Mongrels and Web Services (optional)
Restart your mongrels and any other web services to make sure they hit the new master. If your application does not require a restart, you can proceed to the next step. (This is a application specific step that not all will need to perform.)
Terminate the Old Master and Launch a New Slave
- Terminate the OLD Master database Server
- Clone the running master database Server. Rename it appropriately, it will become your new slave (For example: Slave DB)
- Launch the new slave Server
- Verify that the Input INIT_SLAVE_AT_BOOT = true
- Verify that both the master and slave have the larger volume size
- Look at the Volumes tab on your running Master DB Server
- Look at the Volumes tab on your running Master DB Server
Post Tutorial Steps
- Double check that all Servers in your Deployment are named correctly
- When things have settled, you can change your DNS setting's TTL back to what it was at the start of this Tutorial (for your Master-DB).
Initialize or Format an EBS Volume
Overview
Perhaps you used the Attach Blank Volume action button to Attach an EBS Volume to an Instance. But, before you can use an attached EBS Volume as a normal disk drive, you must first initialize or format it.
Use the procedure outlined below to initialize an EBS volume that was manually attached.
Some ServerTemplates, such as RightScale's MySQL
ServerTemplates contain scripts that will attach and initialize EBS Volumes to a Server at boot and runtime.
Prerequisites
- 'actor' user role privileges
- an EBS Volume that was attached to a Linux Server, but not initialized/formatted.
Steps
The following steps were tested on an instance running CentOS 5.2
- Go to the Volumes tab of the Server that has the unitialized/unformatted EBS Volume. If you just attached the EBS Volume to the instance, you must wait for its status to be
attached
to the instance before attempting to initilize the volume. If the volume still sayspending
you must wait a couple more minutes. - SSH into the Server and run the following shell commands to initialize the EBS Volume:
fdisk /dev/sdjYou must specify which mounted volume you want to format.- Enter
mfor a menu - Enter
nto add a new partion - Enter
pfor a primary partition - Enter
1for the first partion on the disk - Click 'Enter' to accept the default First Cylinder
- Select 'Enter' to accept the default Last Cylinder
- Enter
wto write the partition table (You will be returned to the Unix shell) mkfs.xfs -f /dev/sdj(If you do not have mkfs.xfs installed, you will need to install it using a command similar to the following:yum install kmod-xfs xfsdump xfsprogs dmapimkdir /mnt/ebs- To test, you can type
df -kto see the mounted devices. At this point, you will not see the file system that's on your EBS volume. mount /dev/sdj /mnt/ebs- Run the test again using
df -kbut this time you should see the filesystem on your EBS volume with the correct mount point (e.g. /mnt/ebs).
- Close your SSH session. You can now save data to the EBS Volume and take a backup, which will create an EBS Snapshot of the volume which can later be used to restore your volume's data on another instance.
Create an EBS Snapshot
Overview
An EBS snapshot represents an EBS volume at a particular point in time. You can take an EBS snapshot of an EBS volume regardless of whether or not the volume is attached to a running instance, although it is strongly recommended that you either detach or freeze all writes to a volume before taking a snapshot in order to prevent any data loss or corruption. If you do not take these necessary precautions, your data will not be in synch and you could possibly lose or corrupt data on the disk.
EBS snapshots are a series of data blocks that are saved to S3. You cannot attach the same volume to multiple instances, but you can take a snapshot of the volume, create a clone of the volume from the snapshot and specify the appropriate availability zone.
EBS volumes and snapshots are EC2 region-specific. You cannot use a volume/snapshot that you created in EC2-US in a different region like EC2-EU. This tutorial assumes you are creating an EBS snapshot for EC2-US.
The data on your volume can be corrupted if you do not properly detach/freeze a volume before taking a snapshot. As a best practice, you should always make sure that no writes are being made to a volume before taking a snapshot. Both the EBS Toolbox and MySQL EBS ServerTemplates issue an 'xfs_freeze' on the EBS volume prior to taking the snapshot, which stops all write activity before the snapshot is taken.
Use the procedure outlined below to create an EBS Snapshot.
Steps
Before you Create a Snapshot of an EBS Volume:
- Freeze the volume (if supported by the file system)
- Make sure that all files are closed and that there are no pending writes to the disk
Create an EBS Snapshot
You can take EBS Snapshots of a volume at a particular point in time and then create multiple volumes from a snapshot and place them into any zone. You can see the lineage of a volume/snapshot to see when it was created, as well as any parent/child relationships.
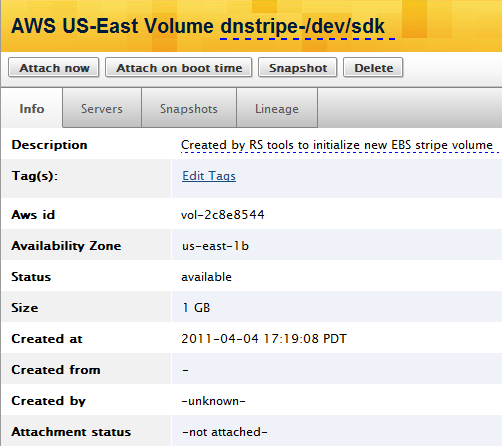
- Go to Clouds > AWS Region > Volumes
- Find your volume of choice and click the Snapshot icon

- Alternatively, you can also click the Snapshot action button from an EBS Volume's homepage.
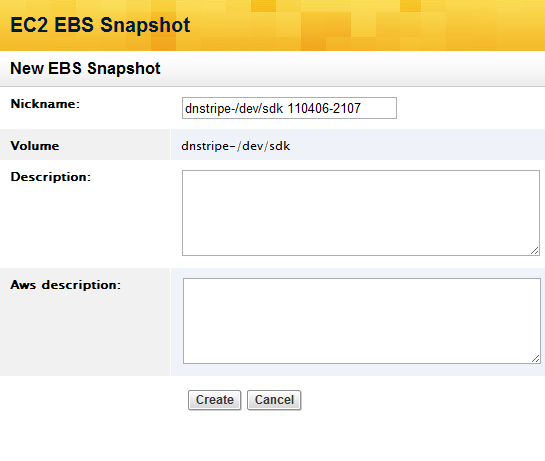
- Provide a name and short description of the volume. Click Create.
- A confirmation window will track the progress of your snapshot.
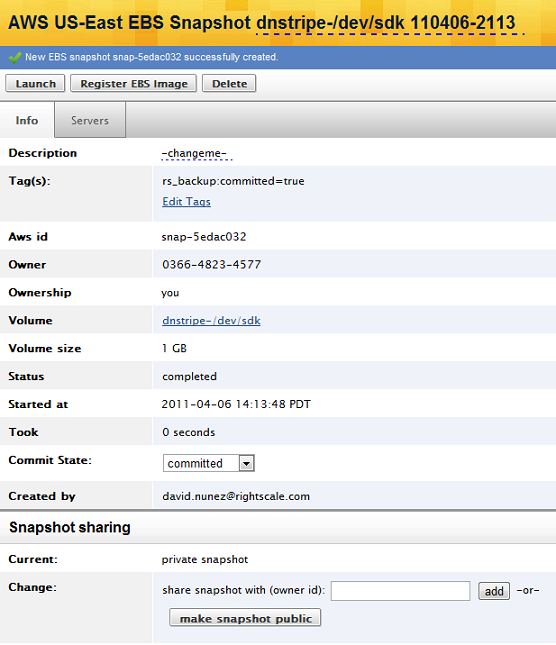
Depending on the size of the volume, it might take several minutes to create the snapshot. You must wait for its status to become completed
before you can launch it and create a volume from the new snapshot.