Create a New instance
Use the following steps to create a new Instance in the Cloud so you can launch it and use it for various purposes.
Steps
- Navigate to Clouds > CloudName > Instances
- Click the New action button and fill out the field information. (Use the information below for additional information if needed.)
- Click the Launch action button when ready to launch your new instance.
- Image - What image the new instance should use, boot from, etc.
- Instance Type - Generically speaking, the size of the instance. Typically includes compute resources such as the amount of CPU, memory, and ephemeral storage.
- Security Group(s) - Select one or more Security Groups. Security Groups are firewalls in the cloud supporting various inbound networking rules (such as allow/deny access to various ports, protocols, IP addresses, other Security Groups,etc.).
- Datacenter/Zone - A regional datacenter in the cloud (Datacenter and Zone are synonymous). A cloud will often have multiple Datacenters which can help when architecting a highly available Deployment. For example, a US based cloud with four Datacenters might be North, South, East and West.
Create a New Instance using the Instance Provisioner
Use the Instance Provisioner to create a new Instance in the Cloud so you can launch it and use it for various purposes. Note that the steps provided below are somewhat generic in nature but focused on creating instances in AWS. You will want to visit these cloud-specific pages as needed for the cloud you are working with.
- Google - Add and Launch a New GCE Instance
- Azure - Add and Launch a New Microsoft Azure Instance
- OpenStack - Add and Launch a New OpenStack Instance
- SoftLayer - Add and Launch a New SoftLayer Instance
- vSphere - Add and Launch a New vSphere Instance
Steps
The Instance Provisioner walks you through the following steps to creating a new Instance:
- Selecting an image
- Specifying hardware settings
- Configuring networking parameters
- Confirming launch settings
- Launching the Instance.
Use the following procedure to create a new Instance in the Cloud using the Instance Provisioner.
Navigate to Clouds > CloudName > Instances > New. The Image screen of the Instance Provisioner displays.
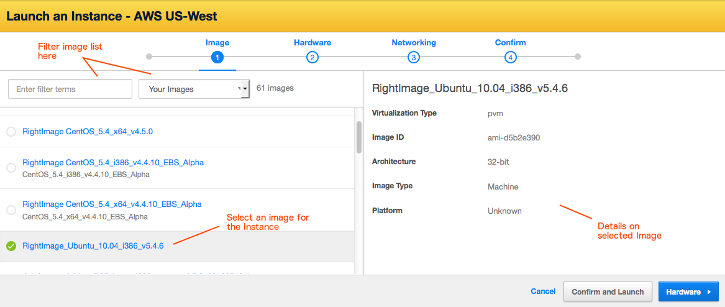
In the left-hand pane, select the machine image you want to use for your Instance. You can use the filter controls to help you locate the images that are of interest to you. The information displayed in the right-hand pane provides specific details on the selected image. Once you have chosen an appropriate image, click Hardware to move to the next screen. Note that you can also use the 'breadcrumbs' at the top of the screen to navigate through the various steps of the Instance Provisioner.
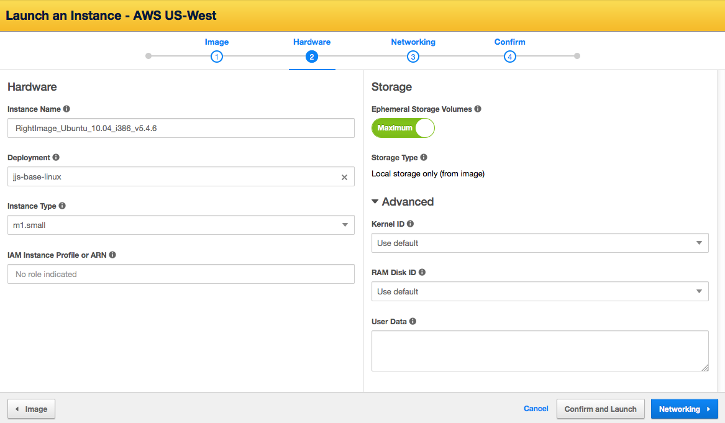
The Hardware screen provides the following fields and controls for configuring the hardware and storage settings for your Instance.
- Instance Name - a user-defined name for the instance. Use this text field to enter a name for your Instance.
- Deployment - the RightScale deployment into which the Instance will be launched. Use the drop-down list to select an existing deployment.
- Instance Type - a cloud-specific descriptor identifying a combination of CPU, storage, memory, and networking capacity. Use the drop-down list to select an appropriate type.
- IAM Instance Profile or ARN - the AWS Identity and Access Management Profile or the Amazon Resource Name. Enter the IAM Instance Profile name, or if you prefer, you can enter the ARN in the proper format (arn:aws:service:region:account:resource). IAM roles contained in the Instance Profile will be assigned to the server instance at launch time.
- Ephemeral Storage Volumes - the number of ephemeral storage devices that will be attached to the Instance. Set this to 'Maximum' to utilize the maximum number of ephemeral devices that the selected instance type can support.
- Storage Type - the type of disk to use for all volumes attached to the Instance. May be dictated by the image selected.
- Kernel ID - the core of the Instance operating system. Use the drop-down list to select an available kernel ID.
- RAM Disk ID - identifies the RAM disk that contains the files required for the kernel. Use the drop-down list to select an available RAM Disk ID.
- Boot to New Volume - If enabled, the instance will launch into volume storage. Otherwise, it will boot to local storage. Available only on certain clouds.
- Delete Volume on Termination - If 'Delete' is selected, the associated volume will be deleted when the instance is terminated. Only shown if 'Boot to New Volume' is enabled.
- Root Volume Size (GB) - The size (in gigabytes) of the volume that contains the root filesystem of the instance. Available only on certain clouds.
- User Data - allows for the configuration of the Instance during launch. Use this optional text field to specify your User Data.
Enter or select appropriate values for the settings on the Hardware screen, then click Networking.
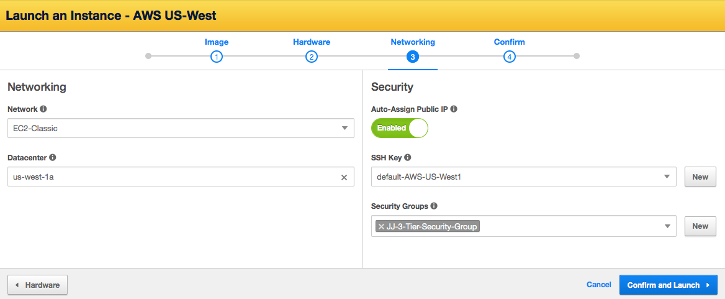
The Networking screen provides the following fields and controls for configuring the networking and security settings for your Instance.
- Network - the Amazon Virtual Private Cloud (VPC) into which the Instance will be launched. The Network contains the IP address range, subnets, route tables, and internet gateways. Use this drop-down to select the network for your Instance.
- Datacenter - a location within a cloud region, meant to isolate a failure from reaching other zones. Use this drop-down to select a datacenter.
- Auto-Assign Public IP - enables/disables auto-assignment of addresses from Amazon's public IP address pool when the Instance is launched. You can assign an elastic IP address if you require an IP address that persists across launches. Use this toggle control to enable or disable auto-assignment of public IP addresses.
- SSH Key - provides secure console login to your Instance. Use this drop-down to select a previously created SSH key, or you can click the New button to create a new key.
- Security Groups - provide firewall rule sets that control access to your Instance. Use this drop-down to select one or more security groups for your Instance. You can also click the New button to create a new security group.
Enter or select appropriate values for the settings on the Networking screen, then click Confirm and Launch.
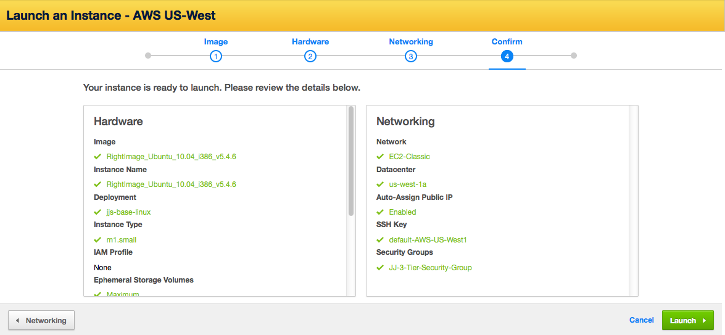
Review your settings for the Instance you want to launch. If you need to change anything, you can use the 'breadcrumbs' at the top of the screen or the buttons in the lower left-hand portion of the screen to navigate back to make modifications. Click Launch to initiate launching the Instance.
Stop a Running Instance
You can stop a running instance by taking the following steps.
- Navigate to Clouds > Cloud Provider > Instances.
- Click the link for the instance you want to stop. The Instance Info page displays.
- Click the Stop button to stop the selected instance.
- Click OK when prompted for confirmation.
Start a Stopped Instance
You can start a stopped instance by taking the following steps.
- Navigate to Clouds > Cloud Provider > Instances.
- Click the link for the instance you want to start. The Instance Info page displays.
- Click the Start button to start the selected instance.
- Click OK when prompted for confirmation.
Add Instances to a New Deployment
When you go to the instances section in RightScale you can see all the active or terminated instances in your cloud. The instances you see can be added to a deployment, switched to a different deployment, or added to a new deployment.
Steps
- Go to Clouds >cloud provider > Instances.
- Select the Instance or Instances you want to move into a deployment from the Actions column.
- Select Add to Deployment from the drop down in the bottom right hand corner of the screen and click Apply to Selected.
The Add Instance(s) to Deployment will pop up. Choose to create a New Deployment or add to an existing deployment. Note: If adding an instance that already exists in a deployment, the instance name will appear red and will be moved out of the deployment into the one you select or create.
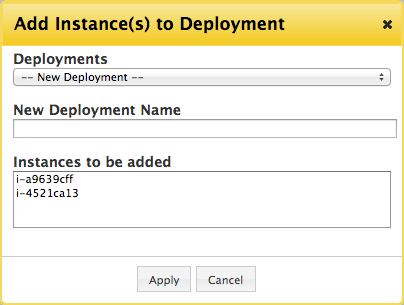
- Deployments - You can chose an existing deployment or you can make a new deployment. By default, New Deployment is selected.
- New Deployment Name - Only displays if you are creating a new deployment. This will be the name of the deployment your instances will be added to.
- Instances to be Added - This will list the instances that are being added to the deployment. If you're adding an instance that already exists in a deployment, the instance name will appear red and will be moved out of the deployment into the one you select or create.
Click Apply.
You will be directed back to the list of instances. If you would like to go to the instance's deployment, you can click on the deployment name in the Deployment column.