Create a New SSH Key
Overview
Before you can launch your deployment, you need to create an SSH Key in the RightScale Dashboard. The SSH key is passed into the new instance to allow root login access to your instance via SSH. Typically you'll find it inserted into /root/.ssh/authorized_keys after the instance is launched. If you launch an instance with an SSH Key pair that was not created through RightScale, then many of our convenient features (bundling, backups, automation, etc.) will not be available to you. Without knowing the contents of the SSH Keys, RightScale will not be able to access your instance to perform such tasks. It's important to use an SSH key that has key material.
Prerequisites
- Note that SSH is required to run RightScripts (prior to RightLink enabled images, which are RightImages prior to v5), so setting up your SSH key can be very important.
- Amazon SSH keys are EC2 region-specific. You cannot use an SSH key that you created in EC2-US for an instance in a different region like EC2-EU. This tutorial assumes you are creating an SSH key for EC2-US. (Functionally, creating SSH keys for the EU region is similar.)
Steps
- Go to Clouds > AWS Region > SSH Keys. Click the New action button.
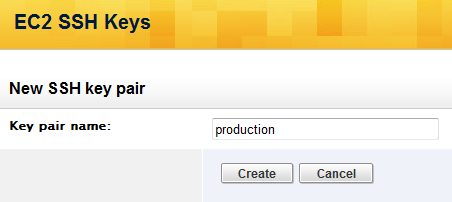
- Name the key pair (for example
production
) and click the Create action button.
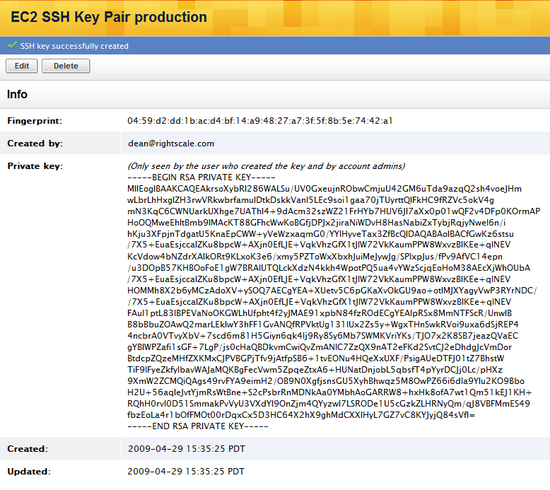
- Copy this key locally to SSH into your instance.
Add Private SSH Key Material
Overview
How come I can't SSH into my EC2 instance in the RightScale Dashboard?
There may be several reasons why the SSH Console button is not visible in the Dashboard for a running EC2 instance. An SSH key consists of a matching private-public keypair. When you create an SSH Key, you are given the matching private key material. AWS will only give you the matching private key material once (when the key is generated). Typically, you will save it in a safe location.
For instances launched directly from images (not ServerTemplates)
By default, when you create an SSH key in the RightScale platform, RightScale will store the private key material for you. But, if you create an SSH key outside of the RightScale platform, RightScale will not be able to capture the private key material. Therefore, if you are new to RightScale and created a new RightScale account, you may notice that you can see all of your running EC2 instances (Clouds > AWS Region > EC2 Instances), but the SSH Console action button is not available. The reason why the SSH Console button is not visible in the Dashboard for a running EC2 instance is because RightScale does not have the matching private key material for the SSH key that was used to launch the instance. If you want to SSH into the instance from the Dashboard, you must upload your private key material to RightScale. Otherwise, you will only be able to SSH into the instance from outside the Dashboard using your own SSH client.
For instances launched with a ServerTemplates using a v4 RightImage
If you are using an older v4 RightImage, the SSH Key is used to establish a client-server connection to the instance so that scripts can be run and for establishing SSH console sessions inside the Dashboard. It's strongly recommended that you upgrade any instances using v4 RightImages to v5 RightImages in order to eliminate this AWS-specific dependency. v5 RightImages have a RightLink agent for establishing secure connections with an instance for running scripts and establishing SSH console sessions.
Prerequisites
- 'actor' user role privileges
- access to the matching SSH key's private key material
Steps
- Go to Clouds > AWS Region > SSH Keys. Find the SSH key that has its private key material missing. Most likely you created the SSH Key outside of the RightScale platform.

- Click on the SSH Key that has missing private key information so that you can edit it and provide the missing private key information.
- Click Edit.
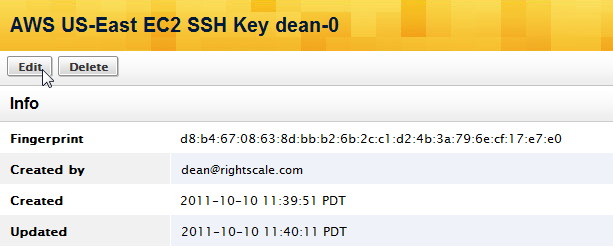
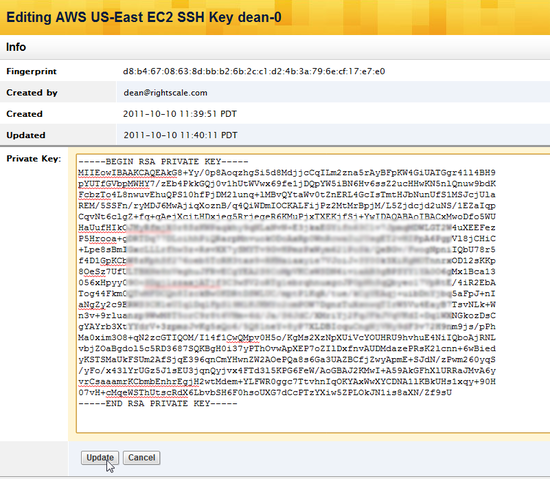
- Copy and paste the matching private key information and click Update.
[
- Go back to the SSH Keys index page and you should now see that the private key material is no longer missing.

- Go to the instance that you were unable to SSH into from the Dashboard and you should now see the SSH Console action button as an option.
If you are interested in using a native SSH client, visit the following FAQ for additional information: (How do I configure my native SSH client to work with RightScale?)
Create an RSA Key Pair
Overview
To create an RSA key pair that you can use to Create a New SSH Key by Importing an RSA Key Pair.
Prerequisites
- SSH client that supports RSA key pair creation
- Running Linux instance that you can SSH into
Steps
- SSH into the running Linux instance. The example below is based off of an Ubuntu 10.04 instance.
In the terminal window, type the following linux command at the prompt:
# ssh-keygenProvide a name that will be used for the key files that will be created.
Generating public/private rsa key pair.
Enter file in which to save the key (/root/.ssh/id_rsa): my-keypair
When asked to provide a passphrase, leave it blank and click Enter. You do not want to use a passphrase.
Enter passphrase (empty for no passphrase): <ENTER>Enter same passphrase again: <ENTER>Next, locate the created private and public key files.
# lltotal 120
drwx------ 7 root root 4096 2011-12-15 00:03 ./
drwxr-xr-x 21 root root 4096 2011-12-14 23:58 ../
-rw-r--r-- 1 root root 3463 2011-12-14 23:58 .bashrc
drwx------ 2 root root 4096 2011-12-14 23:58 .cache/
drwxr-xr-x 2 root root 4096 2011-12-14 23:58 .chef/
drwxr-xr-x 4 root root 4096 2011-11-09 02:40 .gem/
-rw-r--r-- 1 root root 181 2011-12-14 23:57 .gemrc
-rw------- 1 root root 56103 2011-12-14 23:58 .git_completion.sh
-rw------- 1 root root 74 2011-12-14 23:58 .gitconfig
-rw------- 1 root root 32 2011-12-14 23:57 .monit.id
-rw------- 1 root root 1675 2011-12-15 00:03 my-keypair-rw-r--r-- 1 root root 404 2011-12-15 00:03 my-keypair.pub-rw-r--r-- 1 root root 140 2010-04-23 09:45 .profile
drwxrwx--- 2 root root 4096 2011-11-09 02:43 .rightscale/
drwx------ 2 root root 4096 2011-12-14 23:58 .ssh/
-rw------- 1 root root 115 2011-12-14 23:58 .vimrc
View the files and save the contents of your RSA keypair. For your records, you may want to copy and paste the value into a text file for archiving purposes.
- my-keypair (private key)
- my-keypair.pub (public key) ~~~ # view my-keypair ~~~
Create a New SSH Key by Importing an RSA Key Pair
Overview
Use the following procedure to create an AWS SSH Key by using the Import
feature to use your own RSA key pair.
Prerequisites
- 'actor' user role privileges
- valid RSA keypair (See Create an RSA Key Pair)
Steps
- Go to Clouds > AWS Region > SSH Keys. Click the Import action button.
- Provide a name of the SSH Key and the public key material for your key pair and click Import.
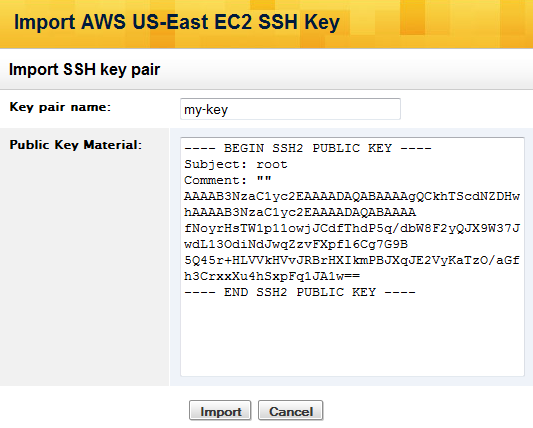
The SSH Key that you just generated does not have private key material like other EC2 SSH Keys. You may not be able to successfully use the SSH key inside the Dashboard/API to log into instances depending on the RightImage version that's being used as well as your Managed SSH preferences. v4 RightImages require that the private key material be present in order to access the instance and successfully execute scripts.

You will not be able to successfully launch an instance using a v4 RightImage because the private key material is missing. However, you can use the key pair for instances using v5 RightImages since Managed SSH is used for authentication purposes.
One of the benefits of using the Import key pair feature is that you can use the same RSA key pair in multiple AWS regions, unlike standard EC2 SSH Keys. Simply repeat the import process using the same RSA key pair to create valid EC2 SSH Keys in other regions in which you would like to use the same key pair.
Delete an SSH Key
Overview
Use the following procedure to delete an existing AWS SSH Key.
You can delete an SSH Key that is referenced by an inactive or active (running) server, so if you try to launch or relaunch a server whose SSH Key was deleted, the request will fail because you will need to select an existing SSH Key.
Prerequisites
- Only the user who created the SSH Key or a user with 'admin' privileges will be allowed to delete an SSH Key (assuming they also have 'actor' user role privileges).
- You must have 'actor' user role privileges in order to delete the key.
Steps
- Go to Clouds > AWS Region > SSH Keys.
- You can either click the Delete icon next to the SSH Key you want to delete or click the Delete action button at an SSH Key's show page.