Background Information
This article describes how to connect to a running Linux server using an SSH session with RightScale's Managed SSH Login feature.
The steps required to set up an SSH connection differ depending on whether you launch your SSH session from within or outside of the RightScale Dashboard, as described below.
Note : If you are using a Windows instance, see RDP into a Server.
Answer
General Best Practices
If the cloud supports the use of SSH Keys (for example, EC2) you should hide the private key material of all ssh keys from non-Admin users.
SSH User Settings
Your user settings determine your SSH preferences. To view and edit your SSH settings, navigate to Settings > User Settings > SSH.
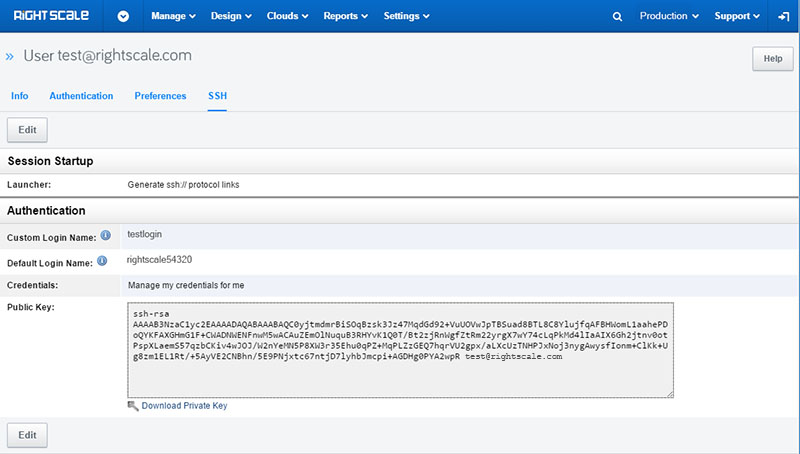
This document will refer to these settings.
Your RightScale user account must have server_login role enabled in order to SSH into servers. This is also required to see the SSH icon/button on the dashboard.
SSH Inside of the RightScale Dashboard
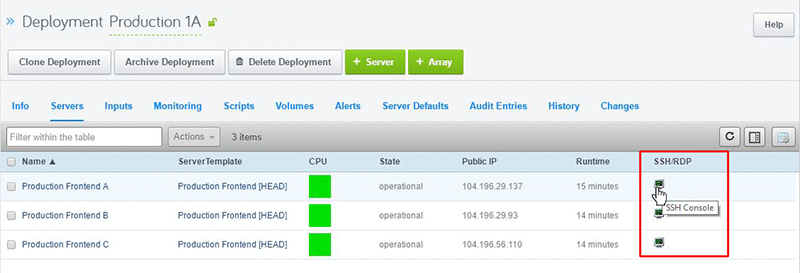
The easiest way to SSH into your machines is to use the integrated SSH feature available from the Dashboard.
To start your SSH session, click the terminal icon next to the instance that you want to access.
Note: More information on setting up a native SSH client to work with the RightScale Dashboard is available in the article titled How do I configure my native SSH client to work with RightScale?.
SSH Outside of the RightScale Dashboard
The following sections describe how to SSH into an instance using a third party SSH client installed on your machine without launching the SSH session from the RightScale Dashboard. Procedures for using PuTTY on a Windows PC are presented as well as procedures for using SSH from a UNIX, Linux, or Mac OSX terminal application.
Windows - Using PuTTY
If you need to SSH into your instances from a Microsoft Windows machine outside of the RightScale Dashboard, we recommend using PuTTY, a widely used free telnet client. Use the following steps to install PuTTY and configure it for use with RightScale-managed servers outside the RightScale Dashboard.
Install the PuTTY Client and Download Private Key from RightScale
First, you need to install the PuTTY client on your Windows PC workstation and download your private SSH key from RightScale.
- Browse to PuTTY's main page and click the link to the 'PuTTY Download Page'.
- On the PuTTY download page, locate and click the Windows installer package and save it to your local drive (e.g., putty-0.68-installer.exe).
- Run the PuTTY installer by double-clicking it.
- From your SSH User Settings, click on
Download Private Key
which will save your private key to your Downloads folder (download location may vary between browsers). - Move this private key to a safe and secure directory that only you have access to.
Convert Private Key to PuTTY-Friendly Format
Now that you have the private key material stored on your local drive, you need to convert it to a format that PuTTY understands. By default, the key is generated by RightScale in openSSH format so it must be converted using PuTTYgen before it can be used in PuTTY.
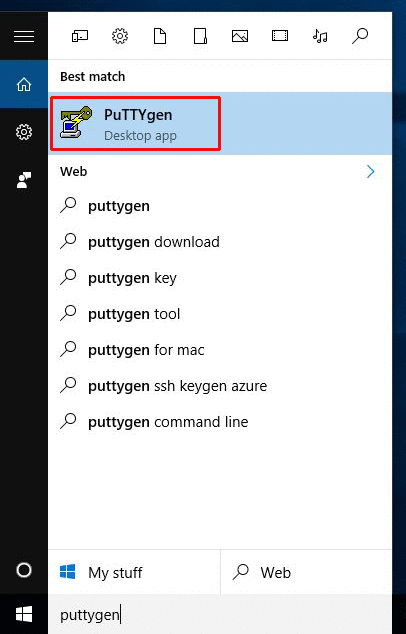
On your workstation, locate and start PuTTYgen. Image below shows typing 'puttygen' in the search box in Windows 10.
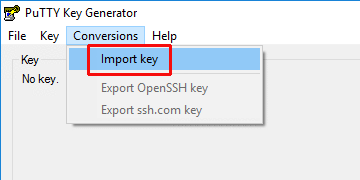
In the PuTTY Key Generator, open the Conversions menu and select Import Key.
Browse to the location where you saved the private key, select it, and click Open. The private key material is loaded and formatted in the key generator.

Click Save Private Key , then click Yes when prompted to save the key without a passphrase.
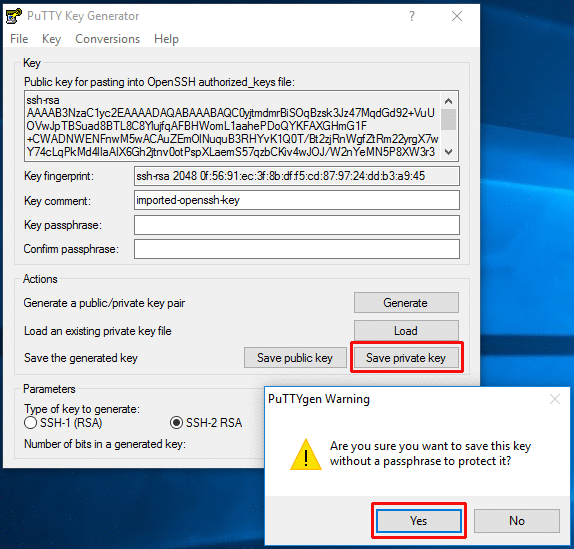
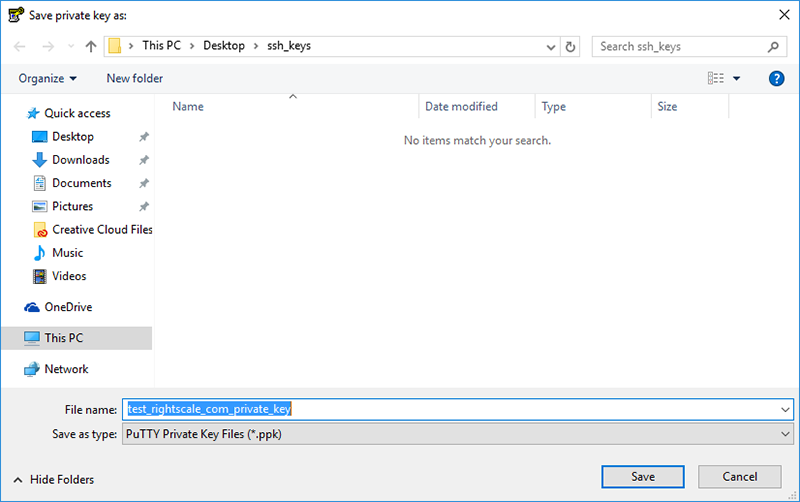
Enter a meaningful name for the generated key, browse to a location where you want to store the key and click Save. Your generated key will be saved with the *.ppk extension.
Close the PuTTY Key Generator.
Configure PuTTY to Use SSH Key-based Authentication
There are two ways in which you can configure PuTTY to use the generated key:
- By pointing to the location of the key in the Auth Options where it will become the default.
- By loading individual keys as you need them using PuTTY's SSH authentication agent Pageant.
The first option is simpler as you do not need to load individual keys, but you are limited to using one key at a time until you update the setting in Auth Options. The second option is more flexible but requires that you select and load a key on every startup of the Pageant application. Both options are described here for your reference, but you can elect to use whichever option you prefer.
Option 1 - Using PuTTY Auth Configuration
From your Windows workstation, launch the PuTTY client.

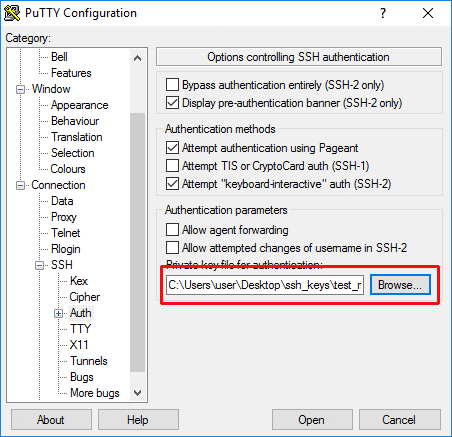
Under the Connection category, select SSH > Auth.
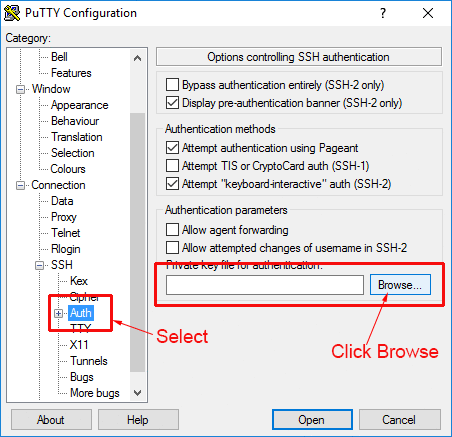
Click Browse and navigate to the location of the key you generated using PuTTYgen.
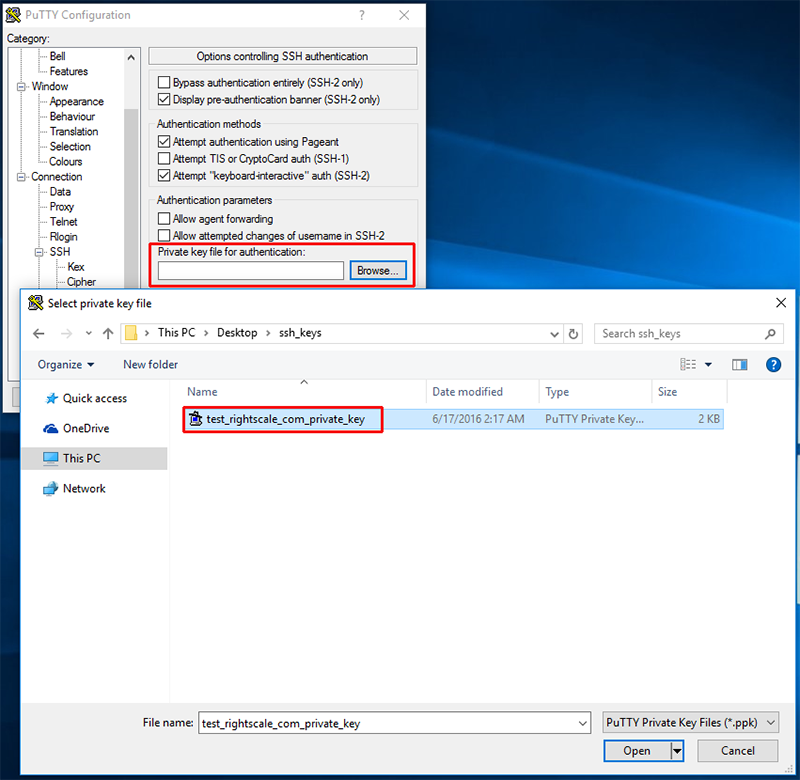
Select the key and click Open.
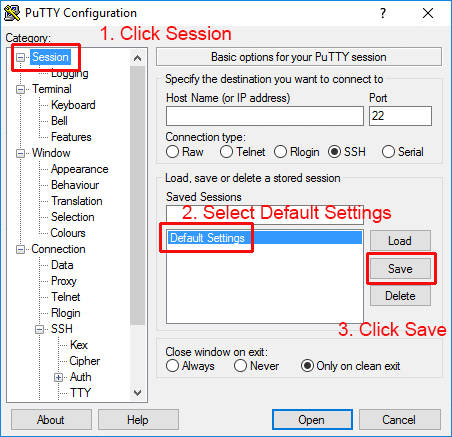
Once the key is loaded, select the Session category then select Default Settings in the Saved Sessions list and click Save. This will save the current PuTTY settings as a default session.
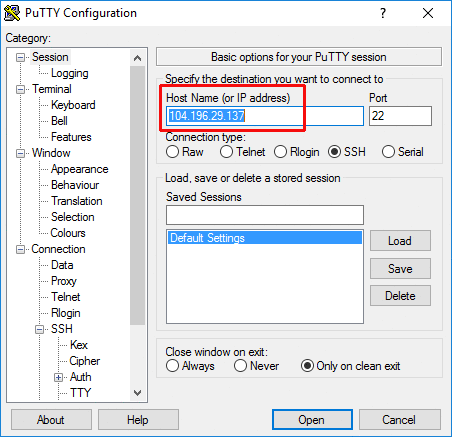
Connect to your server by entering the server IP address in the Host Name field and clicking Open. Make sure Port 22 is set and the Connection Type is set to SSH. [Note: If you are connecting to your server for the first time with PuTTY, you may see a security alert dialog asking if you would like to cache the server's host key in the Windows registry. Choose Yes if your are presented with this dialog.]
Once the session starts you will see a
login as
prompt. From your SSH User Settings, enter your 'Custom Login Name' or 'Default Login Name' and press Enter/Return. After providing your login name, the RightScale agent takes over and authenticates your RightScale username over a key-based exchange without prompting you for a password.
Option 2 - Using the Pageant SSH Authentication Agent
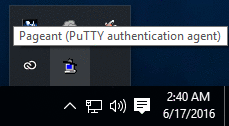
From your Windows workstation, launch the Pageant application. When you run Pageant, it will place an icon of a computer wearing a hat into the Windows System tray. Initially, it will not display an interface or screen for you to interact with until you load a private key into it. To display the Pageant window, double-click its icon in the System tray.
Click Add Key and browse to the location of the key you generated previously with PuTTYgen.
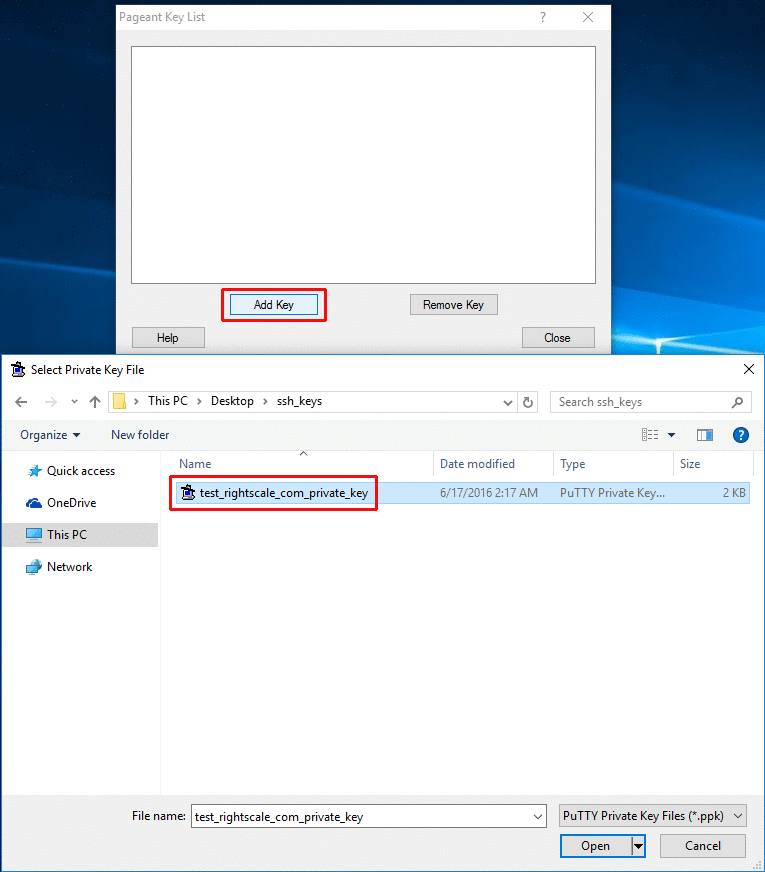
Select the key and click Open. The selected key is loaded into the Pageant Key List.
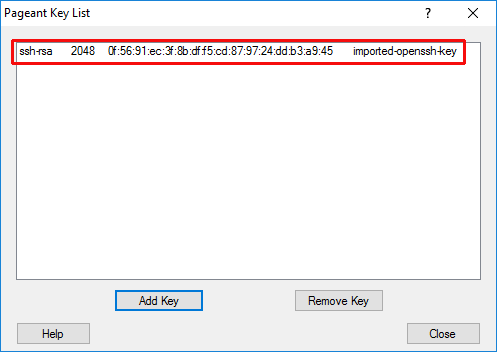
To connect to your server, launch the PuTTY client, enter the server IP address in the Host Name field and click Open.
Once the session starts you will see a
login as
prompt. From your SSH User Settings, enter your 'Custom Login Name' or 'Default Login Name' and press Enter/Return. After providing your login name, the RightScale agent takes over and authenticates your RightScale username over a key-based exchange without prompting you for a password.
Tips for Using PuTTY
PuTTY comprises a powerful set of utilities for managing SSH, telnet, and Rlogin connections to multi-user operating systems. PuTTY is an ideal client for use on Windows PCs that require remote console connection to Linux server systems. The more you work with PuTTY the more you will discover how to best manage your particular remote login requirements. Here are a few tips that you might find useful.
- In the PuTTY Session view you can create and save multiple session profiles and load/use them as you see fit. For example, if you need to SSH into more than one server you can set up a unique session profile for each server (with a different Host Name/IP address), save it and then load it from the Saved Sessions list.
- You can also configure PuTTY to use both Pageant-managed keys along with SSH > Auth-managed keys by creating separate session profiles; some that use Pageant-managed keys and others that use SSH > Auth-managed keys.
Linux/Unix/Mac OS X Terminal
To SSH into your instance using a terminal application on a Unix, Linux, or Macintosh machine outside of the RightScale Dashboard use the following steps.
- From your SSH User Settings, click on
Download Private Key
which will save your private key to your Downloads folder (download location may vary between browsers). - Move this private key to a safe and secure location on your local machine where SSH keys are commonly stored. For example,
~/.ssh/. In our example we will be moving the file to~/.ssh/test_rightscale_com_id_rsa Open your terminal application and at the command prompt issue the following command to change permissions on the key file:
chmod 400 ~/.ssh/test_rightscale_com_id_rsaIssue the following command to add the key file to the SSH authentication agent.
ssh-add ~/.ssh/test_rightscale_com_id_rsaConnect to your running server using the
-ioption to pass the parameter for your ssh private key location.For RightLink 10.5.0 and later, chose the login name you wish to use from your SSH User Settings. In our example we will use the 'Default Login Name':
ssh -i ~/.ssh/test_rightscale_com_id_rsa rightscale54320@<ip_address>For RightLink v5.9 to 10.4.0:
ssh -i ~/.ssh/test_rightscale_com_id_rsa rightscale@<ip_address>For RightLink versions older than v5.9:
ssh -i ~/.ssh/test_rightscale_com_id_rsa root@<ip_address>