Objective
To recreate a 3-tier website architecture in a different cloud to simulate a disaster recovery scenario or deployment migration.
Prerequisites
actor
anddesigner
user role privileges- Valid cloud credentials associated with the RightScale account for the cloud that you are going to use to recreate the 3 tier setup.
- An operational 3-tier deployment.
Overview
What would happen if there was a major failure in the cloud where your site is currently deployed? Or perhaps your cloud credentials were compromised and now you have to redeploy your site in a different cloud. Or perhaps you simply need to migrate to a different cloud for other non-critical reasons. The following tutorial will explain how you can easily redeploy your website architecture in a different cloud infrastructure with RightScale's multi-cloud ServerTemplates.

In the diagram above, the original deployment (on the left) in Cloud X (e.g. AWS) supports the use of volumes for data storage. Therefore, primary backups are saved as volume snapshots. For disaster recovery purposes, a secondary backup of the database is saved to a Remote Object Storage (ROS) location of a different cloud provider (e.g. Rackspace Cloud Files). The secondary backup becomes the key component in a disaster recovery scenario. In the event of a catastrophic cloud failure where servers are no longer functional or become inaccessible, and you need to rapidly redeploy your site in a different cloud infrastructure, you can use the secondary backup for disaster recovery purposes.
Similarly, you could also follow the same procedure outside of a disaster recovery scenario for safely migrating your deployment across two different clouds or regions. For example, you would need to follow the procedure outlined below to move a site architecture across different AWS-regions (e.g. 'us-east' to 'us-west') since volume snapshots are cloud-specific.
In the diagram, Cloud Y is the failover
cloud (i.e. the cloud where you will recreate the site architecture by launching new servers). In order to set up the database tier in the failover
cloud, you will use the secondary backup to restoration purposes.
Fortunately, you can restore your database and recreate your architecture in a different cloud with just a few clicks in the RightScale dashboard.
Note: Currently, you must manually create a secondary backup by running the db::do_secondary_backup operational script on either the master or slave database server.
Steps
Take a Secondary Backup
The first step is to create a secondary backup in the failover
cloud. For example, if you want to failover from an AWS region to Rackspace Open Cloud, you will neeed to create and save a secondary backup in a Rackspace Cloud Files container. Similarly, if your servers are currently deployed in AWS 'us-east' and you want to migrate to servers in AWS 'us-west' instead, create and save a secondary backup to an S3 bucket.
Since you do not want to impact the master
database server, it's recommended that you use the slave
database server to create the secondary backup. Go to the slave
database server's (current) Inputs tab and provide values for the following inputs.
BLOCK_DEVICE
| Input Name | Description | Example Value |
|---|---|---|
| Secondary Backup Storage Cloud (default) | The name of the ROS service that will be used to store the secondary backup(s). (e.g. Rackspace Cloud Files) | text: cloudfiles |
| Secondary Backup Secret (default) | Provide valid cloud credentials so that you can create a secondary database backup in the specified ROS location. For Amazon S3 , select the 'AWS Secret Access Key' credential. For Rackspace Cloud Files , set to your Rackspace account's API key. |
cred: RACKSPACE_AUTH_KEY |
| Secondary Backup User (default) | For Amazon S3 , select the 'AWS Access Key ID' credential. For Rackspace Cloud Files , set to your Rackspace account's username. |
cred: RACKSPACE_USERNAME |
| Secondary Backup Storage Container (1) | The name of the ROS container (e.g. S3 bucket or Cloud Files container) that will be used to store the secondary backup(s). | text: my-container-name |
Go to the slave
database server's (current) Scripts tab and run the db::do_secondary_backup operational script.
Clone the Deployment
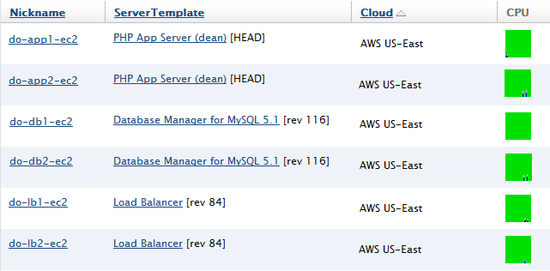
- Go to the deployment that contains the servers of the currently deployed 3-tier architecture. In the example screenshot below, all of the servers are currently deployed in the AWS 'us-east' cloud.
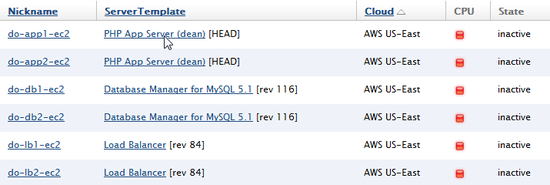
- Click the Clone button and rename the deployment. Note: You will see a notification window that reminds you that all aspects of a deployment will be reused or recreated, if necessary. Click OK.
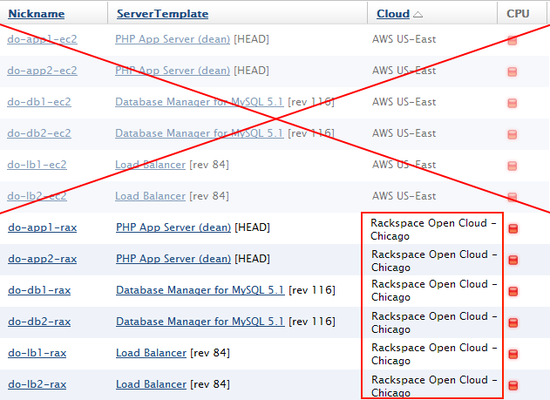
Replace the Existing Servers
The next step is to replace each server with an equivalent server that's configured to launch a server in the failover
cloud.
- Go to the ServerTemplate of a server. Add a server to the
failover
deployment. Be sure to select the appropriate cloud as well.
- Once you have created equivalent servers in the
failover
cloud, you can delete the old servers.
Modify Inputs
Now that your failover
deployment is configured to launch servers into a different cloud, you may need to modify the following inputs. There are two types of primary storage options.
- Volumes
- Remote Object Storage (ROS)
If the failover
cloud supports the use of volumes (e.g. AWS, Rackspace Open Cloud, etc.), volumes will be used for storing primary backups. However, if you're going to use a cloud that does not support volumes (e.g. SoftLayer), you will need to provide values for the following inputs so that primary backups can be saved in an ROS location (e.g. Rackspace Cloud Files container or Amazon S3 bucket).
Go to the failover
deployment's Inputs tab, click Edit and define the appropriate inputs.
BLOCK_DEVICE
Note : To view all of the inputs listed below, you will need to expand the inputs view to display the Advanced
inputs.
| Input Name | Description | Example Value |
|---|---|---|
| Backup Primary Secret (default) | Provide valid cloud credentials so that you can create a primary database backup in the specified failovercloud. If you are using an AWS region as the failovercloud, set this input to 'ignore'. If the failovercloud does not support volumes, you can use one of the supported ROS options. For Amazon S3 , select the 'AWS Secret Access Key' credential. For Rackspace Cloud Files , enter the Rackspace account's API key. |
cred: RACKSPACE_AUTH_KEY |
| Backup Primary User (default) | For Amazon S3 , set to set to your AWS Access Key ID. For Rackspace Cloud Files , enter the Rackspace account's username. |
cred: RACKSPACE_USERNAME |
| Primary Backup Storage Cloud (default) | If the failovercloud supports volumes, this input is ignored because volumes are used for data storage and primary backups are saved as snapshots. If the failovercloud does not support volumes, select the type of ROS service that will be used for primary backups. |
text: cloudfiles |
DB
| Input Name | Description | Example Value |
|---|---|---|
| Database Backup Lineage | You must keep the same lineage name as the other deployment so that the secondary backup can be properly located and retrieved from the specified ROS location. If you are using Rackspace as the failovercloud, this input is used to create subsequent primary database backups. If a Cloud Files container with a matching name does not exist, a new container will be created and named using this input. The primary backup files will also have this input as a prefix. |
text: mysqlbackup |
Database Tier Setup
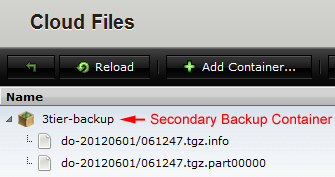
- Check the ROS location where you created the secondary backup. You must wait for the secondary backup to be complete before proceeding to the next step. Note: Secondary backups are saved as binary backups and not as a gzip dump file. In the example screenshot below, a secondary backup was saved to a Rackspace Cloud Files container ('3tier-backup') where the files were named using the value specified for the Database Backup Lineage input ('do').
If you are using an AWS region as a failover cloud, you can create a secondary backup in an existing S3 bucket.
If you are using a cloud that does not support volumes, you can create secondary backups in either Amazon S3 or Rackspace Cloud Files. - Launch the server that will eventually become your
master
database server. (e.g. do-db1) - Once the server is operational, run the db::do_secondary_restore_and_become_master operational script, which will restore the database using the secondary backup, update the DNS record that points to the
master
database server with the new server's private IP address, and create a primary backup. Note : If the script fails, you will need to run the db::do_force_reset before attempting to rerun the previous script. Check the
master
database server's DNS record to make sure it was properly updated with the IP address of the newmaster
database server. If you do not have access to the DNS account, you can also SSH into the instance and run the following command.# dig +short master-database-hostname EXAMPLE # dig +short do-master.rightscaleuniversity.com 10.179.123.44Verify that the primary backup of the
master
database server is complete and available. If you are using Rackspace, the value specified for the Database Backup Lineage input (e.g. do) will be used to create a new Cloud Files container (unless it already exists) with the same name and create a primary backup in that container.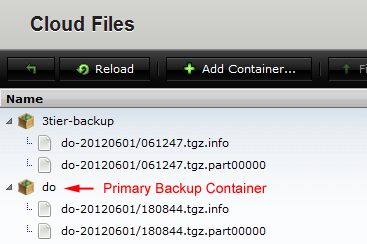
If you are using a cloud that supports volumes (e.g. Amazon EC2), primary backups will be stored as snapshots. Go to Clouds > [Cloud Name] > Snapshots. Note: The backup snapshot(s) will be named using the value specified for the Nickname (1) input.Launch the other (slave) database server.
Once the second database server is operational, run the db::do_primary_init_slave script to make it a
slave
of the newmaster
database server.
Load Balancer Tier Setup
- Launch the load balancer servers.
Application Tier Setup
- Wait for all the load balancer servers to become operational.
- Launch the application servers.
Test the Deployment
- Once all of the servers are operational, test the connectivity of the site by clicking the public DNS host name or public IP address of each load balancer server.
- If the servers in the different tiers appear to be connected properly, update the DNS records that point to your front-end load balancer servers with the public IP addresses of the new load balancer servers.
- Test the FQDN that's associated with the load balancers. (e.g. do-www.rightscaleuniversity.com)