Overview
The ability to create an isolated sandbox or staging
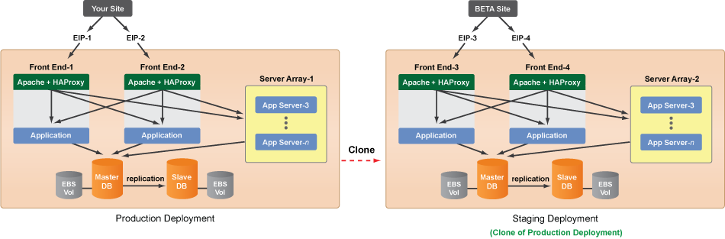
environment for development and testing is one of the key benefits of working in the cloud. RightScale makes it easy to create a staging deployment that you can use for development and testing. It should also be a necessary component for any software upgrade strategy. The key benefit of a staging deployment is that you can create a duplicate of your production deployment for performing all types of performance tests.
The steps below will walk you through the process of creating a separate staging deployment that's a working, but completely separate clone of your existing production deployment.
Prerequisites
This tutorial assumes that you're using MySQL EBS
ServerTemplates for your master/slave database servers.
Scenario
For example, let's say you just had a major software release last week and now you need to push out some minor bug fixes. You need to update your application servers so that they use the latest branch in your SVN repository.
Steps
- Clone the existing production deployment.
- Create two new Elastic IPs for the staging front ends. (e.g. EIP-3, EIP-4) (If you launched the servers in your cloned deployment as-is, you would steal the Elastic IPs from your your production deployment.) You do not have to create new EIPs for the staging deployment's front ends, but it is recommended.
- Create four new A-Record entries with your DNS provider (e.g. DNSMadeEasy) that points to the new Staging Deployment:
- stage.mysite.com assigned to 'EIP-3'
- stage.mysite.com assigned to 'EIP-4'
- masterstage.mysite.com on DDNS (You will use this value for setting the MASTER_DB_DNSID input)
- slavestage.mysite.com on DDNS (get the record number you will need it later)
- Since you might be using the same ServerTemplates in your cloned deployment, you'll want to change the inputs at the deployment level to completely isolate the staging deployment from the production deployment. At a minimum, you will need to change the following inputs for your cloned deployment:
- DB_EBS_PREFIX or DB_LINEAGE_NAME - e.g. project_stage (Important! You do not want both your Production and Staging Deployments to create backups with the same lineage name. It's crucial that you isolate your backups from each other.)
- DB_HOST_NAME - e.g. masterstage.mysite.com
- LB_HOSTNAME - e.g. www4.stage.mysite.com
- MASTER_DB_DNSID: e.g. 1234567 (from step 3)
- MASTER_DB_DNSNAME: e.g. masterstage.mysite.com (from step 3)
- SLAVE_DB_DNSID: 7654321 (from step 3)
- WEBSITE_DNS: stage.mysite.com
- Create a final backup of the Master-DB in your production deployment by running the
DB EBS backup
RightScript. You will use this snapshot to build the Master-DB in the staging deployment. If you are not particular about having the most recent backup, you can select and use a previous backup snapshot. - Once the snapshot is 100% complete you'll have the latest backup. (e.g. project_production-master-201105131545) Notice that it's using the DB_EBS_PREFIX or DB_LINEAGE_NAME input parameter (e.g. project_production) that's set in the production deployment.
- Launch the Master-DB in the staging deployment. When you see the launch inputs confirmation screen, you'll need to set a couple of inputs to select the desired backup to use build the staging deployment's database. The override inputs give you the ability to choose a specific EBS snapshot or EBS Stripe.
- For EBS Non Stripe setups, set the following input:
- DB_RESTORE_PREFIX_OVERRIDE - Enter the full name of the snapshot that you want to use for the database restoration. You can use a master or slave backup. You will most likely use the database prefix that you're using in your production deployment. (e.g. project_production-master-201105131545)
- For EBS Stripe setups, set the following inputs:
- OPT_DB_RESTORE_LINEAGE_OVERRIDE - Enter the lineage name that you're going to restore from. This is most likely the lineage name that you're using in your production deployment. (e.g. project_production) If you only set this input, the most recently completed backup (master or slave) will be chosen. However, if you want to select a specific backup, you can specify a timestamp. See input below. You will need to specify the timestamp that's defined by the snapshot's tag (not name). (e.g. rs_backup:lineage=otherlineagename)
- OPT_DB_RESTORE_TIMESTAMP_OVERRIDE - Enter a specific timestamp of an existing stripe backup. You cannot provide an arbitrary timestamp value. You will need to specify the timestamp that's defined by the snapshot's tag (not name). (e.g. rs_backup:timestamp=1303613371) Leave this input blank if you want to use the most recent backup available (default).
- Once the Master-DB is operational, run the
DB EBS master restore
orDB EBS restore and become master
RightScript on the server so that it will become the Master-DB for the staging deployment. The script will also initiate a backup after it's rebuilt the database on a volume stripe. The backup snapshots will be used when you later launch the Slave-DB. Note: The override inputs were only used by the restore script to initially build the database. However, backups that will be taken of the staging deployment's database will use the DB_EBS_PREFIX or DB_LINEAGE_NAME (e.g. project_stage) to name all future backup snapshots. Soon you will have separate backups for both your production and staging deployments. - Once the snapshot of the staging deployment's Master-DB (e.g. project_stage-master-201105131710) is 100% complete, launch the Slave-DB server in the staging deployment. Since you have a backup of the Master-DB, set the following input: INIT_SLAVE_AT_BOOT = true. In just a few minutes you'll have a functional master/slave database setup in your staging deployment.
- Next, assign the new Elastic IPs (e.g. EIP-3, EIP-4) to the front end servers in the staging deployment. Configure them to be assigned at boot time. Launch the front end servers.
- Congratulations! You now have a fully functioning staging deployment that you can use for development or testing.
This will give you a totally new, fully functional deployment that doesn't interfere with your production deployment in any way. It has a separate load balancer, separate database, and separate DNS entries. Use the Staging deployment to perform all of your development and testing. For example, use new/different ServerTemplates, add/modify RightScripts, specify different RightImagesTM, change instance types, test your application code on the new database schema, etc. Periodically you might want to update your Staging deployment's Master-DB by using previous snapshots of the production database.