Create a Network
Overview
Creating a network with Network Manager allows you to specify network resources to help manage the infrastructure you create in RightScale. You can add subnets, create security groups, and view the audit entries of your network (as well as the audit entries of each network resource). Additionally, you can view a map of your network to visually see the security group rules and the deployments associated to your network.
Prerequisites
- 'security_manager' user role privilege
Steps
- Go to Manage > Networks.
- Click New Network.
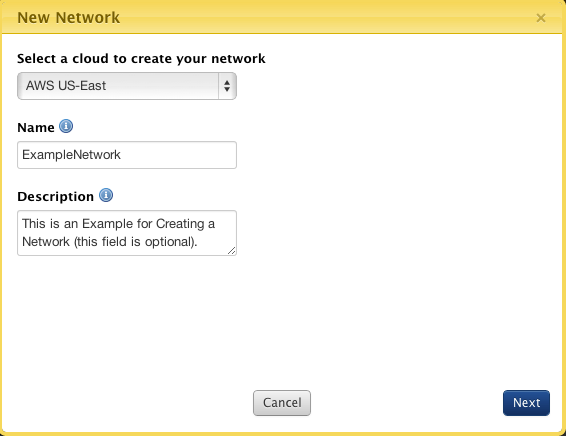
- Select a cloud to create you network : A network is created in a single cloud. Currently only AWS and OpenStack clouds are supported.
- Name: The user-defined name of the network.
- Description: (Optional) a user-defined description of the network.
- Click Next.
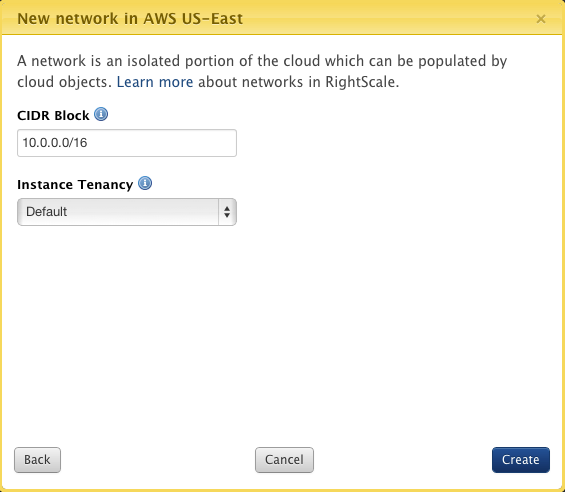
- CIDR Block: IP Range for your network. A network can contain 16 to 65,536 (eg : 10.0.0.0/16) IP addresses. You cannot change the size of a network after you have created it.
- Instance Tenancy: Instance Tenancy indicates whether an instance launched in this network will run on a single-tenant or shared hardware.
- Click Create.
- You will be taken to Networks where you will see a list of Networks (if there are more than one) and by default you will see the Name of your network, the Cloud it is in, and the CIDR Block. These are the default columns that are displayed. You can adjust which columns appear for your network by select the gear icon next to New Network.
When you create a network, a default security group will automatically be created. When you add a ServerTemplate to a deployment, you will see a default(name_of_network) under security groups. This allows a server on the default security group to connect to any external server.
Edit a Network
Overview
Editing a network allows you to modify the name and description of the network. You cannot modify any of the network information -- such as the cloud, Resource UID, or CIDR Block -- after the network has been created.
Prerequisites
- 'security_manager' user role privilege
Steps
- Go to Manage > Networks and find your network.
- Select your network and click Edit. You can make changes to the networks name and description.
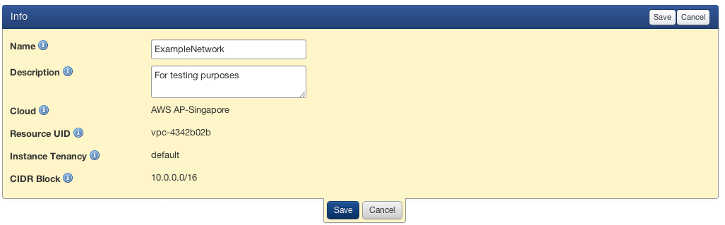
- Name: The user-defined name of the network.
- Description: A user-defined description for the network. Optional.
- Cloud: The cloud to which the network belongs. Corresponding cloud resources (network, etc) will be created in the cloud you select.
- Resource UID: The unique id for this resource assigned by the cloud provider.
- Instance Tenancy: Instance Tenancy indicates whether an instance launched in this network will run on a single-tenant or shared hardware.
- CIDR Block: IP Range for your network. Network can contain 16 to 65,536 (eg : 10.0.0.0/16) IP addresses. You cannot change the size of a network after you have created it.
- Click Save.
View a Network Map
Overview
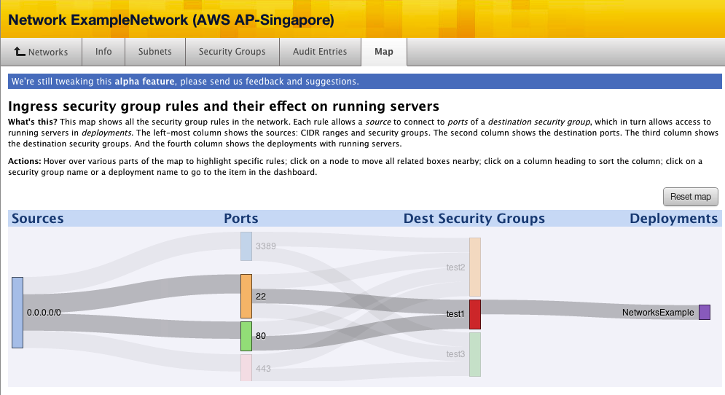
A Network Map shows all the security group rules in a network. Each rule allows a source to connect to the ports of a destination security group, which allows access to servers running in deployments. The left-most column shows the CIDR ranges, or sources. The second column shows the ports open on the network. The destination security group shows the security group that have those ports open. The fourth column shows the deployments with the running servers that are connected to the security groups on the network.
Prerequisites
- 'security_manager' user role privilege
Steps
- Go to Manage > Networks.
- Click on your network and you will be taken to the Info tab which provides information about the network.
- Go to the Map tab.
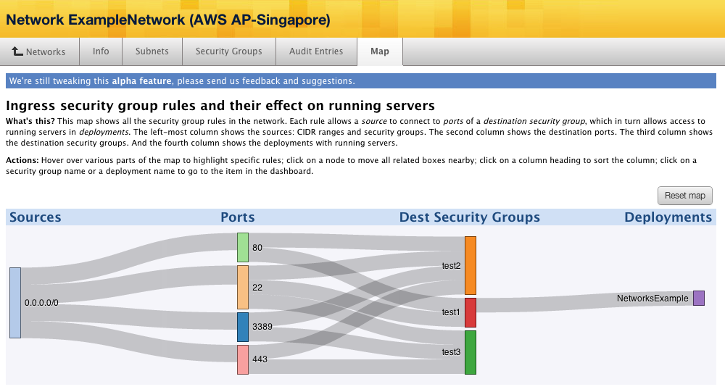
- The map above shows a network with a ports 80 and 22 open on the security group that is configured for a server that is running in a NetworksExamples deployment.
- Source - The CIDR range of the network.
- Ports - The ports open on the network. Ports can connect to multiple security groups on a network. For example, in the image above, port 80 is used in two security groups on the network, test1 and test2.
- Destination Security Groups - The security group of the network with the ports that are open connected to them.
- Deployments - The running deployments that are using the security groups of the network.
- You can click on the color of a destination security group a network is connected to and all the ports and sources that the servers in the deployment rely on will be highlighted. Additionally, you can click on a port number or color and it will highlight which security groups have those ports open. You can click on the name of a security group and it will take you to that security group in the network.
Delete a Network
Prerequisites
- You need the 'security_manager' user role privilege in your RightScale account.
Overview
When you delete a network, you are removing the ability for instances to interact with the network and network resources. You cannot remove a network if you have instances that are associated to the network (whether the instances are operational or not).
Steps
- Go to Manage > Networks and locate the network or networks you would like to remove.
From the Actions drop-down, select Delete.

A confirmation will appear asking if you are sure you will want to remove the selected network or networks.
Click Delete.
You can only remove a network if it does not have any instances associated to it. You will need to modify the Subnets and Security Groups used by an instance before this can be removed. If the instances is operational, you will need to terminate it before you can modify the instance. Additionally, will will need to remove the Subnets and Security Groups that were created in the network before the network can be deleted.
View Audit Entries of a Network
Overview
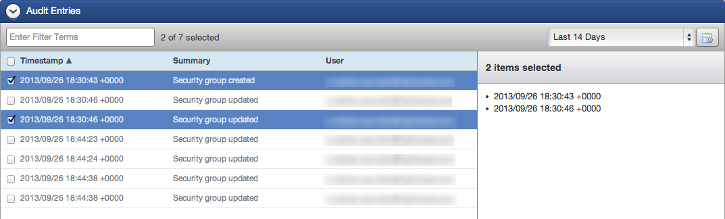
The Audit Entries tab in the Network Manager lists the information of the actions taken on the network, such as when the network was created or modified. It displays the date and time an action was made, the summary of the action, and the user who performed the action. This section does not display the actions taken on security groups or subnets. Security groups and subnets have their own audit entries field.
Prerequisites
- 'security_manager' user role privilege
Steps
- Go to Manage > Networks and select a network.
- Click on the Audit Entries tab.
- You will see a list of information about the actions performed on a network.
Add a Network to a Network Gateway
Prerequisites
- A Unified Cloud Platform account
- A previously created network gateway
- 'security_manager' user role privilege
Overview
When you attach a network to a network gateway, you are joining two networks together. In RightScale, you have the choice of creating an internet gateway or a VPN gateway. An internet gateway allows public internet access to you private network. A VPN gateway allows connectivity to another private network that is either on premises or in another Virtual Private Cloud (VPC).
Steps
- Go to Manage > Networks > Network Gateways and find your network gateway. You can only attach one network to a network gateway. If a network is already connected to a network gateway, you will see it in the Network column of the list of network gateways.
- Click Edit and next to Network select the network you would like to attach to the network gateway. You will only be able to select networks that are in the same cloud as your network gateway.
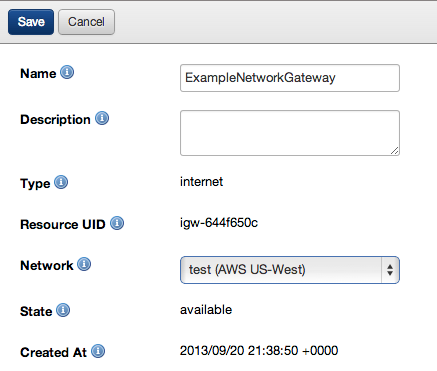
- Click Save. It can take several moments for the network to get connected to the network gateway.
Create a Subnet
Overview
A subnet is a range of IP addresses within your network. Instances that you launch can be contained within a subnet in your network. After setting up a network, you can configure multiple subnets. Then you can launch an instance in any subnet that you have created. Security groups can be applied to subnets to add an additional layer of security for instances in a network.
Prerequisites
- 'security_manager' user role privilege
Steps
- Go to Manage > Network > select a Network.
- Click on the Subnets tabs.
- Click New Subnet.
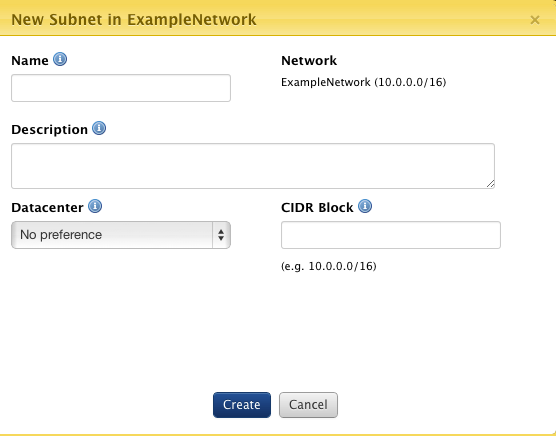
- Name: Name of the subnet. You can create up to 20 subnets in a VPC.
- Description: A user-defined description for the subnet. Optional.
- Datacenter: This corresponds to Availability Zone in AWS. Resources in Datacenters are logically grouped and are fault isolated from other resources in other Datacenters.
- Network: The name of the network and CIDR block of your network.
- CIDR Block: IP Range for the subnet. The subnets CIDR block can be the same as the VPC's CIDR block or a subset of VPC's CIDR block. If you create more than one subnet in a VPC, the subnets CIDR blocks must not overlap. The smallest subnet you can create uses a /28 netmast (16 IP addresses) and the largest uses a /16 netmask (65,536 IP addresses).
- Click Create.
- The subnet will be created. It's state will be
pending
and, after a few moments, will beavailable
which means you can assign the subnet to an instance.
When creating a subnet, you have to specify a subnet within the range of the CIDR block of the network or you will receive an error. For example, if your network is 10.0.0.0/16, the range of subnets you create should be between 10.0.0.0/16 - 10.0.255.240/28. If you already have a CIDR block range defined, you cannot create a subnet with a range that overlaps. So if you have a subnet with a CIDR block of 10.0.0.0/16, you will not be able to create a CIDR block of 10.0.3.0/24.
View a Subnet
Overview
A subnet is a range of IP addresses within your network. Instances that you launch can be contained within a subnet in your network. After setting up a network, you can configure multiple subnets. Then you can launch an instance in any subnet that you have created.
Prerequisites
- 'security_manager' user role privilege
Steps
- Go to Manage > Network and click on a network with the Subnet you would like to modify.
- Click on the Subnets tab.
- A list of subnets will display. If there are no subnets, you can Create a Subnet.
- Drop-downs will appear that contain information about the subnet: Info and Audit Entries.
Info
The Info section shows information of the subnet that was defined when the subnet was created.

- Name: Name of the subnet. You can create up to 20 subnets in a VPC.
- Resource UID: The unique ID for this resource assigned by the cloud provider.
- Network: The unique ID for this resource assigned by the cloud provider.
- Datacenter: This corresponds to Availability Zone in AWS. Resources in Datacenters are logically grouped and are fault isolated from other resources in other Datacenters.
- CIDR Block: IP Range for the subnet. The subnets CIDR block can be the same as the VPC's CIDR block or a subset of VPC's CIDR block. If you create more than one subnet in a VPC, the subnets CIDR blocks must not overlap. The smallest subnet you can create uses a /28 netmast (16 IP addresses) and the largest uses a /16 netmask (65,536 IP addresses).
- State: Describes the current state of the subnet. The state of the subnet may be either pending or available.
- Description: A user-defined description for the subnet. Optional.
Edit Info
- In the upper-right corner, click Edit.
- The table highlights yellow and the Name and Description field can be edited. Currently, these are the only fields that can be changed. Make the changes you need. Note: Once the description field been populated with text and saved, you cannot edit the field and leave a blank description.
- Click Save.
Audit Entries
- From the Audit Entries section, you can see information about the actions performed on the subnet. It list the time, summary, and user that perform an action, such as creating, removing, or modifying the subnet. Note: the audit information in this section is different from the Audit Entries tab of the network.
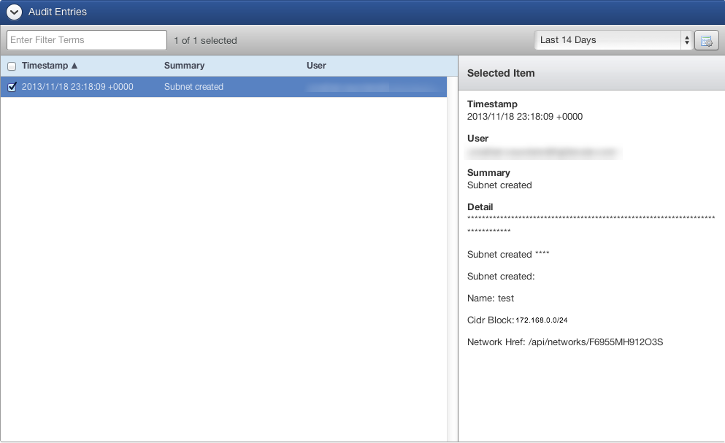
When you select a specific audit entry, you can see various information about the audit entry, including the Network Href of the subnet. This can be be beneficial if you are using the Networks API. For more information, see the API 1.5 Reference information.
Delete a Subnet
Overview
Deleting a subnet will remove the range of IP addresses that have been allocated to a network.
Prerequisites
- 'security_manager' user role privilege in your RightScale account.
Steps
- Go to Manage > Networks and select the network with the subnet you would like to remove.
- Go to the Subnets tab and select the subnet you would like to remove.
- From the Actions drop-down, select Delete.
- A confirmation will display asking if you want to delete the subnet. You will not be allowed to delete a subnet if it is being used by a running instance. You will need to terminate the instance to remove it. When a non-running instance has a subnet and that subnet is removed, the instance will point to another subnet in the network. If your network does not have any subnets, the instance will reference the default network settings of the cloud.
- Click Delete.
Create a New Security Group
Prerequisites
- 'security_manager' user role privilege
Overview
Security groups act as firewalls in your network. A security group defines which ports are open to allow incoming connections to a server. They are designed to control who can communicate (or initiate communication) with a server.
With the Network Manager, you can define multiple security groups within a network from a particular cloud provider. Your instances can access any security group that has been created in Network Manager. For example, if you create two different networks in AWS US-East, with their own security groups, your instances in US-East can access any of the security groups from both networks.
You can assign multiple security groups in a cloud to a server. Permissions defined in a security group are additive in nature. So if a server has two security groups where one group has port 80 open and the other group has port 80 closed, port 80 will be open to the server.
Steps
- Go to Manage > Networks and select the network you would like to use.
- When you click on your network, you will be taken to the Info tab which provides information about your network.
- Go to the Security Groups tab.
- Select New Security Group.
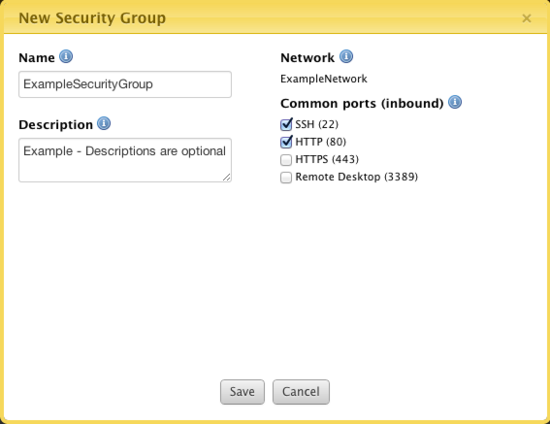
- Name: The user-defined name of the Security Group
- Description: (Optional) The user-defined description of the Security Group.
- Network: The network which contains this security group.
- Common ports (inbound): This displays the most common used inbound (ingress) ports. Inbound ports accept traffic that comes into a server from remote locations.
- SSH (22): This enables port 22 which grants SSH access into the server.
- HTTP (80): This enables HTTP access to servers.
- HTTPS (443): This enables HTTPs access to servers.
- Remote Desktop (3389): This allows you to use to RDP into a Windows server.
- Click Save.
Delete a Security Group
Overview
Deleting a security group removes the security group from the network as well as from the non-operational servers that are have their security group value set to the network's security group.
Prerequisites
- 'security_manager' user role privilege
Steps
- Go to Manage > Networks and select the network you would like to use.
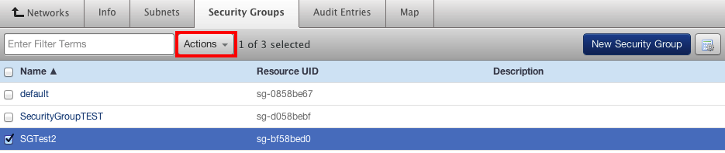
- Go to the Security Groups tab and select the security group or groups you would like to remove.
- From the Actions drop-down, select Delete.
- A confirmation will display asking if you want to delete the security group. When a security group is deleted, it is removed from the instances it was associated to. You cannot delete a security group if it is in use by a running server. You will need to terminate the server. If the server is terminated, the security group will be removed. You will not be able to launch a server without a security group.
- Click Delete.
Add a Security Group to another Security Group
In some clouds, you can specify another security group, or set of security groups, as the source to which the rule applies. The following describes only the group-specific options; for a list of all rule options see create a new security group firewall rule.
- Go to Manage > Networks and select the network you would like to use.
- Select a security group and go to its Security Groups tab.
- Click New Rule and make the appropriate selections for your firewall rule.
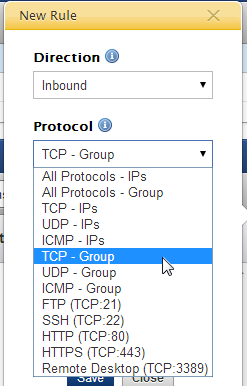
- Protocol - Select any of the
Group
protocols for group options - Owner - Be sure to specify the appropriate value based upon the chosen cloud. Typically, you will grant access to security groups within the same cloud account, however you can grant access to a security group in a different cloud account, if desired.
- AWS - Use your 12-digit AWS account number (without spaces). Click My Account to prepopulate the field with the AWS account number that's associated with the current RightScale account.
- For an Amazon Elastic Load Balancer (ELB), use the following: amazon-elb
- OpenStack - Specify either the username that was used to create the OpenStack cloud account. (e.g. my-company) or the Tenant ID. To locate the Tenant ID, log in to the cloud console and go to Settings > OpenStack API, and copy the suffix at the end of the Nova Service Endpoint. (e.g. http://50.162.234.224:8774/v1/8a2e587052628a2e587df155d8a2e587)
- AWS - Use your 12-digit AWS account number (without spaces). Click My Account to prepopulate the field with the AWS account number that's associated with the current RightScale account.
- Group - Specify the appropriate name or ID of the security group for which the firewall rule applies.
- AWS - You can either specify the name of the security group (e.g. mySG) or the security group's Resource UID (e.g. sg-0a1b3456) located under the Info tab.
- For an Amazon Elastic Load Balancer (ELB), use the following: amazon-elb-sg
- Remember, you can either specify a different security group or the same security group itself. You can also give a security group from a different cloud account access.
- Note: You can only create a group-based firewall rule for a security group that's within the same cloud/region because the private network must be accessible. For example, in Amazon EC2, you cannot add a security group from 'us-east' to a security group in 'us-west'.
- Google - Traffic is allowed only from sources with these tags
- OpenStack - Enter the 'Resource UID' of the security group you wish to add. (e.g. 91) You cannot use the security group's name for this field.
- AWS - You can either specify the name of the security group (e.g. mySG) or the security group's Resource UID (e.g. sg-0a1b3456) located under the Info tab.
- Tag - Apply the firewall rule to groups with this tag.
- Azure - Default tags are predefined identifiers that represent a category of IP addresses. The VirtualNetwork tag denotes all virtual and local network address spaces. The AzureLoadBalancer tag denotes the IP addresses from where Azure load balancer health probes will originate. The Internet tag denotes the public IP address space.
- Protocol - Select any of the
- Click Save.
Assign Multiple Security Groups to an Instance
Objective
Assign multiple security groups to an EC2 server.
Prerequisites
- An unlaunched server. After you launch a server, you cannot add additional security groups to it or remove assigned security groups from it.
- Assigning security groups requires the 'actor' role.
Overview
Security group ingress rules are additive in nature. For example, if you assign two security groups—'A' and 'B'—to a server, and security group 'A' has ports 22 and 80 open and security group 'B' has ports 22 and 443 open, the server will have ports 22, 80, and 443 open, as shown in the diagram below.

Steps
Servers
Provided that a server is not running, you can edit its security groups by opening its properties and clicking Edit. In the Server Details
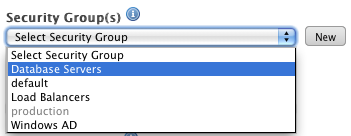
screen that displays, use the Security Group(s)
drop-down list to select a security group to assign to the server, or click the New button to create a new security group for the server.
Clicking the ![]() button next to a security group name removes the server from the security group.
button next to a security group name removes the server from the security group.
When you launch the server, it is included in all security groups specified in its properties.
Server Arrays
You can also add multiple security groups to a server array under using the same process described in the previous section. All servers launched in the server array are assigned the security groups specified.
Create a New Security Group Firewall Rule
Prerequisites
- 'security_manager' user role privilege
- RightScale account with valid AWS and/or OpenStack credentials
Overview
After you have created a Security Group, you can create different types of firewall rules to control both the inbound (requests to the instance) and outbound (requests from the instance) firewall permissions. Remember, any instance that is launched into a cloud infrastructure (e.g. AWS EC2), must be assigned at least one security group. And it's the individual firewall permissions defined within those security groups that determines whether or not an inbound/outbound request will be denied. Although changes to a security group's firewall rules will immediately affect all running instances (using that security group) it's recommended that you define a security group's firewall rules prior to launching instances with that security group.
You can create two different types of firewall rules.
- IP-based - Firewall permissions are granted to either any IP address (e.g. 0.0.0.0/0), a range of IP addresses (e.g. 173.0.0.0/8), or a specific IP address (e.g. 225.0.12/32) using CIDR notation.
- Group-based - Defines firewall rules that are granted to another security group or to a security group itself.
The following clouds support the use of security groups:
- Amazon EC2
- Google Compute Engine
- Microsoft Azure
- OpenStack
Steps
Create an IP-based Firewall Rule
- Go to Manage > Networks and select the network you would like to use.
- Select a security group and go to its Security Groups tab.
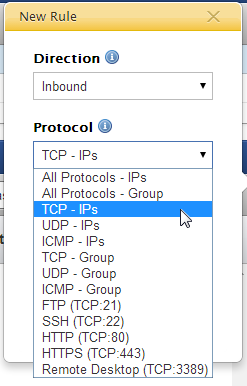
- Click New Rule and make the appropriate selections for your firewall rule.
- Direction - Defines if the firewall rule applies to inbound or outbound requests to/from instances.
- Inbound - Requests to instances using the security group.
- Outbound - Requests from instances using the security group.
- Protocol - Defines the protocol(s) to which the rule applies. (TCP/UDP/ICMP) Several of the most common firewall are predefined for your convenience. (Note: the create rule will allow any '0.0.0.0/0' IP address.
- All Protocols - IPs - Create a rule that allows requests to/from any '0.0.0.0/0' IP address for all TCP and UDP ports, and ICMP 0..0 (depending on the specified direction).
- All Protocols - Group - Create a rule that allows requests to/from another security group or itself (if specified) over the private network.
- TCP IPs - Create a rule for a TCP port or range of ports.
- UDP IPs - Create a rule for a UDP port or range of ports.
- ICMP IPs - Create a rule for the ICMP protocol.
- Common Rules
- FTP (TCP:21) - This enables standard FTP access to servers.
- SSH (TCP:22): This enables port 22 which grants SSH access into the server.
- HTTP (TCP:80): This enables HTTP access to servers.
- HTTPS (TCP:443): This enables HTTPs access to servers.
- Remote Desktop (3389): This allows you to use to RDP into a Windows server.
- Ports - Specify a port or range of ports for the firewall rule. See examples below:
- Single Port : 80 to 80
- Range of Ports : 8000 to 8050
- IP Range - Specify the IP address or range of IP addresses that will be allowed access. Use the My IP button to populate the field with your machine's own public IP address. For example, you may want to only give access to your own personal development machine or to your company's network.
- My IP - 173.225.0.12/32
- Priority (Azure only) - Rules are evaluated based in priority order until a matching rule is found. Once a rule is found, no further rules are evaluated. The lower the value, the higher the priority. If left blank, RightScale will set a high priority with a gap of 100 from the previous priority.
- Action (Azure only) - Whether to allow or deny if rule matches. Default to Allow.
- Direction - Defines if the firewall rule applies to inbound or outbound requests to/from instances.
- Click Save.
Edit a Security Group Firewall Rule
Overview
A security group defines which ports are open to allow incoming or outgoing connections to a server within a network. Security groups essentially act as firewalls in the cloud. They are designed to control who can communicate (i.e., initiate communication) with a server.
Security groups give you a flexible way to restrict server access, allowing you to set restrictions specific to particular protocols, ports, IP addresses, or combinations of these. Permissions defined in a security group are additive in nature; so, if a server has two security groups where one group has port 80 open and the other group has port 80 closed, port 80 will be open (not closed) on the server.
Prerequisites
- 'security_manager' user role privilege
Steps
- Go to Manage > Networks > Select Network > Security Groups tab > Select your security group.
- From the Rules section, select the rule with the description you would like to modify. Note: you can only modify the description of one rule at a time. You can select multiple rules and edit the description. The field will be grayed out.

- The description will appear in a new display so it can be modified. Note: Once the description field been populated with text and saved, you cannot edit the field and leave a blank description.
- Once the new description is entered, click Update.
Delete a Security Group Firewall Rule
Overview
A security group defines which ports are open to allow incoming or outgoing connections to a server within a network. Security groups essentially act as firewalls in the cloud. They are designed to control who can communicate (i.e., initiate communication) with a server.
Security groups give you a flexible way to restrict server access, allowing you to set restrictions specific to particular protocols, ports, IP addresses, or combinations of these. Permissions defined in a security group are additive in nature; so, if a server has two security groups where one group has port 80 open and the other group has port 80 closed, port 80 will be open (not closed) on the server.
Prerequisites
- 'security_manager' user role privilege
Steps
- Go to Manage > Networks > Select Network > Security Groups tab > Select Security Group.
- From the Rules section, select the rule or rules you would like to remove.
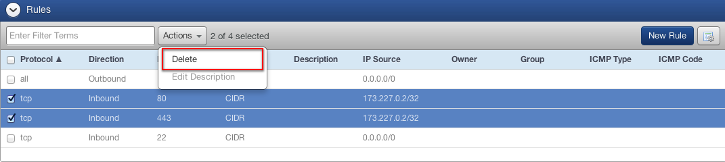
- Select Actions and click Delete. A confirmation will display asking if you would like to remove the security group rule or rules.
- Click Delete.
View the Audit Entry of a Security Group
Overview
A security group defines which ports are open to allow incoming or outgoing connections to a server within a network. Security groups essentially act as firewalls in the cloud. They are designed to control who can communicate (i.e., initiate communication) with a server.
Security groups give you a flexible way to restrict server access, allowing you to set restrictions specific to particular protocols, ports, IP addresses, or combinations of these. Permissions defined in a security group are additive in nature; so, if a server has two security groups where one group has port 80 open and the other group has port 80 closed, port 80 will be open (not closed) on the server.
Prerequisites
- 'security_manager' user role privilege
Steps
- Go to Manage > Networks > Select Network > Security Groups tab > Select security group.
- From the Audit Entries section, you can see information about the actions performed on the security group. It lists the time, summary, and user that performs an action, such as creating, removing, or modifying the security group. Note: the audit information in this section is different from the Audit Entries tab of the network.
Create a Route Table
Objective
To create a route table that determines the destination of your network traffic.
Prerequisites
- You need the 'security_manager' role in your RightScale account.
- Currently, route tables can only be created in AWS VPCs.
Overview
A route table contains information that helps direct network traffic to other locations such as another instance or a network gateway. A route table is a database that keeps track of paths of data -- controlling where traffic is coming from and where it is going to.
When a network is creating in the Network Manager, a route table is created by default and directs traffic to the CIDR range of the network. This default route table cannot be modified or deleted. If you would like to direct traffic to either an IP address, instance, or network gateway, you can do so by creating a new route table and creating routes within the table. Subnets, which are smaller CIDR portions of a network, can be associated to a route table. If the route is not specified for a subnet when the subnet is created, it will use the default route table.
Steps
- Go to Manage > Networks and select the network where you would like to create a route table.
- Go to the Route Tables tab and select New Route Table.
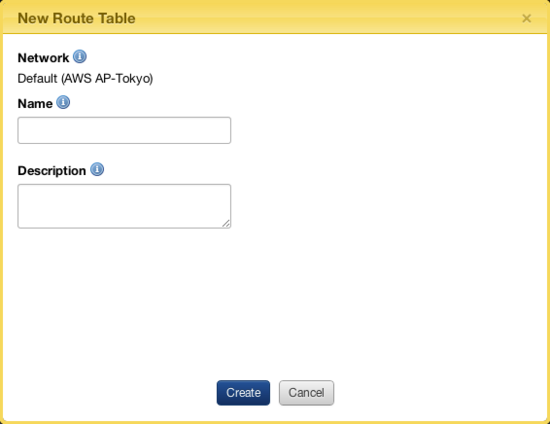
- Enter the following:
- Network: The network that this route table is associated with.
- Name: The user-defined name of the routing table.
- Description: (Optional) The user-defined description for the route table.
- Click Create.
Create a New Route for a Route Table
Prerequisites
- You need the 'security_manager' role in your RightScale account.
- Currently, route tables can only be created in AWS VPCs.
Overview
By default, a route table is created for a network and traffic is directed to the CIDR block address of the network. The default route cannot be modified. If you would like traffic routed outside of the network, such as to an Internet gateway or another network, you will need to create a new route from within a route table. You can create a route in either the default route table or another route table. When you create a route, you will need to specify where the traffic is coming from (the destination CIDR) and where it will be going to (the next hop).
Steps
- Go to Manage > Network > select network > Route Tables and select your route table.
- Click New Route.
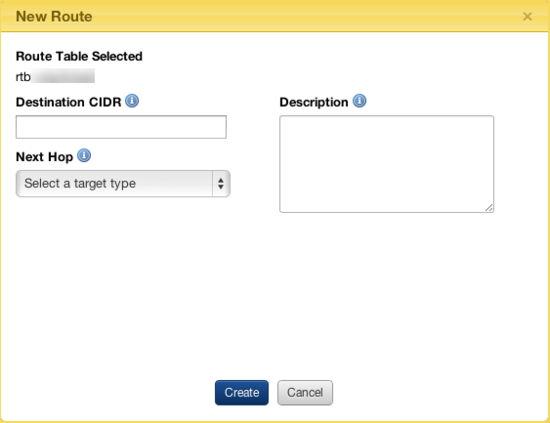
- Enter or select the following:
- Destination CIDR: The CIDR address block of the incoming traffic.
- Next Hop: The location where the network traffic will be directed. It can either be an internet gateway attached to the network or a NAT instance in a VPC. For example, traffic coming from a CIDR address block of 172.0.0.0/24 will be directed to one of the Next Hop options. You can select one of the following:
- Local - The default route of the network. When instances are launched within the network, the local route covers those instances by default. The local route cannot be modified.
- IP Address - Route to an individual IP address.
- Instance - Route to an individual instance.
- Network Gateway - Route to an internet gateway or a VPN gateway.
- Description: (Optional) The description of the route.
- Click Create.
Edit a Route in a Route Table
Prerequisites
- You need the 'security_manager' role in your RightScale account.
- Currently, route tables can only be created in AWS VPCs.
Overview
Editing a route table allows you to modify the destination CIDR address block, Next Hop, or description of a route within a route table.
You cannot modify the default route that is created for your network.
Steps
- Go to Manage > Networks > select network > Route Tables and find your route table.
- Select your route table and from the Routes tab, click Edit. You can change a number of settings as described below.
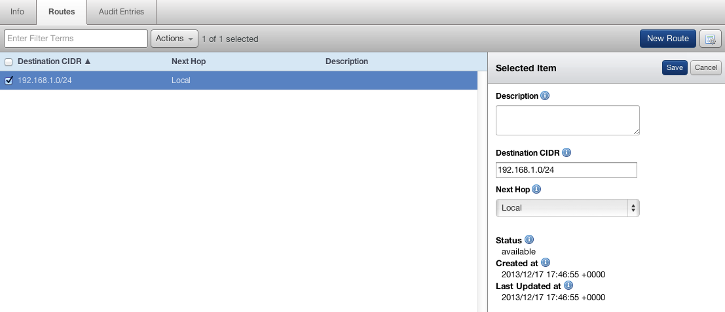
- Destination CIDR: The CIDR location where the network traffic will be directed.
- Next Hop: The location where the network traffic will be directed. It can either be an internet gateway attached to the network or a NAT instance in a VPC. For example, traffic coming from a CIDR address block of 172.0.0.0/24 will be directed to one of the Next Hop options. You can select one of the following:
- Local -The default route of the network. When instances are launched within the network, the local route covers those instances by default. The local route cannot be modified.
- IP Address - Route to an individual IP address.
- Instance - Route to an individual instance.
- Network Gateway - Route to an internet gateway or a VPN gateway.
- Description: (Optional) The description of the route.
- Status: Describes the status of the route.
- Created at: The date and time that the route was created.
- Last Updated at :The date and time that the route was updated.
- Click Save.
Delete a Route from a Route Table
Prerequisites
- You need the 'security_manager' role in your RightScale account.
- Currently, route tables can only be created in AWS VPCs.
Overview
Deleting a route will remove the network traffic path of to a specific destination.
Steps
- Go to Manage > Networks > select network > Route Table and locate the route table you'd like to remove.
- Select your route table and click Actions and Delete.
- A confirmation will display asking if you want to delete the route. You cannot delete the default local route of the route table.
- Click Delete.