Best Practices for Autoscaling Alerts
Overview
Server arrays are commonly used for application tiers (e.g. PHP, Tomcat, Rails) where additional application servers are launched or terminated in response the changing workloads at the application level.
If you are using a server array for autoscaling purposes, you must configure each server with the appropriate alert specifications so that it can vote for a grow/shrink action, which causes the server array to resize up or down accordingly.
Things to Consider
Identify all voters
Depending on how the deployment is configured, you may need to add the alerts at multiple levels to ensure that each server will inherit the same alert. Use the reference architecture examples below as a general guideline to make sure that each voting
server will inherit the same alert specifications.
- If you are using the same ServerTemplate to launch each voting server and it's not being used in a different deployment, add the alert to the ServerTemplate.
- If you are using a server array to launch all voting servers and the ServerTemplate is used in multiple deployments, add the alert to the Server Array's Next Alerts tab so that each new instance launched into the array will inherit its alert specifications from the array level.
- If there are servers at the deployment level (under the deployment's Servers tab) and its ServerTemplate is used in multiple deployments, add the alert to each inactive server's Alerts tab. If server is already active (overational), you must add the alerts to each active server's Current Alerts and Next Alerts tabs to apply the alerts to the running server as well as ensure that it will be inherited by the next instantiation of that server.
Select the Metric
Before you create alerts for triggering an autoscaling event, the first step is to identify the appropriate metric for autoscaling purposes.If you pick an inappropriate metric for the alerts, the server array may potentially resize up/down under false conditions. Be sure to test autoscaling in a staging environment to make sure the server array is resizing appropriately as expected. You may need to change the metric or thresholds accordingly to ensure proper autoscaling behavior.
Add alerts at the appropriate level(s) to make sure that each voting
server will inherit the same alert specifications.
If you do not have a specific metric that you want to use, it's recommended that you use 'cpu-idle' as the base metric for each alert. Although you can use a different metric for scaling down, it's generally recommended that you use the same metric for both resize actions.

- Scale Up
- If a server's 'cpu-0/cpu-idle' is < 30% available for longer than 5 minutes, vote to 'grow' the server array.
- Scale Down
- If a server's 'cpu-0/cpu-idle' is > 70% available for longer than 5 minutes, vote to 'shrink' the server array.
Manage Server Arrays
In the Dashboard, Server Arrays (or simply Arrays
for short) are located under Manage > Arrays. A list of all Server Arrays in your account will be displayed along with relevant information. The table provides a way to monitor all of your Server Arrays.
- For alert-based Arrays, you can see how many instances are currently operational in the Array, how many instances are voting to either grow/shrink the Array, as well as whether or not the Server Array is active.
- For queue -based Arrays, you can see how many instances are currently operational in the Array, as well as which queues are being monitored.
- For spot instance Arrays, you can place bids on spot instances to be used in your Server Array, enabling you to cut costs by paying less than the on-demand price.
- You may select a Nickname to see more detailed information about a specific Server Array.
Server Array Schedule
You can also define how an alert-based array resizes over the course of the week by using the server array schedule feature. This feature is not supported on queue-based server arrays.
Note: The time zone for the Server Array Schedule is UTC.
WARNING! Any changes that are made to the min/max count in the server array schedule will override the array's default min/max count settings.
Go to Manage > Arrays and select an array that you would like create a custom schedule for and click the Schedule Edit link under the Info tab.
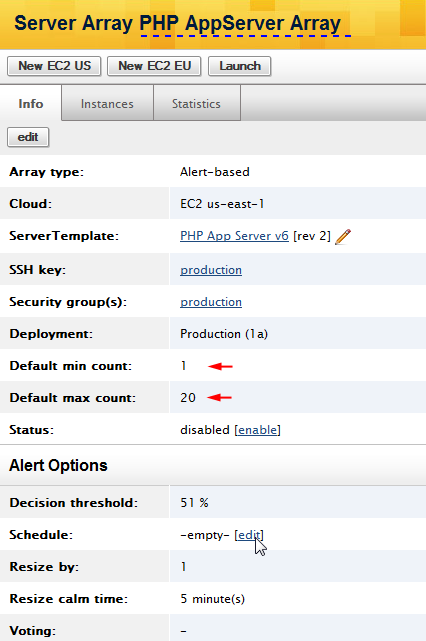
Notice the current default min/max counts for the server array.
Let's say you want to increase your resize settings during the upcoming week because a new release or promotion will be launched on Monday. Instead of modifying your default settings, you can just change them for this week.
To support the increased traffic to the site, you want to increase the min count to 5 servers and the max count to 50 servers during normal business hours and then return to the default settings overnight.
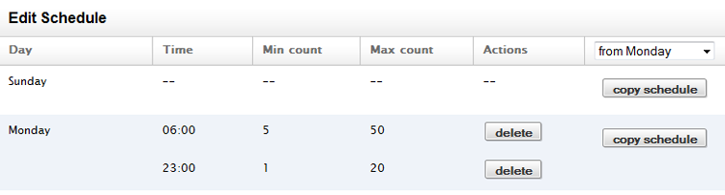
Select Monday from the drop down list and type the time that you would like these new setting to take effect. The time follows the 24h format and is UTC. Specify the new min/max counts and click the apply button.

The new resize configurations will be added to the specified day.
Remember, these new settings will persist until they are changed. The only way to revert back to your default settings is to add another resize setting. The default min/max settings will be listed by default.
Select Monday again from the list, but this time set the time to 23:00 and keep the default min/max settings.
Now you want to use the same resize patterns for the rest of the business week. To copy the settings of one day to another, select as Monday from the drop down bar and click the copy schedule link next to the day you want to inherit the settings. Repeat the steps as necessary.
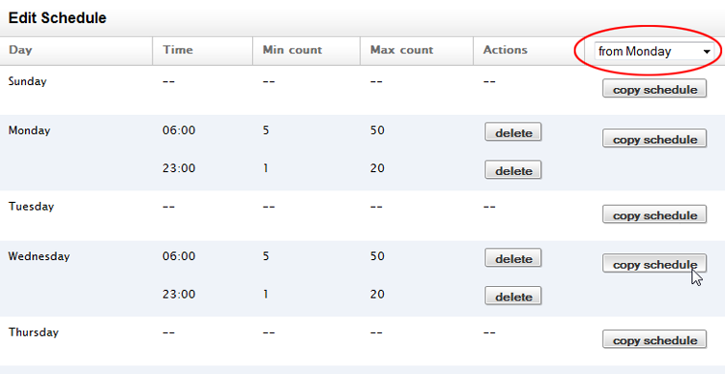
The schedule is a rolling calendar, so the settings from Saturday will continue to be active until the settings are changed.
To reset a day's setting, select reset from the drop down bar and click the copy schedule link next to the day.
Weighted Arrays
Overview
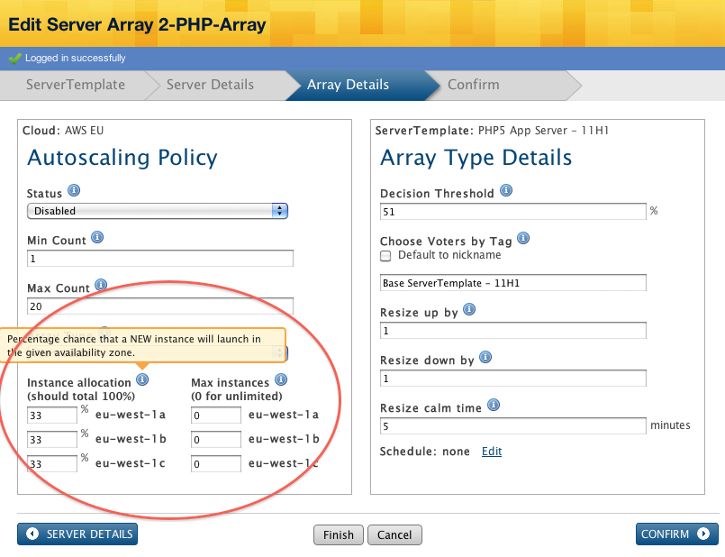
Weighted arrays allow you to adjust the distribution of your array's launched instances to favor a particular ration among the available data centers/zones. The UI defines the weights in percentages, but the actual algorithm is a weighted distribution.
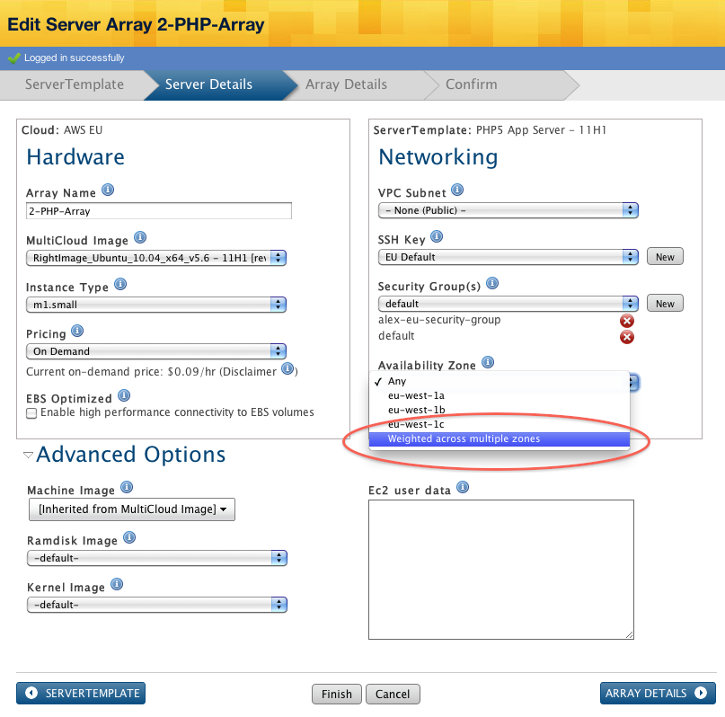
If the weighted array option is selected in the Server Details tab, the user enters proportions to describe precisely how they want to scale across datacenters on the Array Details tab
Weighted Array Algorithm
Weighted array instances are launched sequentially using the defined probability to choose a region in each occurrence of a launched instance. For example, if there are 2 instances each in zone A, zone B, zone C and zone D and you specified a weighted distribution of 25%, 25%, 25% and 25%, there is an equal chance of an instance launching in any of those regions. Say zone A is selected. An instance will attempt to launch in zone A. If that instance fails, it will not retry launching in that zone until successful, it will continue to randomly select a zone until an instance is successful. This helps if there is an outage in a zone or one is overloaded. A round robin method would attempt to launch in the same zone zone until successful. This way it's not completely predictable, and the weights you specify will be applied each attempt at launching an instance. The weighted array algorithm takes into account the distribution of instances that already exists.
The allocation is weighted randomly, so the number of instances launched in each zone may not be equal at any point in time but asymptotically equal. The weighted random approach is more effective than trying to keep perfect distribution. If a datacenter/zone runs out of instances, the randomized algorithm will be able to launch in the next available zone.
What is Autoscaling?
Overview
Before we can properly define autoscaling (auto-scaling), we must first explain the different types of scaling since autoscaling only applies to a specific type of scaling in the cloud. Remember, scaling
refers to the ability to grow or shrink an object or set of objects. Scaling provides a means of changing the server sizes or quantity of servers to meet your application's demands. The ability to efficiently scale up or down is one of the key benefits of the cloud. And when combined with the monitoring and alert tools of the RightScale platform, you can truly harness the power of the cloud by dynamically scaling, automatically, based on predefined alert conditions (autoscaling).
What is Scaling?
Scaling is the ability to increase/decrease compute capacity either by launching additional servers or changing server sizes.
Below is a summary of the two types of scaling:
- Horizontal Scaling - The ability to automatically scale (grow/shrink) the number of server resources that are provisioned to a particular Deployment. For example, as your site grows and the number of user requests increases, you can scale-up horizontally by launching and provisioning additional server resources to serve your application. Conversely, when those resources are no longer needed, you can scale-down and automatically terminate underutilized server resources.

- Vertical Scaling - The ability to scale the size of a server. Another way to dramatically change compute capacity is to change server sizes. Depending on your site's architecture, cost, and bandwidth requirements, it might be more beneficial for you to scale vertically instead of horizontally. For example, instead of managing 6 smaller servers, you might want to simplify your Deployment and replace them with 2 larger servers that provide an equivalent amount of performance at a more cost-effective rate. Vertical scaling is also common for growing the size of your database over time. Unlike horizontal scaling, you do not vertically scale automatically. Autoscaling does not apply to vertically scaling scenarios.

What is Autoscaling?
The ability to autoscale only applies to horizontal scaling. In the RightScale platform, autoscaling is achieved by setting up scalable server arrays, as well as defining the alert conditions under which additional servers will be launched or terminated. You can set up two different types of server arrays for autoscaling purposes:
- Alert-based Server Arrays - Define a set of predefined alert specifications that are constantly being monitored on the server by RightScale's alert daemon. (e.g. If 'cpu-idle 0' is < 25% for 15 minutes) When an alert condition's threshold has been met or exceeded, an alert is triggered and either an Alert Escalation is called or the server's Voter Tag changes accordingly to denote a vote to grow/shrink the server array.
- Queue-based Server Arrays - Strictly used for back-end, batch processing applications where
worker
instances are launched to process work units from an input queue and then send the result files to either S3 or another queue. Queue-based server arrays are a primary component for creating grid applications.
Scaling Manually vs. Automatically
Although autoscaling might seem like the preferred method for scaling in the cloud, manual scaling is definitely a preferred method for certain use cases. For example, vertical scaling typically involves making significant changes to a server's core configuration. Therefore, it's better to perform such changes manually. Remember, when you set up scalable server arrays for (horizontal) autoscaling purposes, you're not changing an existing server's configuration. Rather, you are simply adding or subtracting compute resources based on changing demand metrics.