Manage Your Publishing Organization
Use this procedure to fill out information about your organization (such as your company name, email address, and logo) that can be subsequently used in the publishing process (by the Publishing Assistant). End users will see this information tied to your organization when looking at objects you publish to the MultiCloud Marketplace.
Prerequisites
Requires 'publisher' role on your account.
Steps
- Navigate to Design -> MultiCloud Marketplace -> Your Publishing Organization
- Fill out the following fields:
- Organization name (required)
- Organization email (required)
- Welcome Message
- Support Message
- Small logo - Must be less than 30Kb to upload. (Max. Dimensions: 32x32 pixels)
- Large logo - Must be less than 30Kb to upload. (Max. Dimensions: 64x64 pixels)
- Note: JPG, JPEG, PNG, and GIF formats are supported for logos.
- Once saved, click the Edit action button to make changes.
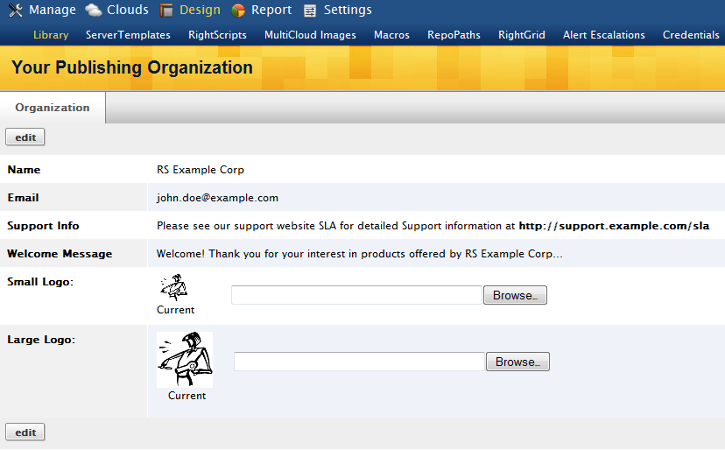
Your Publishing Organization should look similar to this:
- You can navigate back and make subsequent edits as needed, either to the text, or logos, etc.
Update Your Imports
Occassionally developers will publish newer versions of their RightScale components and make them available in the MultiCloud Marketplace. For example, RightScale publishes newer revisions of their most popular ServerTemplates several times throughout the year, which often include bug fixes, new cloud support, and overall performance enhancements. In order to take advantage of these new components, you will need to first import them from the MCM. It is your responsibility to determine whether or not to import the newer revisions and use them in your account.
!!info*Note:* Typically, the most common way to import the most recent revision of a RightScript or MultiCloud Image is from the context of a ServerTemplate.
Use this procedcure to compare and/or import newer revisions of RightScale components (e.g. ServerTemplates, RightScripts, or MultiCloud Images) that are available in the MultiCloud Marketplace (MCM).
!!info*Note:* Since macros do not have the same version control system as ServerTemplate and RightScripts, you will not have the option to import newer versions because that feature does not apply to macros.
Prerequisites
- 'designer' user role privileges
- 'library' user role privileges are required to import a newer revision from the MCM.
Steps
- Go to Design > Account Library* > **Your Imports.
- The Overview tab provides a summary of what updates are available for each of the RightScale components that are available in the MCM.
- Click one of the RightScale component tabs to view a more detailed summary.
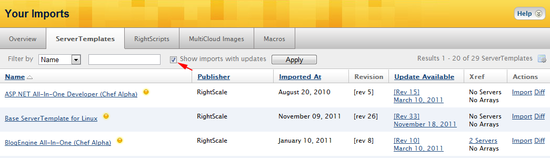
- Any imported components that have newer revisions available in the MCM will be highlighted with orange spheres. You can click the
**Show imports with updates**
filter option and click Apply to only view the ServerTemplates with orange spheres. The screenshot below shows an example for updating ServerTemplates.
- To compare the most recently imported revision of a component in your RightScale account with the newest revision that is available in the MCM, click the Diff action text link.
- Click the Import action text link if you want to import the newest revision into your RightScale account. Note: 'library' user role privileges are required to perform this action.
- Next, you will need to decide how to upgrade the related servers, server arrays, or RightScale components to use the newest versions. It is recommended that you develop a migration strategy before you perform any global updates.
Deprecate a Published Component
If you've previously published a RightScale component and now have an updated revision of the component that you want to publish, you may want to deprecate the old one so that new users will only be able to import your latest version. Use this procedure to deprecate a previously published RightScale component (e.g. ServerTemplate, RightScript, or MultiCloud Image) so that it no longer appears visible in the MultiCloud Marketplace or importable as a standalone component.
What happens when you deprecate a RightScale component?
When you deprecate a RightScale component, you're only affecting the visibility of that component in the MultiCloud Marketplace. Deprecated components will no longer be visible in the MultiCloud Marketplace nor will they be importable for new users. However, a deprecated component will still be usable if required by a Macro. For example, a user might have previously subscribed to a Macro from the MultiCloud Marketplace that uses a couple different ServerTemplates to create the Servers in a Deployment. A user will still be able to successfully run the Macro to create the Deployment even if those ServerTemplates have been deprecated. Remember, a Macro will only import the required ServerTemplates, etc. when it's run. The same rules apply to ServerTemplates. If a published ServerTemplate is active in the MultiCloud Marketplace and it references a deprecated MCI, the MCI will be imported when the ServerTemplate is imported. However, that MCI will not be importable as a standalone component.
!!info*Note:* If a component belongs to multiple Account Groups, it cannot be deprecated from one Account Group and active in another. A component can either be active or deprecated. Its status applies to all Account Groups in which it's a member.
Deprecate vs. Remove
In order to preserve the functionality of a Macro, you should deprecate its related components instead of removing it from an Account Group or deleting the Account Group(s) that contain those components. When you delete an Account Group, any components in the Account Group will be removed, not deprecated, which could potentially cause errors. Deprecated components will not break any dependencies.
Prerequisites
- 'publisher' user role privileges
- a published RightScale component that's either publicly or privately shared and active (visible) in the MultiCloud Marketplace.
Steps
- Go to Design > Account Library > Your Publications. Under the appropriate tab (e.g. ServerTemplate, RightScripts, etc.), click the nickname of the component you wish to deprecate.
- Under the
Deprecation Status
row, click the Deprecate text link.

Reactivate a Deprecated MultiCloud Image
Use this procedure to reactivate a previously deprecated MultiCloud Image (MCI) so that it will appear visible in the MultiCloud Marketplace and become importable as a standalone component. You can only reactivate a previously deprecated MCI.
What happens when you reactivate a deprecated an MCI?
When you reactivate a previously deprecated MCI it will once again become visible in the MultiCloud Marketplace so that new users will be able to import it as a standalone component.
Prerequisites
- 'publisher' user role privileges
- a published MCI that was previously deprecated
Steps
Go to Design > Account Library > Your Publications > MultiCloud Images tab.
Click the nickname link of the MCI that you want to reactivate. Under the
Deprecation Status
row, click the Reactivate text link. Before you reactivate the MCI, you may want to notify the person who originally deprecated the component.
Create a New Account Group
An Account Group specifies which RightScale accounts will have access to import a shared RightScale component (e.g. ServerTemplate, RightScript, etc.) from the MultiCloud Marketplace. Use the following procedure to create an Account Group that can be used for privately sharing RightScale components.
Prerequisites
- Requires 'publisher' role on your account.
- RightScale account must be enabled for private sharing.
Steps
- Navigate to Design > Account Library > Your Account Groups and click New.
- Enter a name for the new Account Group. (e.g. My Beta Project)
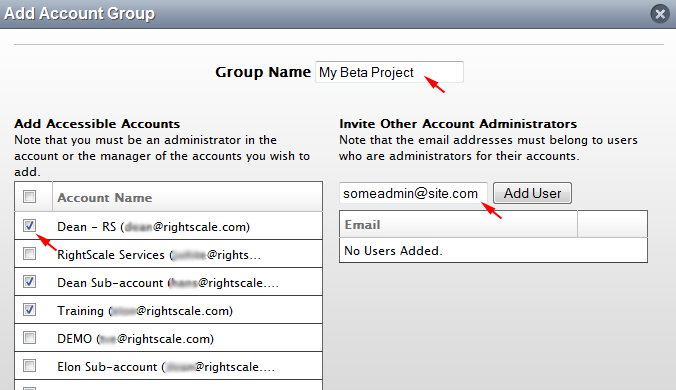
- The next step is to select which RightScale accounts you want to invite and grant access to. Remember, sharing is done between RightScale accounts and not actual users. The email address of the RightScale account
owner
will be listed in parenthesis: RightScaleAccountName (owner@site.com) If you select to invite any of the RightScale accounts to which you're already a member of, an Account Group Email Invitation will be sent to the account owner. To grant access to an unlisted RightScale account, you must send an Account Group Email Invitation to a user of that RightScale Account that has 'admin' privileges. (Note: Only a user with 'admin' privileges can accept an Account Group Invitation.) But be careful! Remember, a user might have 'admin' privileges in multiple RightScale accounts. So if you send an email invitation to john@site.com, he must careful to accept the invitation on behalf of the intended RightScale account. Since an Account Group Invitation can only be accepted once, if john@site.com accidentally accepts the invitation for the incorrect account, you'll have to revoke the account's access and send another invitation. - When you're finished, click the Create button to create the Account Group.
Once you've created the new Account Group, you can manage the Account Group and under Design -> Account Library -> Your Account Groups. You can revoke RightScale account access or send more Account Group Invitations. The users who received the Account Group Invitation must accept it in order to verify an RightScale account's access to the components in the Account Group. Once the invitation has been accepted, any user with 'library' user role privileges in the RightScale account that now has access to those shared components will be able to import them from the MultiCloud Marketplace under the
Shared
category.
Delete an Account Group
Before you delete an Account Group, it's important to first understand the implications of that action.
What happens if I delete an Account Group?
It is possible to delete an Account Group that contains RightScale components (e.g. ServerTemplates, RightScripts, etc.). However, you will not be able to delete an Account Group to which other RightScale accounts currently have access. When you delete an Account Group, any components that were published and added to that particular Account Group will no longer be accessible in the MultiCloud Marketplace. If an account previously imported a component into their RightScale account's local collection, a copy of that component will remain in that account. Once a component has been imported from the MultiCloud Marketplace, it will not be retroactively removed from that account even if that component is later deprecated or the Account Group is deleted.
Take the followings steps to delete an Account Group.
Prerequisites
- 'publisher' user role privileges
Steps
- Go to Design > Account Library > Your Account Groups > Account Groups tab.
!!info*Note:* You will only be able to delete an Account Group that is not actively being shared with any RightScale Accounts. If a RightScale Account has accepted an Account Group invitation and has been granted access, you must first click the Edit action icon and remove any account access before it can be deleted.
- Click the Delete action icon. You will be prompted to confirm the delete action.
Revoke Account Group Access
One of the common issues with private sharing is that the wrong RightScale account might accidentally be granted access to an Account Group. Since Account Group Invitations are sent to a user's email address and that user might have 'admin' access in multiple RightScale account, a common mistake is that the recipient of the invitation accidentally accepted it on behalf of the wrong (unintended) RightScale account. In such cases, it's necessary to revoke a RightScale account's access to an Account Group.
!!info*Note:* If RightScale components (ServerTemplates, RightScripts, etc.) were imported from the MultiCloud Marketplace prior to access being revoked, those assets will remain inside that RightScale account's local collection; they will not be removed.
Take the following steps to to revoke previously granted access to an Account Group.
Prerequisites
- Requires 'publisher' role on your account.
- RightScale account must be enabled for private sharing. Private sharing is only supported on paid editions of RightScale.
Steps
- Navigate to Design > Account Library > Your Account Groups.
- Click the Edit icon next to the Account Group you wish to modify.
- Uncheck the selected RightScale accounts to remove access to the Account Group's components in the MultiCloud Marketplace.
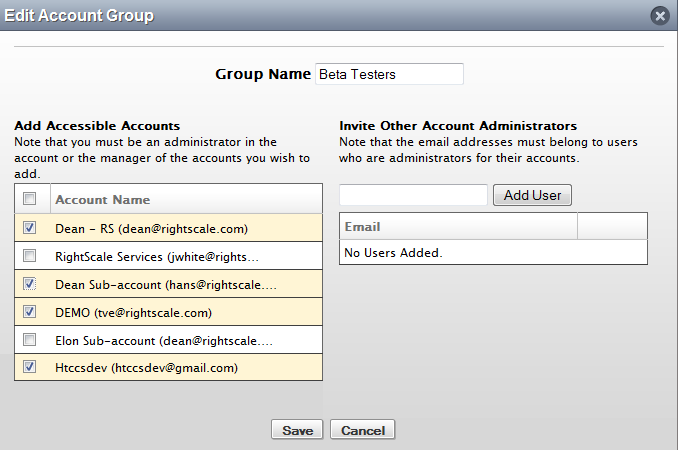
- Click Save.
Create a New EULA
Use this procedure to Create a new End User License Agreement (EULA) that can later be attached to a RightScale component (e.g. ServerTemplate) during the publication process.
Prerequisites
Creation and management of EULAs requires 'library' and 'publisher' User Roles.
Steps
Navigation
- Navigate to Design > Account Library > Your EULAs
- Click the New action button
Add and Format content
- Name your EULA
- The Name is for the publishers benefit, it is not seen by the end-user who accepts the EULA before they can import the component (e.g. ServerTemplate)
- 50 character limit
- Enter the text (content body) of your EULA. Most will want to copy/paste existing EULAs into this field.
- There is a 500k character limit
- Basic markdown formatting can be used
Preview
- Click the Preview action button to see what the end user would be presented prior to acceptance. It is likely you will have to go through a few iterations (change/preview) before saving your EULA.
!!info*Note:* The preview window includes an acceptance checkbox. This is functional for end users but only for display purposes here.
Save and View EULA Information
- Click the Save action button to save your EULA
- You will be placed on the Info tab of your new EULA. Note the following fields and Tab level information:
- Fields
- Created On - Date/time stamp of creation
- Revision - EULAs support basic revisions. A newly created EULA will always be revision 1 [rev 1]. See the Revisions tab for complete Revision, Created At timestamp and a Used by tally.
- Used By * - Total tally of all revisions of this EULA being used by published ServerTemplates.
* The specifics of the Used By column may seem a bit confusing at first. The key is to realize that this column of the table is a tally of all revisions. If you select the individual EULA, and sum up the Used by total for each revision, that is where the total tally comes from. Consider the following basic example:
- You create a EULA named
Acme Software Co.
- Over time, you create 3 revisions of this EULA.
- The first revision was attached to three ServerTemplates (ServerTemplate A, B and C) while publishing the templates
- The second revision was attached just once to ServerTemplateD during publishing
- The third revision was attached to two ServerTemplates (ServerTemplate E and F) during publishing
- The Used By total on the Design -> Account Library -> Your EULAS -> Acme Software Co. will be 6 (3 + 1 + 2)
- Select each revision of the EULA to see the individual revision totals
- Select the Xref tab to see what ServerTemplates the EULA is attached to (in our example, there will be 6 entries in the table)
- Select the Revisions tab to see when the different EULA revisions were created, and how many ServerTemplates they are attached to
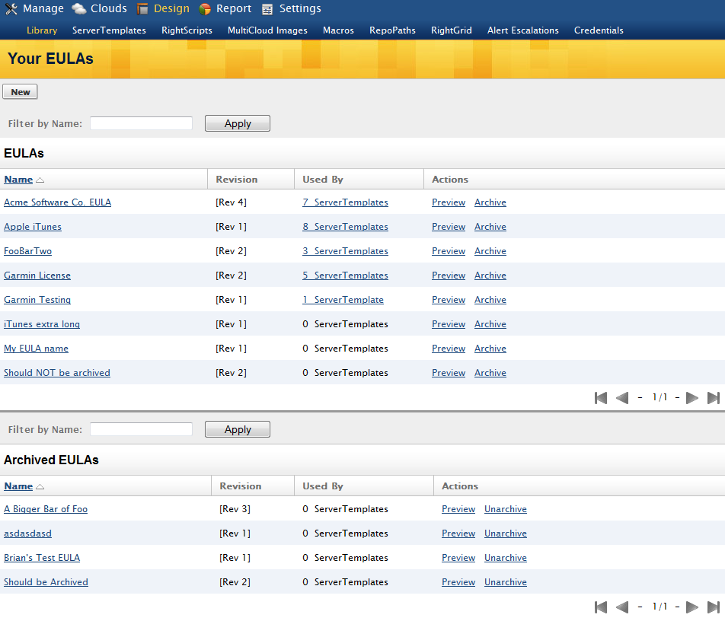
Viewing all EULAs
Viewing your EULAs is extremely easy. Navigate to Design > Account Library > Your EULAs. This is sometimes referred to the EULAs Index page.
EULAs are listed in two tables:
- EULAs - EULAs listed here are said to be unarchived, or active_ EULAs.
- Archived EULAs - Previously active EULAs that were explicity archived are listed here.
- If you archive an active EULA, it is moved to the Archived EULAs table. (Note: You cannot delete a EULA)
- If you unarchive an EULA, it is moved back to the standard EULAs table.
Create a New EULA Revision
Objective
Use this procedure to create a New EULA Revision.
!!warning*Warning!* Adding or updating a EULA will create a new revision of that EULA, but any existing published components (e.g. a ServerTemplate with a previous revision attached) will not be affected. You must create a new revision of the component (e.g. ServerTemplate) to add, remove, or attach an updated EULA to it.
Prerequisites
An existing EULA that you need another revision for.
Steps
- Navigate to Design -> Account Library -> Your EULAs
- Select the EULA you wish to revise. Note: You can only revise active EULAs, not archived EULAs
- Click the New Revision action button
- The Text field is pre-populated with content from the previous revision
- Add or modify the content of the Text field as needed
- Preview the content, revise, etc.
- When ready, click the Save action button to create your new EULA revision
- The revision timeline is updated, along with all associated EULA data
- Older revisions can only be viewed, not edited or individually archived. (That is, they can be archived, but only as part of an entire lineage that gets archived.)
Attach a EULA
Use this procedure to attach an End User License Agreement (EULA) to an RightScale component. The following steps attach a single EULA to an unpublished ServerTemplate. More than one EULA can be attached, by selecting multiple EULA checkboxes as discussed below.
Prerequisites
Requires 'library' and 'publisher' User Roles.
Navigation
- Navigate to Design > ServerTemplates
- Select the ServerTemplate you want to attach a EULA to. This could be a brand new ServerTemplate, or a previously attached ServerTemplate; it really does not matter as long as you commit and publish the ServerTemplate you want (to attach a EULA to).
Commit
- Click the Commit action button
- Fill out the Message field and click the Commit button. (For more information, see the Commit a ServerTemplate tutorial.)
- You should have an additional revision for that ServerTemplate
Publish
- Click the Publish to Library action button. (Reminder: You must select a non-HEAD revision in order to attach a EULA.)
- You will be presented with a list of Existing EULAs similar to the following:
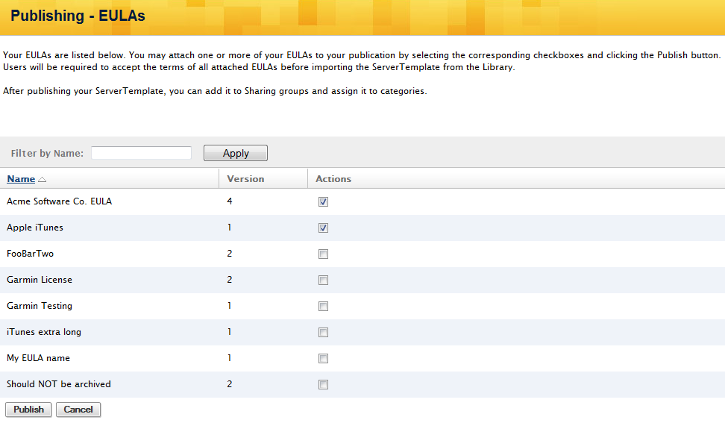
- Check each EULA that you want attached to the ServerTemplate. (Acme Software Co.)
- Optional: You can add more EULAs by selecting the Add EULA action buton.
- Warning: If your ServerTemplate is not part of a Sharing Group you will be notified and have to add it to one before proceeding.
- Click the Publish action button when ready
Testing Your EULA
To test the remainder of the process surrounding EULAs, try importing a published ServerTemplate that has one or more EULAs attached to it. This is exactly the user experience the end user of your ServerTemplate would experience.
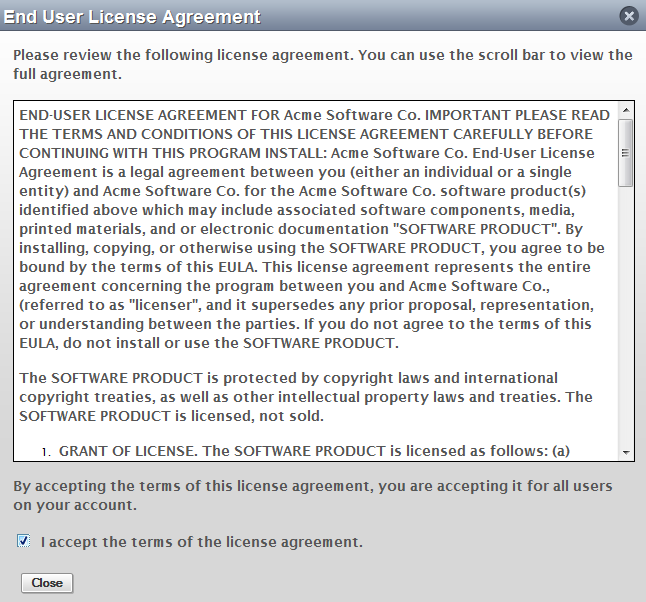
Accept a EULA
When an end user Imports a ServerTemplate that has one or more EULAs attached to it, they must select the accept
checkbox for each EULA before proceeding. If any accept
checkbox is not selected then the ServerTemplate will not be imported to the local view. Use this procedure to accept an End User License Agreement that was previously attached to a ServerTemplate in the MultiCloud Marketplace.
- Navigate to Design > MultiCloud Marketplace > ServerTemplates.
- Search/Select the ServerTemplate you wish to import
- Click the Import action button
- For each EULA attached to the ServerTemplate, you will be presented with the actual EULA text body. An example End User License Agreement will look similar to this:
- You must select the
accept
checkbox before proceeding. If you do not, you will receive a message similar to the following:
Please review the agreement and select the checkbox above to continue.
Viewing Additional EULA Information
Publishers can view additional EULAs information. accepted all EULAs and proceeded with the import process from the MultiCloud Marketplace, notice the EULAs will be listed here:
- Navigate to Design > Account Library > Your Publications
- Note the EULAs column in the table. Use the Filter by EULAs option if the table is quite large. (For example, you can find all EULAs named
Acme Software Co.
that were accepted.) - Select the ServerTemplate name you are interested in for more detailed information (based on the EULAs column)
- The Info tab lists the number of attached EULAs
- Click the EULAs tab to find out more detailed information
- The EULA name and version is displayed
- You can select the EULA name (link) and the Preview action button to see the specific EULA content, revision information, when it was created, how many ServerTemplates use the EULA, etc.
Archive or Unarchive a EULA
It is important to note that you cannot delete a EULA. However, you can archive them. A basic understanding of the following scenario will help illustrate why you cannot delete a EULA. Once a EULA is created, it can be attached to multiple ServerTemplates. Once those ServerTemplates are imported and accepted by an end user, the exact license agreement needs to be recorded. If the EULA was deleted, the ability to tie the exact EULA to a given ServerTemplate would be lost. However, you can archive an existing EULA. Archived EULAs cannot be attached to ServerTemplates. However, they can be unarchived and attached to a ServerTemplate.
!!warning*Important!* When you archive a EULA, you are archiving the EULA's entire lineage (i.e. all revisions). For example, if you archive revision 4 of a EULA, revisions 3, 2 and 1 are also archived. Similarly, when you unarchive a EULA, the entire lineage is unarchived.
Take the following steps to archive (or unarchive) an existing End User License Agreement (EULA).
Archive a EULA
- Navigate to Design > MultiCloud Marketplace > Your EULAs
- There are two ways to archive a EULA
- Click the archive action link for the EULA you want to archive.
- Or if you are viewing an individual EULA's show page, you can click the Archive action button.
When you archive a EULA, it is moved from the EULAs
table to the Archived EULAs
table.
If you have many EULAs, use the Filter by Name
option to help find the one you need.
Unarchive a EULA
As mentioned earlier, EULAs cannot be deleted but they can be archived. If you ever need to use a previously archived EULA, simply click the Unarchive action link of the specific EULA in the Archived EULAs table. All revisions of that EULA will become active.