Create an AWS Elastic Load Balancer
Overview
You can use Amazon's Elastic Load Balancers (ELB) for load balancing purposes. Windows and Linux ServerTemplates can automatically register and unregister when servers are launched in a deployment or autoscaling array. For mission critical applications using AWS Elastic Load Balancers, you should configure the ELB to service application servers running in multiple availability zones.

Use the following procedure to create a new Amazon Elastic Load Balancer (ELB).
Prerequisites
- If you have valid Amazon Web Services (AWS) EC2 credentials, you are automatically granted the Elastic Load Balancer service. No additional service sign ups are required.
- 'actor' user role privileges
Steps
Create a Load Balancer
- Go to Clouds > AWS Region > Load Balancing
- Click Create ELB and fill out the required form fields:
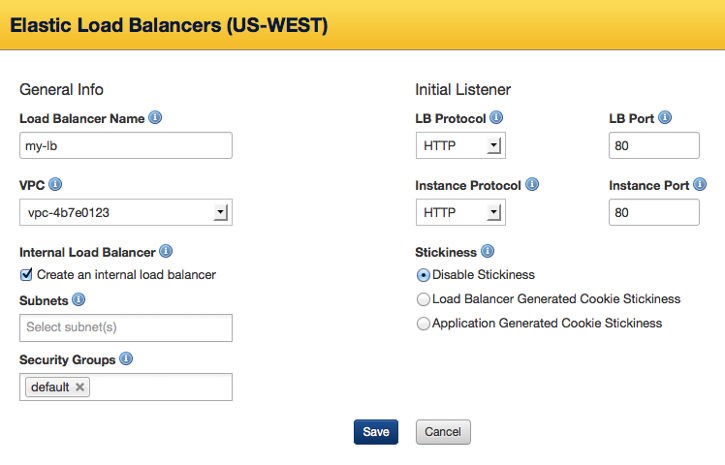
General Info:
- Load Balancer name - The name of our Elastic Load Balancer. It must be unique within your AWS account.
- VPC - The Virtual Private Cloud you'd like to associate to this load balancer.
- Internal Load Balancer - Select this option to create an internal load balancer. A DNS name will be created and it will contain the private IP address of the load balancer. This option is only available if you set a value for VPC.
- Subnets - Your load balancer can interface with instances in one or more subnets. Only subnets in the selected VPC are available. This option is only visible if you set a value for VPC.
- Security Groups - One or more security groups to manage traffic communicating with your load balancer. This option is only visible if you set a value for VPC.
- Availability Zone(s) - Select all of the availability zones for which the ELB will service. (Tip: Click in the box to view and select additional zones.) An ELB will only load balance across instances in the selected availability zones. An ELB is region-specific; it cannot load balance across multiple regions. For example, you cannot load balance your application traffic amongst instances in the 'us-east' and 'us-west' regions. Note: This field is not displayed if you have selected a value for VPC.
Default Listener:
- LB Protocol - The routing transport protocol that will be used by the ELB. (TCP, HTTP, HTTPS)
- LB Port - External port that the ELB will listen on to accept client requests. Valid ports are 80, 443, 1024-65535.
- For an example (v13.5 LTS) 3-tier deployment, use HTTP:80.
- Instance Protocol - The routing transport protocol that the ELB will use to connect to the instances (i.e. application servers) in its load balancing pool. (HTTP, HTTPS, TCP, SSL) If you are using one of the application ServerTemplates (v12+) published by RightScale, select 'HTTP' for the protocol. Note: The Load Balancer and Instance Protocols must match. You can create additional listener rules after you create the ELB.]
- Instance Port - The port that the ELB will use to send traffic to the application instances. Valid ports are 1 to 65535. The Instance Port does not have to match the Load Balancer Port. If you are using one of the application ServerTemplates (v12+) published by RightScale, the default application listener port is '8000'.
- For an example (v13.5 LTS) 3-tier deployment, use HTTP:8000.
- Stickiness - This is where you can create a session sticky policy for your load balancer (stickiness meaning that once a session starts, all requests will attempt to routed subsequent to the same server for that given session). You can select one of the following options:
- Disable Stickiness - Does not allow session stickiness the load balancer and application server.
- Load Balancer Generated Cookie Stickiness - A special cookie is used to track the backend server instance for each request. When the LB receives a request, it checks to see if this cookie is present in the request. If so, the load balancer sends the request to the application server specified in the cookie. If not, the request is sent to a server chosen based on the existing load balancing algorithm. This option creates a stickiness policy with sticky session lifetime controlled by the lifetime of the browser or a specified expiration period. This only works with HTTP/HTTPS listeners.
- Application Generated Cookie Stickiness - This is similar to the Load Balancer Generated Cookie Stickiness option, with the following exception: once a cookie is explicitly removed or expires, the session stops being sticky until a new application cookie is issued.
- Click Save.
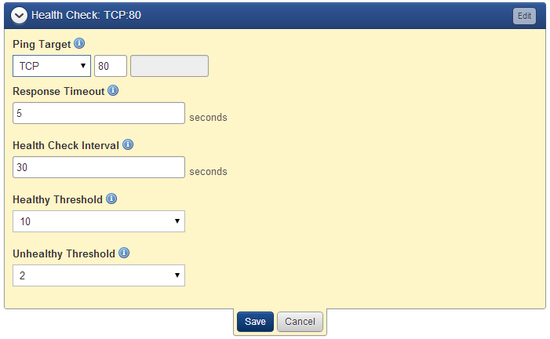
- Configure the Health Check test for the ELB and click Save.
Add Additional Listeners (optional)
Elastic Load Balancers support both HTTP and HTTPS (SSL) requests. When you create an ELB, you must define a default listener. If you wish to set up additional listeners (e.g. HTTPS), you can configure them after the ELB is created.
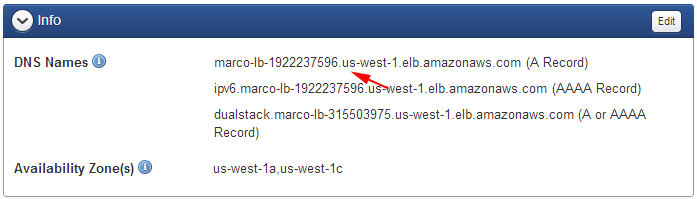
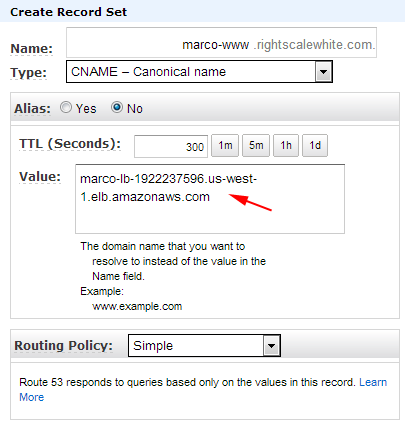
- Create a CNAME with your DNS provider (e.g. AWS Route 53, DNS Made Easy, DynDNS, etc.)
Example: Amazon Route 53
Create a Security Group for Application Servers
The next step is to create or update a security group that will be used by application servers to allows ingress communication from an ELB. By default, RightScale's Linux-based application ServerTemplates (e.g. PHP, Rails, Tomcat) listen on TCP port 8000 and the Windows-based application ServerTemplate (e.g. Microsoft IIS App) listens on TCP port 80.
- Create or modify a security group in the AWS region where the ELB will service requests to the application servers. Later, you will configure the application servers to use this security group in order to connect to the ELB.
- Create the desired port permissions. At a minimum, you will need to open up port 80 for HTTP access. You can also open up 443 for HTTPS (SSL) access. Specify the following information to create a permission for an ELB.
- Direction: Inbound
- Protocol: TCP - Group
- Ports:
- For v12.11 or v13.5 LTS ServerTemplates, use 8000..8000 (PHP, Rails, Tomcat, Django); 80..80 (Microsoft IIS)
- For v14 ServerTemplates, use 8080..8080 (PHP, Rails, Tomcat, Django); 80..80 (Microsoft IIS)
- Owner: amazon-elb
- Group: amazon-elb-sg
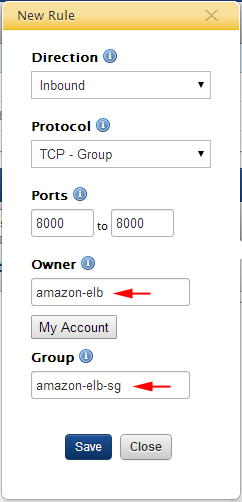
- Click Save.
- Later, when you set up your application servers and/or server array, be sure to use the above security group for the application servers will connect to the Elastic Load Balancer.
You cannot add a new security group to a running instance. In such cases, it's recommended that you add the security group to the next
server and relaunch the server.
Add an Instance to an AWS Elastic Load Balancer
Overview
Once you have created and configured your load balancer, you can add instances to it. Use the following procedure to add an instance to an AWS Elastic Load Balancer.
Prerequisites
- A configured AWS Elastic Load Balancer (ELB)
Steps
- Navigate to Clouds > AWS Region > Load Balancing > LoadBalancerName.
- Click Add Instance.
- Select the instances that you want to add and click Save.
- To remove an instance, click the check box for the instance and select Remove from the Actions drop down.
Remove an Instance from an AWS Elastic Load Balancer
Overview
Once you have created and configured your load balancer and added an instance to it, you may need to remove the instance. This is very simple to do. Use the following procedure to unregister a Server attached to an AWS Elastic Load Balancer (ELB).
Prerequisites
- A configured AWS Elastic Load Balancer with a server attached to it.
Steps
- Navigate to Clouds > AWS Region > Load Balancing > LoadBalancerName
- Expand the Instances tab.
- Select the instances that you want to remove.
- Select Remove from the Actions drop down.
Add Listeners to an Elastic Load Balancer
Overview
When you first create a new Elastic Load Balancer, it's automatically set up with one listener already predefined. By default, an ELB will be configured to listen over HTTP on port 80 and forward traffic to port 80 on the receiving EC2 instances, which are typically your application servers.
- HTTP; 80->80
To add additional listeners or make changes to existing ones, use the Listeners tab of the ELB. Use the following procedure to add listeners to an existing Amazon Elastic Load Balancer (ELB).
Prerequisites
- An existing ELB
- 'actor' user role privileges
- To add a Listener for SSL communications, you'll need a Server Certificate.
Steps
- Go to Clouds > AWS Region > Load Balancing.
- Select an existing ELB from the list.
- Click Add Listener.
To add a Listener, specify the following information:
- Load Balancer Protocol - The routing transport protocol that will be used by the ELB.
- HTTP
- HTTPS
- TCP
- SSL
- Load Balancer Port - External port that the ELB will listen on to accept client requests. Valid ports are 80, 443, 1024-65535.
- Instance Protocol - The front end protocol used by the instance.
- Instance Port - The port that the ELB will use to send traffic to the application instances. Valid ports are 1 to 65535. The Instance Port does not have to match the Load Balancer Port.
- Certificate (for HTTPS and SSL only) - Select or upload the Server Certificate that will be used for encryption purposes. See Server Certificates.
- Stickiness - (HTTP and HTTPS only) - Use stickiness to bind a user's session to a specific application instance. Also known as session affinity.
Create a New Sticky Session
Overview
By default, AWS ELB distributes requests to Instances running your application based on the lowest load. However, you can create a Sticky Session so that a request is bound to the same Instance for the length of the entire session. Sticky sessions are based on either load balancer or application generated HTTP cookies. This tutorial will step you through how to create a Sticky Session for your ELB. Use the following procedure to create a new Sticky Session policy for an AWS Elastic Load Balancer (ELB).
Prerequisites
- A created ELB and two or more front end Servers that have registered with the ELB.
- There is an AWS-imposed limit of 20 policies per ELB.
- Load Balancer protocol set to either HTTP or HTTPS
Steps
- Navigate to Clouds > AWS Region > Load Balancing.
- Click the ELB that you want to create a Sticky Session for.
- Expand the Listener(s) tab.
- Select either Load Balancer Generated Cookie Stickiness or Application Generated Cookie Stickiness to determine the basis for stickiness and set the following parameters:
- For Load Balancer Generated Cookie Stickiness, set the Expiration Period (in seconds), after which stickiness will be disabled. Leaving this field blank means that stickiness will not expire.
- For Application Generated Cookie Stickiness, enter the Cookie Name.
- Click Save.

Additional ELB Information
The following is an excerpt from the AWS ELB Developer Guide (Sept 2010), where it speaks to the Cookie Type:
Load Balancer-Generated HTTP Cookies
The load balancer uses a special load balancer-generated cookie to track the application instance for each request. When the load balancer receives a request, it first checks to see if this cookie is present in the request. If so, the request is sent to the application instance specified in the cookie. If there is no cookie, the load balancer chooses an application instance based on the existing load balancing algorithm. A cookie is inserted into the response for binding subsequent requests from the same user to that application instance. The policy configuration defines a cookie expiry, which establishes the duration of validity for each cookie.
For more information about the policy configuration for load balancer-generated HTTP cookies, see Create LB Cookie Stickiness Policy.
Application-Generated HTTP Cookies
The load balancer uses a special cookie to associate the session with the original server that handled the request, but follows the lifetime of the application-generated cookie corresponding to the cookie name specified in the policy configuration. The load balancer only inserts a new stickiness cookie if the application response includes a new application cookie. If the application cookie is explicitly removed or expires, the session stops being sticky until a new application cookie is issued.
For more information about the policy configuration for application-generated HTTP cookies, see Create App Cookie Stickiness Policy.
Post Tutorial Steps
Disable a Sticky Session
- Navigate to the Load Balancer
- Expand the Listener(s) tab.
- Select Disable Stickiness
Edit an AWS Elastic Load Balancer Configuration
Overview
There are several ways you can modify your load balancer's configuration that will affect the way it operates. One of the more common edits you can perform from the Dashboard is changing (adding to or deleting from) the Availability Zones your load balancer distributes traffic in. Use the following procedure to edit the configuration of an AWS Elastic Load Balancer (ELB) in the RightScale Dashboard.
Prerequisites
- EC2 credentials, and a previously created AWS Elastic Load Balancer
Steps
- Navigate to Clouds > AWS Region > Load Balancing.
- Select the correct LoadBalancerName link.
- You will be given the option to modify these areas:
- Info - This section displays the DNS Name of the LB and the Availability Zone(s) associated to the LB. You can edit this section to modify the zones the LB should service traffic in.
- Health Check - Based on the information configured in this section, ELB routinely checks the health of the load balancer within an AWS instance. You can specify either TCP, HTTP, HTTPS, or SSL and a valid port between one and 65535. The default is TCP:80. Additionally, you can specify the following:
- Response Timeout - Time to wait when receiving a response from the health check (between two and 60 seconds)
- Health Check Interval - Amount of time between health checks (0.1 min. to 5 min.)
- Unhealthy Threshold - Number of consecutive health check failures before an instance is declared as unhealthy (two to 10)
- Healthy Threshold - Number of consecutive health check successes before an instance is declared as healthy (two to 10)
- Instance(s) - You can view current instances associated to your LB and add instances to your LB.
- Listener(s) - You can view current listeners associated to your LB and add new listeners to your LB.
Consult the AWS documentation for additional information. (Our default values align with AWS and the above values could possibly become dated over time.)
- After editing one of all of these sections, don't forget to Save your changes.
Post Tutorial Steps
To view the current configuration of your load balancer, navigate to:
Clouds > AWS Region > Load Balancing > LoadBalancerName
Delete an AWS Elastic Load Balancer Configuration
Overview
Use the following procedure to delete an AWS Elastic Load Balancer in the RightScale Dashboard.
Prerequisites
- EC2 credentials, and a previously created AWS Elastic Load Balancer.
Steps
- Navigate to Clouds > AWS Region > Load Balancing.
- Select the correct LoadBalancerName checkbox.
- Select the Actions dropdown and Delete.
- Confirm deletion in the dialog window.