Objective
To set up an HAProxy load balancer server or servers in a public or private cloud environment.
Prerequisites
- You must log in under a RightScale account with
actor
andlibrary
user roles in order to complete the tutorial. - For Amazon EC2, and other clouds that support security groups, you must have a security group defined with TCP port 22 open for SSH access, the appropriate web port (80 for HTTP or 443 for HTTPS) open for client access, and any other port and protocol access required by your load balancers. Also, remember that iptables is installed by default on all servers, as described under Security below.
- We strongly recommend that you set up credentials for password values and any other sensitive data included as Chef recipe inputs.
- You can use this ServerTemplate to distribute traffic to any application server listening on port 8000 (e.g. Apache+PHP, Tomcat, IIS, JBoss).
- You must have a Chef Server or use Hosted Chef to use this ServerTemplate.
- You must upload the rs-haproxy and other required cookbooks to your Chef Server.
Overview
This tutorial describes the steps for launching one or more HAProxy load balancer servers in the cloud, using the Load Balancer with HAProxy for Chef Server (RightLink 10)) ServerTemplate. However, in a typical three-tier server architecture there are two dedicated load balancer servers, which is necessary to support redundancy and failover for client communications.
For a technical overview of this ServerTemplate, see Load Balancer with HAProxy.
Create Credentials
Although the Load Balancer ServerTemplate does not assume that any specific predefined credentials exist, we recommend that you set up the following credentials if you need to enter any of the following input values. This ServerTemplate assumes that all of these credentials are setup if you want to use the desired functionality that these inputs depend on.
- LB_STATUS_USERNAME - Optional user name to require in order to log in to the HAProxy status report page.
- LB_STATUS_PASSWORD - Optional password corresponding to LB_STATUS_USERNAME.
- HAPROXY_SSL_CERTIFICATE - Certificate used to enable SSL authentication
For information on setting up credentials, see Create a New Credential.
Create Elastic IPs (AWS only)
If you are launching HAProxy load balancer servers in EC2, it is recommended that you use Elastic IPs. Typically, you will have two load balancers for redundancy purposes. If you haven't already done so, create an Elastic IP for each load balancer. Be sure to create the Elastic IPs in the AWS region (e.g. 'us-east') where you intend to launch the load balancer servers. See Create Elastic IPs (EIP).
Steps
Add a Server
Follow these steps to add a load balancer server to the deployment.
- Go to the MultiCloud Marketplace (Design > MultiCloud Marketplace > ServerTemplates) and import the most recently published revision of the Load Balancer with HAProxy for Chef Server (RightLink 10))) ServerTemplate into the RightScale account.
- From the imported ServerTemplate's show page, click the Add Server button.
- Select the cloud for which you will configure a server.
- Select the deployment into which the new server will be placed.
- Next, the Add Server Assistant wizard will walk you through the remaining steps that are required to create a server based on the selected cloud.
- Server Name - Provide a nickname for your new load balancer server (e.g., lb1).
- Select the appropriate cloud-specific resources that are required in order to launch a server into the chosen cloud. The required cloud resources may differ depending on the type of cloud infrastructure. If the cloud supports multiple datacenters / zones, select a specific zone. Later, when you create the other load balancer server you will use a different datacenter / zone to ensure high-availability. For more information, see Add Server Assistant.
- If you are using Elastic IPs (AWS EC2 only), select an existing Elastic IP from the drop-down, or click New to create a new one.
- Click Confirm, review the server's configuration and click Finish to create the server.
Create another Load Balancer Server
For production environments, it's strongly recommended that you have at least two load balancer servers (preferably in different availability zones or datacenters) for redundancy purposes. The easiest way to create a second load balancer is to simply clone and modify the first load balancer server.
- Go to the show page of the load balancer server that you just created and click the Clone button.
- Change the name of the server accordingly. (e.g. lb2)
- Under the Info tab, click Edit.
- Select a different zone/datacenter and Elastic IP (if applicable).
Configure Inputs
The next step is to define the properties of your load balancer server or servers by entering values for inputs. As a best practice, you should define required inputs for the servers at the deployment level. For a detailed explanation of how inputs are defined and used in Chef recipes and RightScripts, see Inheritance of Inputs.
To enter inputs for the Chef recipes that will run on your load balancers, open the deployment's Inputs tab, click Edit, and use the following settings to configure input values. We recommend that you set up credentials for password values and any other sensitive data as shown in the examples.
Chef Inputs
| Input Name | Description | Example Value |
|---|---|---|
| CHEF_ENVIRONMENT | The chef environment name to use | text: _default |
| CHEF_SERVER_URL | The url of your chef server | text:https://chef-server.example.com |
| CHEF_VALIDATION_KEY | The chef orgainization validation key. | cred:CHEF_VALIDATION_KEY |
| CHEF_VALIDATION_NAME | The chef validator name | text:example-validator |
| LOG_LEVEL | Chef client log level | text:info |
| VERSION | The version of chef client to install | text:12.16 |
HAPROXY Inputs
| Input Name | Description | Example Value |
|---|---|---|
| POOLS | Comma-separated list of URIs or FQDNs for which the load balancer will create server pools to answer website requests. The last entry will be the default backend and will answer for all URIs and FQDNs not listed here. A single entry of any name (for example, default) will mimic basic behavior of one load balancer with one pool of application servers. This will be used for naming server pool backends. Note: Application servers can provide any number of URIs or FQDNs to join corresponding server pool backends (for example, www.mysite.com, api.mysite.com, /serverid, default). The POOLS should be unique across deployments. | text: www.mysite.com, api.mysite.com For the standalone and 3-tier tutorials, use: text:default |
| HEALTH_CHECK_URI | The URI that the load balancer will use to check the health of a server. It is only used for HTTP (not HTTPS) requests. Example: / | text: / |
| BALANCE_ALGORITHM | Defines which load balancing algorithm is used to establish connections with application servers in the load balancing pool. * roundrobin (default) - Incoming requests are distributed in a round-robin fashion. (a-b-c-a-b-...) * l eastconn - Incoming requests are sent to the server with the fewest number of active connections. * source - Incoming requests from the same client IP address will be sent to the same application server. |
text: roundrobin |
| SESSION_STICKINESS | Determines session stickiness. Set to 'True' to use session stickiness, where the load balancer will reconnect a session to the last server it was connected to (via a cookie). Set to 'False' if you do not want to use sticky sessions; the load balancer will establish a connection with the next available server. | text: true |
| SSL_CERT | PEM formatted string containing SSL certificates and keys for SSL encryption. To configure HAProxy without SSL encryption, do not set this input. | nil |
| STATS_PASSWORD | Password to access HAProxy statistics page | nil |
| STATUS_URI | HAProxy statistics URI | text: /haproxy-status |
| STATS_USER | The username that is required to access the load balancer statistics report page | nil |
Launch the Server
- Go to the deployment's Servers tab and launch all of the load balancer servers. When you view the input confirmation page, there should not be any required inputs with missing values. If there are any required inputs that are missing values (highlighted in red) at the input confirmation page, cancel the launch and add values for those inputs at the deployment level before launching the server again. Refer to the instructions in Launch a Server if you are not familiar with this process.
Remember that as a best practice for building high-availability sites, you should have two load balancers that you launch in different availability zones or data centers.
Configure DNS Records
If you are using Elastic IPs or already know the public IP addresses that will be used by the load balancer servers, you might have already set up the DNS records for the load balancing tier. However, if you do not know the public IP addresses that will be assigned to the load balancer servers, you must manually set up the DNS records after the servers have been launched. Once the servers become operational (and have been assigned their respective public IP addresses), create or update the DNS records with your DNS provider. Each load balancer server should have its own DNS record with the same hostname (e.g. www.example.com) that points to its public IP address.
The DNS records for the HAProxy load balancing tier should direct traffic from the associated hostname (FQDN) (e.g. www.example.com) to the application servers in its load balancing pool.
Next Steps
Connect Application Servers
Launch new application servers that will connect to the HAProxy load balancers or connect any operational application servers using the rs-haproxy::frontend operational script.
Check HAProxy Status
The easiest way to check the status of the HAProxy load balancing pool is to view the HAProxy Status page. By default, the Status URI input is set to /haproxy-status.
If you created DNS A Records for the load balancer servers, you can visit the HAProxy Status page by entering your
If DNS A Records are not used, you can also use the public DNS name or IP of a load balancer server. (e.g. http://192.34.456.77/haproxy-status ))
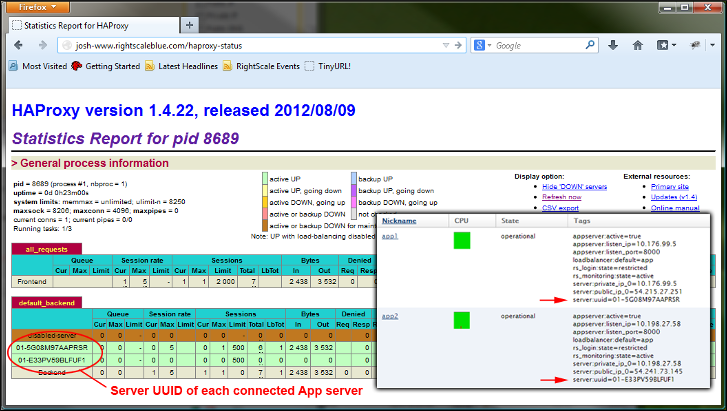
Each application server that is successfully added to the load balancing pool will be highlighted in green. In the example screenshot above, two application servers are in the load balancing pool and are able to receive requests from the load balancer servers. Notice that each application server is identified by its universally unique identifier (UUID) that RightScale assigns to each instance. You can find the server's UUID in its machine tags or under its Info tab.
Application servers highlighted in red are not included in the load balancing pool and will not receive any client requests. There are several reasons why an application server may be highlighted in red.
- The application server's firewall permissions are not allowing ingress communication from the load balancers. Check the firewall permissions of the application server (as defined by its security group, if applicable, and/or iptables rules).
- The application server is not operational. Perhaps the application server is in the booting or decommissioning state.
- The health check failed.