Assign an Elastic IP at Launch
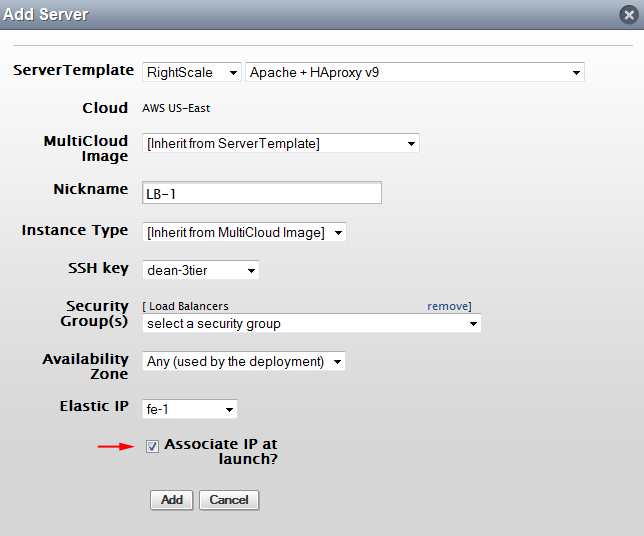
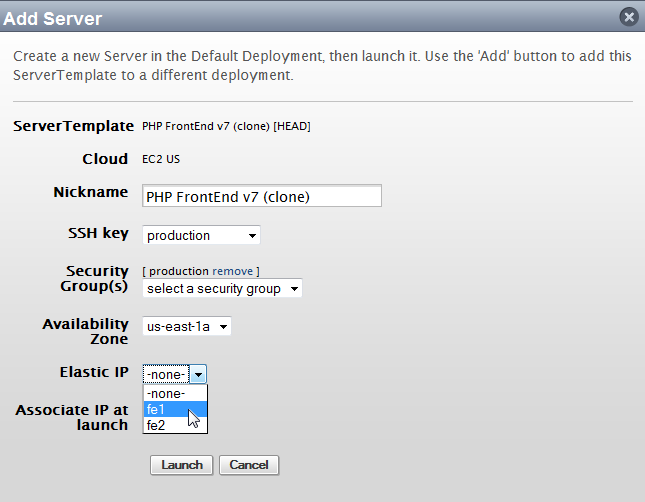
The most common way to use an Elastic IP (EIP) is to assign it to a server when it's launched for the first time. You can also assign an Elastic IP to a current running instance. If you select an EIP, but uncheck the Associate IP at launch
option, the instance will be randomly assigned a Public IP address at launch time; the Elastic IP will not be assigned to the instance.
Add a Server to a Deployment
Modify Inactive Server
You can also change the configuration of a server to associate an EIP at launch time. You can only apply this setting to an inactive server that has not been launched. So, if there is a Current
server that's already running, you'll need to modify the Next
server.
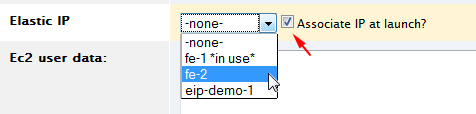
You can steal an Elastic IP from a running instance! Be sure to check and make sure that a running instance is not using the EIP that you want to assign to a new server.
Transfer an Elastic IP to a Running Instance
Once you have a running production deployment, you might run into a scenario where you need to replace one of your load balancers because it's corrupted, outdated, or failed. There are several places inside the Dashboard where you can easily transfer an Elastic IP to another running instance.
Things to Consider
- It will take several minutes for an EIP to transfer to another instance.
- When a new instance is assigned an EIP at launch, it will wait for the EIP to settle before trying to handle any traffic. But, if you transfer an EIP to an instance that is already running, it will not wait for the EIP to settle before handling traffic.
- HAproxy will maintain any connections to the old server in order to prevent users from dropping their connection.
Sticky sessions
will persist until there are no more connections to the old server or until you manually shut down or terminate the instance.
Instructions
Verify that the instance that you are transferring the EIP to is stable and ready to receive incoming traffic.
Change EIPs at the Deployment Level
If your instance is running, you can associate an EIP at the Deployment level. Go to your Deployment's home page (Manage > Deployments > DeploymentName). Click on the Servers tab. If the Public IP
column is not displayed, you will need to make it visible by using the Show/Hide Columns
option. To change an instance's EIP, click the Edit icon and select an EIP from the list and click the OK icon.
Change EIPs at the Server Level
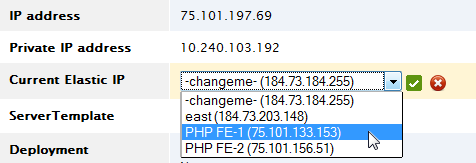
If your instance is running, you can associate an EIP at the Current
Server level. Under the Info tab, select an EIP for the Current Elastic IP
parameter.

Assign an Elastic IP to an Inactive Server
If you've already created a deployment, but forgot to associate an EIP to a particular server or want to change current EIP, you can still change the IP settings before launching the server.
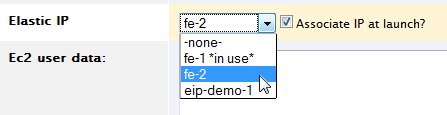
Inside your deployment, select the nickname of the stopped server that needs to be assigned an EIP or you can select the Next
server configuration of a running server if you want the EIP to be assigned on a Relaunch action. Under the Server's Info tab, click Edit and select the appropriate Elastic IP for the server and make sure that the Associate IP at launch
checkbox is checked. Click Save.
Check to See if an Instance is Using an EIP
The easiest way to check whether or not an instance is using an EIP is to see if the public DNS name and (Public) IP address match your Elastic IP.
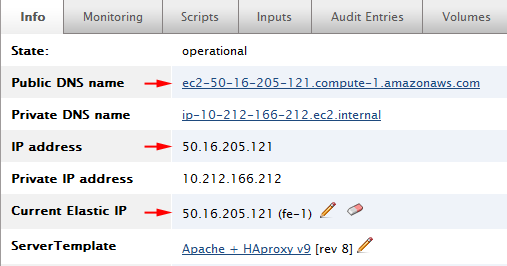
Also, on the Info tab, you can view specific User Data information.
The User Data
information does not list the current IP address of the instance; it lists the IP address that was originally used to launch the instance, so sometimes the listed IP will be a mismatch from what is listed above.

Disassociate an Elastic IP from a Running Instance
It's very easy to disassociate an Elastic IP address from a running instance. But, before you perform such an action, make sure that you really want to disassociate an Elastic IP address and not Transfer an Elastic IP to a Running Instance.
When you disassociate an Elastic IP from a running instance, it will remain without a publicly addressable IP address until Amazon can assign a new dynamic IP address, which could take several minutes. You should also make sure that you've already changed the DNS records accordingly to ensure that disassociating the EIP will not negatively impact your deployment.
You can disassociate an Elastic IP from a running instance at the deployment and instance levels.
Deployment Level
At the deployment level, if you click on the Disassociate icon, you will receive a warning/confirmation window. Click OK to disassociate an Elastic IP from an instance.
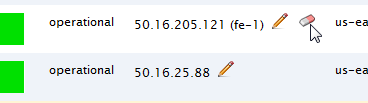
Server Level
At the Server level, if you click on the Disassociate icon, you will receive a warning/confirmation window. Click OK to disassociate an Elastic IP from an instance.
![]()
Assign an Elastic IP After an Instance is Launched
Once an instance is launched, you can associate a new or different Elastic IP to the running instance.
Once you select an Elastic IP and click the OK button, the instance will start to receive traffic for that IP address once the IP address has enough time to transfer over to the new instance (about 5 minutes). Therefore, make sure you are not stealing an Elastic IP from another running instance and that it is OK to inherit traffic from the previous owner of that Elastic IP. If you are using an Elastic IP that you know has not been used for over 24 hours, you will probably not inherit old traffic.
You can associate an Elastic IP to a running instance at the deployment and instance levels.
Deployment Level
At the deployment level you can click the instance's Edit icon and select the appropriate Elastic IP. If the Public IP
column is not displayed, you will need to make it visible by using the Show/Hide Columns
option. To change an instance's EIP, click the Edit icon and select an EIP from the list and click the OK icon.
Server Level
To associate an Elastic IP at the instance level, under the Info tab, click the Edit icon to select an EIP to associate to the running instance. If the instance already has an EIP, you can only choose a different EIP, otherwise click Cancel.
Create a New Elastic IP (EIP)
Overview
Amazon's Elastic IP (EIP) addresses allow you to assign an IP address to an instance of your choice, which replaces the need for normal dynamic IP addressing in the cloud. Elastic IPs are static addresses, but are dynamically remappable IP addresses within the cloud, making it easier to manage servers and make global changes compared to static IPs on traditional hosting solutions. It's a way of ensuring that you don't 'inherit' traffic from other's servers on EC2, because you're using an IP that's specifically reserved for your usage only, as long as you keep that EIP. EIPs allow you to mask instance or Availability Zone failures by rapidly remapping your public IP addresses to any instance in your account.
By default, an account can have a maximum of five Elastic IPs. Amazon charges you $0.01/hr for each unused EIP that you reserve because you're essentially taking away another public IP address from Amazon's IP pool that they can no longer provision to another EC2 instance. If you want to create more than 5 EIPs, you can submit a request to Amazon to increase your limit.
For a conceptual diagram and example of how you can use EIPs to update a site, read the section on Designing Failover Architectures on EC2.
Prerequisites
Amazon Elastic IPs are EC2 region-specific. You cannot use an EIP that you created in EC2-US for an instance in a different region like EC2-EU. This tutorial assumes you are creating an EIP for use in a specific EC2-US region.
Steps
Creating an Elastic IP
- Go to Clouds > your AWS region.
- Click IP Addresses.
- Click New.
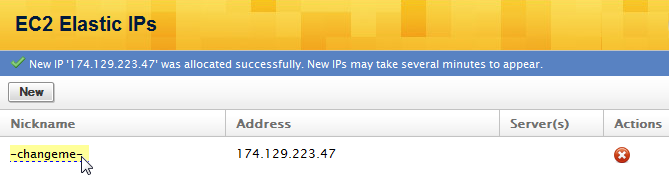
In a couple of minutes a new Elastic IP address will be added to your account. Refresh your window and you should see the IP address that was just created.
- Click on the Elastic IP's default nickname, change it to fe1 and click ok.
- Create another EIP and name it fe2. Write down the IP addresses for the front-end servers because you will need to list them in the next step.
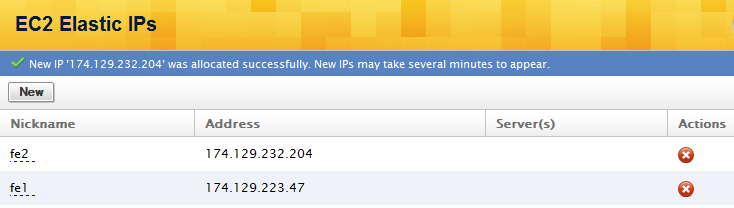
Congratulations! You now have two Elastic IPs that you can associate to an EC2 instance. You can either attach an Elastic IP to instance at boot time or to a running instance. See Best Practices for Elastic IP (EIP) to learn more about the best practices on using EIPs.
Assign Elastic IP at Launch Time
When you launch a server, you have the choice of assigning an Elastic IP at launch time. You will need to select these EIPs when you launch a server in one of the later Application Server Setup tutorials.
Be careful NOT not to steal an EIP from an existing server.
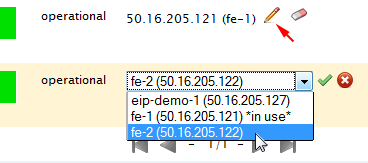
Assign Elastic IP to an Operational Server
Use the Edit action button to assign/reassign an EIP to a running server.
You will only see the edit button next to a running server.


Switch My Frontends to Use EIastic IPs
Overview
If you have running frontend servers that are using a DNS Provider for configuring their dynamic IP addresses and wish to switch to using an Elastic IP instead, you will need to follow the migration instructions below in order to ensure that your visitors do not experience any problems connecting to your site. If you do not take the necessary steps when changing the IP addresses of running frontend servers, your users could experience a sudden interruption of service and bad server requests as you suddenly switch to using Elastic IP addresses.
Migration Instructions - Summary
In order to follow best practices when switching to Elastic IP addresses you must follow the necessary precautionary steps.
- Create Elastic IPs for your frontend servers. See Create Elastic IPs (EIP).
- Launch new servers using the appropriate frontend ServerTemplate that is using the latest RightImageTM
- Connect the new EIP frontend servers to the running application servers.
- Connect the new EIP frontend servers to each other. Note: This step only applies to Basic Setups because in this scenario, frontends are also running application servers.
- Change the DNS A records for your two frontends to point to the new EIP frontend servers.
- Once no more requests are being served from the old frontend servers, terminate them.
Sample Setup Diagrams
Below are diagrams of two common setups. The Basic Setup is a 4-instance deployment where the frontends serve as both the load balancer and application server. In the Advanced Setup, the frontends are strictly load balancers that point to all of the application servers.

Steps
Step 1: Create two Elastic IPs for your frontend servers.
If you have not reserved Elastic IP (EIP) addresses that you can later assign to your frontend servers, follow the Create Elastic IPs (EIP) tutorial and register two Elastic IPs. You will need an EIP for each frontend server.
Step 2: Launch new frontend servers using the most recent frontend ServerTemplates
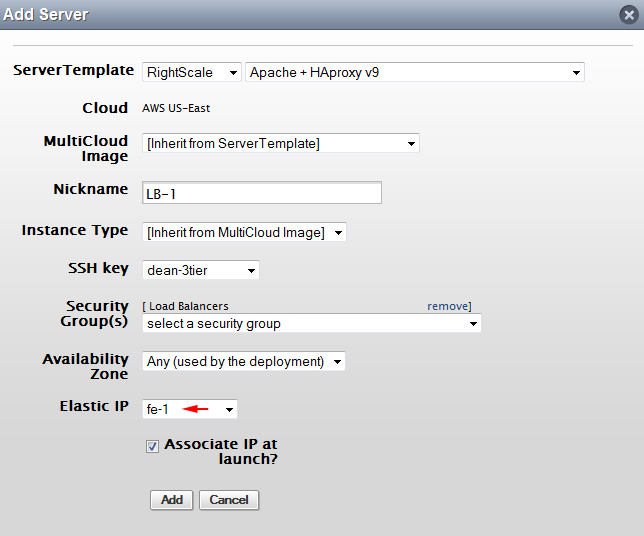
Select the appropriate RightScale frontend ServerTemplate (PHP FrontEnd, Rails FrontEnd, etc.).
Add a Server to your Deployment with the appropriate server information. Select the first Elastic IP (e.g. fe-1) that you want to associate with the first frontend. Click Add.
Repeat the process for the second frontend server and select the other Elastic IP (e.g. fe-2).
Launch the new servers.
Once the servers are operational, continue to the next step.
Step 3: Connect the new EIP frontend servers to the running application servers
The next step it to connect the new EIP frontend servers to the running application servers by executing the LB get HA proxy config operational RightScript. The new frontend servers will try to get the configuration file from the running frontend servers. Once they get the configuration file, they can route traffic to the application servers.
Step 4: Connect the new frontends to each other
This step only applies to the Basic Setup. For Advanced Setups, skip to the next step.
Since the frontend instances are also running the application servers, you'll need to associate the new frontends together by running the LB mongrels to HA proxy connect RightScript.
Step 5: Change the DNS A records to point to the Elastic IPs
The new EIP frontend servers are now ready to serve traffic. With your DNS provider, lower the TTL on the A records that point to your frontend servers so that the change will be propagated more quickly. Wait a couple of minutes and then change the DNS A records to point to the new EIP frontend servers so incoming traffic will be routed to the frontends.
Step 6: Terminate old frontend servers
Once no more requests are being handled by the old frontend servers (FE-1, FE-2), you can safely terminate the instances. You can find information about HAproxy and Apache activity in the monitoring graphs. We recommend leaving the old frontend servers running for a couple of days to make sure everything is running properly, because if you experience any problems, it will be easy to switch back to the old frontends.