Objective
To set up two MySQL 5.1/5.5 database servers running in an asynchronously replicated (master/slave) configuration in a single deployment in a public or private cloud environment with data stored on a logical volume made up of two volumes set to backup on the slave every hour.
Prerequisites
- You must log in under a RightScale account with 'actor,' 'designer', 'security manager,' and 'library' user roles in order to complete the tutorial.
- For Amazon EC2, and other clouds that support security groups, you must have a security group defined with TCP port 22 open for SSH access, and any other ports required by the server (for example, the default MySQL port, TCP port 3306), for the required security groups and IP addresses.
- We strongly recommend that you set up credentials for password values and any other sensitive data used for script/recipe inputs. To learn how to create credentials see Create Credentials for Common Inputs.
- This tutorial installs a blank MySQL database and uses a mysql dump file stored in a Github repository to restore a single database.
- You must have a Chef Server or use Hosted Chef to use this ServerTemplate.
- You must upload the rs-mysql cookbook to your Chef Server.
Overview
This tutorial describes the steps for launching MySQL database servers running in an asynchronously replicated (master/slave) configuration in the cloud. Before starting the tutorial it is strongly recommended that you read the Technical Overview of the ServerTemplate which describes its overall functionality.
Volumes
Database data will be stored on volumes. Backups will be done using the volume snapshots feature of the cloud being used. It is strongly recommended that you use volumes to store the contents of the MySQL database for greater efficiency and optimal performance.
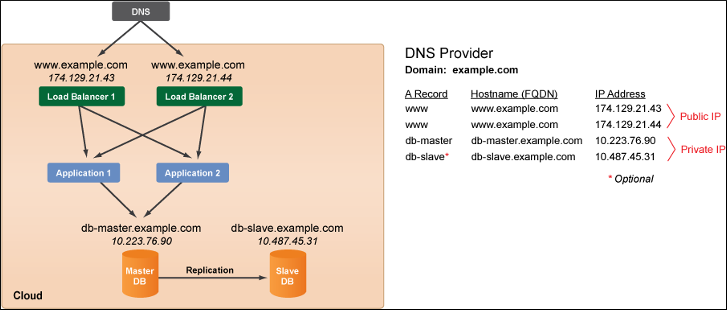
Create DNS Records
In a typical 3-tier architecture setup, DNS A records are used to create fully qualified domain names (FQDNs) that map to a particular server or tier of servers. The diagram below shows a typical example of a 3-tier website architecture.
In this type of architecture, the application servers locate the master
database server by using Master-DB's FQDN (e.g. db-master.example.com), which resolves to the Master-DB's IP address. Since the IP address of an instance in the cloud is often dynamically assigned at launch time, you are required to use a DNS provider that supports dynamic DNS (i.e. the ability to dynamically update the IP address of an A record) for the Master-DB server (at a minimum).
Time to Live (TTL) Setting
When you create the DNS records, it's important to set appropriate TTLs to ensure that servers will not stay connected to an old IP address that is no longer assigned to a functional server. For example, the DNS record that points to the master
database server should have a low TTL to ensure that the application servers will connect to the correct server within a reasonable amount of time. It's strongly recommended that you use a TTL of 60 seconds for the DNS record that points to the master
database server.
The current version of the ServerTemplate has default support for DNSMadeEasy. ‘A’ records are created or updated if they already exist. You will need to provide your “API key” in the “DNS User Key” input and the “Secret key” in the “DNS Secret Key” input. It is strongly recommended that Credentials are used to store and use these keys.
Steps
If you are setting up a database server for testing purposes or if you do not have your own dump file, you can use the following sample MySQL dump file to complete the tutorial. The sample is a bzip2 compressed file (.bz2) file.
Add a Server
Follow these steps to add a database server to the deployment.
- Go to the MultiCloud Marketplace (Design > MultiCloud Marketplace > ServerTemplates) and import the most recently published revision of the following ServerTemplate into the RightScale account.
- From the imported ServerTemplate's show page, click the Add Server button.
- Select the cloud and the deployment for the new server and click Continue.
- Next, the Add Server Assistant wizard will walk you through the remaining steps that are required to create a server based on the selected cloud.
- Server Name - Provide a nickname for your new database server (e.g., mysql-db1). Do not include
master
orslave
in the name, because a database server's role can change in the future. - Select the appropriate cloud-specific resources (e.g. Datacenter/Zone, Security Group, etc.) that are required in order to launch a server into the chosen cloud. The required cloud resources may differ depending on the type of cloud infrastructure. If the cloud supports multiple datacenters/zones, select a specific zone. Later, when you create the other database server you will use a different datacenter/zone to ensure high-availability. For more information, see Add Server Assistant.
- Important! If you are not using volumes to store the database, you must select an instance type that has disk space that's at least twice as large as your database because LVM snapshots are performed locally on the instance before they are gzipped and saved to the specified ROS location. Also, although these ServerTemplates will work with any instance size, you may experience degraded performance with small instance sizes (such as EC2 micro) due to lack of system resources. We do not recommend smaller instance types for production use.
- Server Name - Provide a nickname for your new database server (e.g., mysql-db1). Do not include
- Click Confirm, review the server's configuration and click Finish to create the server.
Initial Setting of Inputs at the Deployment Level
The following inputs should be set at the deployment level. Go to the deployment's Inputs tab (Manage > Deployments > your deployment > Inputs) and click Edit.
Although you can enter values for missing inputs as text values, it's strongly recommended that you set up credentials for passing sensitive information to scripts such as passwords or any other sensitive data.
Chef Inputs
| Input Name | Description | Example Value |
|---|---|---|
| CHEF_ENVIRONMENT | The chef environment name to use | text: _default |
| CHEF_SERVER_URL | The url of your chef server | text:https://chef-server.example.com |
| CHEF_VALIDATION_KEY | The chef orgainization validation key. | cred:CHEF_VALIDATION_KEY |
| CHEF_VALIDATION_NAME | The chef validator name | text:example-validator |
| LOG_LEVEL | Chef client log level | text:info |
| VERSION | The version of chef client to install | text:12.16 |
Database Inputs
Required
| Input Name | Description | Example Value |
|---|---|---|
| BACKUP_LINEAGE | The prefix that will be used to name/locate the backup of the MySQL database server. | text: mysql_test_lineage |
| DEVICE_COUNT | The number of devices to create and use in the Logical Volume. | text: 2 |
| DEVICE_VOLUME_SIZE | Size of the volume or logical volume to create (in GB). | text: 10 |
| SERVER_ROOT_PASSWORD | The root password for MySQL server. | cred: MYSQL_ROOT_PASSWORD |
| SERVER_USAGE | The Server Usage method. It is either 'dedicated' or 'shared'. In a 'dedicated' server all server resources are dedicated to MySQL. In a 'shared' server, MySQL utilizes only half of the resources. Example: 'dedicated' | text:dedicated |
Advanced
| Input Name | Description | Example Value |
|---|---|---|
| MYSQL_SERVER_VERSION | MySQL Server Version | text: 5.5 |
| APPLICATION_DATABASE_NAME | The name of the application database. | text: app_db |
| APPLICATION_PASSWORD | The password of the application database user. The Application Username and Password will allow access to the database in a restricted fashion. | cred: MYSQL_APP_PASSWORD |
| APPLICATION_USERNAME | Username to access the application database. | cred: MYSQL_APP_USERNAME |
| DNS_MASTER_FQDN | The fully qualified domain name of the MySQL master database server. | text: db.example.com |
| DNS_SECRET_KEY | The secret key to access/modify the DNS records. In our example, this will be set to the ‘Secret Key’ from DNSMadeEasy. | cred: DNSMADEEASY_SECRET_KEY |
| DNS_SECRET_KEY | The user key to access/modify the DNS records. In our example, this will be set to the ‘API Key’ from DNSMadeEasy. | cred: DNSMADEEASY_API_KEY |
| SERVER_REPL_PASSWORD | The replication password set on the master database and used by the slave to authenticate and connect. If not set, ‘MySQL Root Password’ will be used. | cred: MYSQL_REPLICATION_PASSWORD |
Optional
| Input Name | Description | Example Value |
|---|---|---|
| RESTORE_TIMESTAMP | The timestamp (in seconds since UNIX epoch) to select a backup to restore from. The backup selected will have been created on or before this timestamp. Example: 1391473172 | |
| SCHEDULE_ENABLE | Enable or disable periodic backup schedule. | text: true |
| SCHEDULE_HOUR | The hour to schedule the backup on. This value should abide by crontab syntax. Use '*' for taking backups every hour. | text: * |
| SCHEDULE_MINUTE | The minute to schedule the backup on. This value should abide by crontab syntax. | text: 30 |
Launch the Master Database Server
After configuring your deployment inputs, launch your newly configured master database server.
Go to the deployment's Servers tab and launch the database server. When you view the input confirmation page, there should not be any missing values (highlighted in red) for inputs that are required by any of the server's boot scripts. If there are any inputs highlighted in red, cancel the launch and add the missing values at the deployment level before launching the server again. Refer to the instructions in Launch a Server if you are not familiar with this process. Click the Launch (not 'Save and Launch') button at the bottom of the input confirmation page.
Initialize the Master Database Server
Wait for the server to reach the operational
state before proceeding. To view the status of a script run, go to the “current” server’s Audit Entries tab. Go to the “current” server’s Scripts tab, look in Operational Scripts, and run the following scripts, in order, to initialize the master database server.
- MySQL Server Stripe - chef - creates and attaches the volumes, sets up a striped logical volume, and uses it for the database data location.
- Variant: rs-mysql::volume - run this instead to use a single volume.
- MySQL Server master - chef - registers it as the “master” database server and assigns appropriate replication privileges and machine tags. This also creates/updates the DNS record with the IP information of the server.
- MySQL Server Backup - chef - Creates a backup of the volumes holding the database data. This backup will be used to setup a ‘slave’ database server.
It is strongly recommended to not run scheduled backups on your ‘master’ database server. Backups involves locking the database and freezing the filesystem. This will usually cause issues with applications writing to the database. Backups should only be done on the ‘slave’ database servers. Final Setting of Inputs at the Deployment Level
Since the Master-DB is up and running, and an initial backup was made, one more input should be set at the deployment level to be used by new Slave-DB servers. Go to the deployment's Inputs tab (Manage > Deployments > your deployment > Inputs) and click Edit.
Final Setting of Inputs at the Deployment Level
Since the Master-DB is up and running, and an initial backup was made, one more input should be set at the deployment level to be used by new Slave-DB servers. Go to the deployment's Inputs tab (Manage > Deployments > your deployment > Inputs) and click Edit.
RS-MYSQL
Required
| Input Name | Description | Example Value |
|---|---|---|
| Restore Lineage | The lineage name to restore backups. | text: mysql_test_lineage |
Add a Slave Database Server
Create a slave server in your deployment.
- Clone the Master-DB server.
- Rename the server accordingly. (e.g. mysql-db2) Remember, you do not want to include the word
slave
in the nickname because this server may become themaster
server during a failover scenario. You don't want the server's nickname to potentially cause any confusion. - Under the server's Info tab, click Edit and change the server's availability zone. In order to ensure high availability, it's strongly recommended that you launch the Slave-DB server in a different availability zone as the Master-DB. Note: Cross-zone data transfer costs may apply.
Launch the Database Server
Make sure the following conditions are true before you launch the second database server.
- The master database server state is
operational.
- The initial primary backup of the master database server is 100% complete. You can track the status in the dashboard (Clouds > region > Snapshots). The time required to complete the initial primary backup will vary based on factors such as storage type, volume size, etc.
Because the inputs are configured in the deployment level for slave database servers, there is no need to alter the inputs.
Go to the deployment's Servers tab and launch the “slave” database server. When you view the input confirmation page, there should not be any missing values (highlighted in red) for inputs that are required by any of the server's boot scripts. If there are any inputs highlighted in red, cancel the launch and add the missing values at the deployment level before launching the server again. Refer to the instructions in Launch a Server if you are not familiar with this process. Click the Launch (not 'Save and Launch') button at the bottom of the input confirmation page.
Initialize the Slave Database Server
Wait for the server to reach the operational
state before proceeding. To view the status of a script run, go to the “current” server’s Audit Entries tab. Go to the “current” server’s Scripts tab, look in Operational Scripts, and run the following scripts, in order, to initialize the slave database server.
- MySQL Server Stripe - chef - as a result of ‘Restore Lineage’ being set at the deployment level, restores the volumes from the latest backup, attaches them to the server, re-enables the striped logical volume, and sets it as database data location.
- Variant: MySQL Server Volume - chef - run this instead if this recipe was used on the master database. This will restore the single volume if a single volume was used on the master database.
- MySQL Server Slave - chef - registers it as a “slave” database server, connects and syncs with the ‘master’ database server using the appropriate replication privileges, and sets machine tags.
- MySQL Server Backup - chef - Creates a backup of the volumes holding the database data.
- MySQL Server Schedule - chef - Adds the crontab entry for taking backups periodically.
Periodic backups should be done on a slave database since locking a slave database for writing should have little or no impact on applications that should be accessing the master database. Once the backup completes, the filesystem is unfrozen, and the databases is unlocked, the slave database will catchup with the master.