Use RightScale Self-Service to deliver curated, governed cloud services to all the users in your organization. By using RightScale Self-Service, you can empower developers with on-demand access to cloud infrastructure to accelerate innovation, streamline development, and reduce costs related to “shadow IT.” Self-Service provides an easy-to-use portal for automated deployment of cloud applications and policy-based governance over cloud usage.
Introduction to CloudApps
The following sections provide a brief introduction to CloudApps including descriptions of the various states of the CloudApp lifecycle, operations (both user-defined and system-defined), and details on the CloudApp display in the Self-Service user interface.
What is a CloudApp
A CloudApp (Cloud Application) is a high-level construct that represents an application running in the cloud. CloudApps are launched and managed via RightScale's Self-Service portal, using either the Self-Service Catalog in the web user interface or the Self-Service API.
The CloudApp Lifecycle
Throughout its lifecycle, a CloudApp transitions through many states as shown in the following diagram.
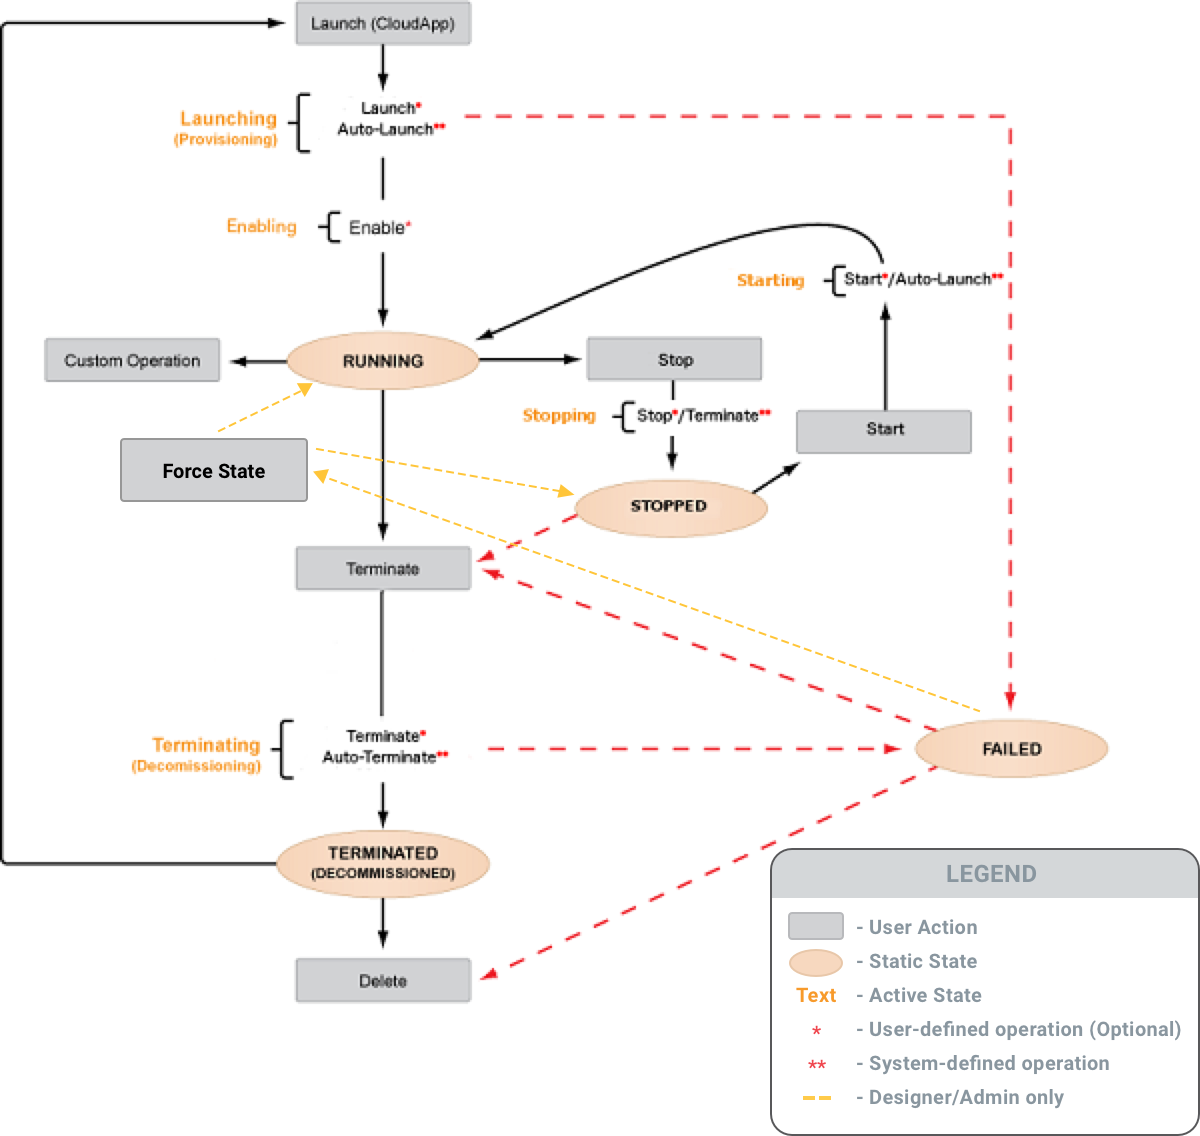
The following table describes the various states in the CloudApp Lifecycle.
| State | Type | Description | Available Next Actions |
|---|---|---|---|
| Launching | Active | Triggered when a CloudApp is launched from the Catalog or launched from a previously terminated CloudApp. | |
| Starting | Active | Triggered automatically when a user clicks the Start button, or when a scheduling event occurs. Note that this will call the built-in operation called startdefined in the CAT if it exists, otherwise it will call the launch flow ( launchthen auto_launchthen enable). |
|
| Running | Static | Indicates successful completion of the Enable operation. | Terminate, Stop |
| Stopping | Active | Triggered when a user clicks the Stop button, or when a scheduling event occurs. Note that this will call the built-in operation called stopdefined in the CAT if it exists, otherwise it will call the terminate flow ( terminatethen auto-terminate). |
|
| Stopped | Static | Indicates successful completion of the Stop operation. | Terminate, Start |
| Terminating (Decommissioning) | Active | Triggered when a user clicks the Terminate button. | |
| Terminated (Decommissioned) | Static | Indicates successful completion of the Decommission/Terminate operation. | Launch, Delete |
| Failed | Static | Indicates that a failure has occurred in one of the following operations: launch, auto_launch, terminate, auto_terminate, stop, start | Terminate, Delete, Force State |
If you delete a CloudApp that is in a Failed state, some cloud resources may not be properly decommissioned and/or removed. Always attempt to Terminate a Failed CloudApp before deleting it.
Operations
Operations describe the actions that can occur on your application across its lifecycle. Operations are further classified as either user-defined or system-defined. There are four special user-defined operations and any number of custom user-defined operations is supported. Custom operations can be made available to the end users through the Self-Service user interface. System-defined operations are built-in.
User Defined Operations
All user-defined operations are optional and are written using the RightScale Cloud Workflow Language (RCL).
- Launch - Defines which actions are executed when a CloudApp is launched (e.g. create a server)
- Enable - Enables one or more resources or services.
- Start - Starts the CloudApp. This operation is called by the scheduler if it exists.
- Stop - Stops the CloudApp. This operation is called by the scheduler if it exists.
- Custom Operation - Defines a specific set of actions that are designed for execution during a CloudApp's running state.
- Terminate - Defines which actions are executed when a CloudApp is terminated (e.g. shutdown a server)
- Force State - Available only to
designerandadminroles, allows the state to be forced toRunningorStoppedif the CloudApp isFailed
System Defined Operations
- Auto-Launch - Sequentially provisions all resources defined in the CAT that are either not explicitly passed in to the 'provision' operation, or do not have a condition statement that evaluates to 'false'. This operation cannot be overridden.
- Auto-Terminate - Deletes all resources defined in the CAT as well as resources (except volume snapshots) associated with the deployment, even if they were not created via the CAT. These resources will be destroyed and will no longer exist. This operation cannot be overridden. If there were any errors during the deletion of resources, they will be recorded and the operation will proceed with deleting as many resources as possible before entering the failed state. These errors can then be seen and rectified before retrying the operation.
- Delete - Removes the CloudApp from the Self-Service portal so that it can no longer be launched again. However, the CloudApp is not removed from the catalog. Warning! Once you delete a CloudApp, all of its metadata is permanently removed.
CAT Design Concepts
The purpose of a CAT is to provide a simplistic and repeatable way of defining resources and operations. A CAT enumerates all the resources used by a Cloud Application (CloudApp) and lists operations that can be used to provision the CloudApp, operate it, and decommission it. You can think of CATs as similar to AWS CloudFormation templates. However, there are some fundamental differences between AWS CloudFormation templates and CATs. The CAT allows you to write code that describes the orchestration for your system as your code is executed. The CAT is fundamentally different than the AWS CloudFormation template in that with a CAT you can specify operations and use imperative code that runs when the service is operational or is being configured. AWS CloudFormation templates are static
declarative code in JSON format that do not promote the same level of interaction and configuration as CATs.
Anatomy of a CAT
RightScale has defined a ruby Domain Specific Language (DSL) to describe CloudApps. Using a DSL means that the full power of the ruby language is available to construct the CloudApp definition (things like date, string, number manipulations are especially useful). Think of ruby in this context as a macro
language that gets evaluated on load rather than at runtime. The first step toward creating CAT files is understanding the template structure and format.
Here are the aspects of a CloudApp that are defined in a CAT in two primary categories:
Metadata
Descriptive information for the CAT contained in required fields for name, short-description, long-description, and rs_ca_ver (CAT parsing engine version).
Declarations
There are 7 different types of declarations that can be used in a CAT.
- Parameters - used to get input to a CloudApp from an end-user
- Mappings - used to abstract detail away from an end-user
- Resources - declaratively describe the cloud resources needed for this CloudApp
- Conditions - boolean values based on the environment of the CloudApp
- Outputs - used to show running CloudApp information to end-users
- Operations - define the behaviors that apply to this CloudApp during its lifecycle
- Definitions - reusable code components written in a cloud-focused workflow language (RightScale Cloud Workflow)
See CAT File Language for detailed information on CAT metadata fields and declarations.
Example CAT File
Here is an example of what a CAT looks like. But we do not expect you to use this as your only resource for building your own. This is only for visual reference to help digest all this new information. To find how to start designing CATs, continue reading on.
Simple Single-Server CAT
name "LAMP AIO"
rs_ca_ver 20131202
short_description "LAMP All-In-One"
long_description "A single server running CentOS 6.4, Apache, PHP and MySQL"

resource "lamp", type: "server" do
  name "LAMP AIO"
  cloud "EC2 us-west-2"
  instance_type "m1.small"
  security_groups find("front_end"), find("ssh")
  server_template find("LAMP All-In-One with MySQL 5.5 (v13.5 LTS)", revision: 2)
  inputs do
    { "app/database_name"                => "text:my_app_db",
      "db/application/password"          => "cred:DBAPPLICATION_PASSWORD",
      "db/application/user"              => "cred:DBAPPLICATION_USER",
      "db/dns/master/fqdn"               => "env:PRIVATE_IP",
      "db/dump/container"                => "text:lamp_bucket",
      "db/dump/database_name"            => "text:my_app",
      "db/dump/prefix"                   => "text:dump",
      "db/dump/storage_account_id"       => "cred:AWS_ACCESS_KEY_ID",
      "db/dump/storage_account_provider" => "text:s3",
      "db/dump/storage_account_secret"   => "cred:AWS_SECRET_ACCESS_KEY",
      "repo/default/provider"            => "text:repo_git",
      "repo/default/repository"          => "text:git://github.com/rightscale/examples.git",
      "repo/default/revision"            => "text:unified_tomcat" }
  end
end
Let's take a moment to analyze the example above.
First, you will see at the top of the CAT is where we define the metadata for the CloudApp including a name (LAMP AIO
), the CAT parser engine version, or rs_ca_ver (20131024), a short_description (LAMP All-In-One
), and a long_description (A single server running CentOS 6.4, Apache, PHP and MySQL
).
The remaining code block defines a CloudApp resource called lamp
which is of type server
. Within this block we provide a name for the resource and declaratively specify the cloud, datacenter, instance_type, security_groups, and the server_template from which the server is derived. Finally, we define all the inputs required to successfully launch the server.
Because no user-defined operations are explicitly specified in the CAT, compiling and launching the reference CAT causes the built-in Auto-Launch operation to execute on the lamp
resource resulting in an operational LAMP All-in-One server with MySQL 5.5 in RightScale. A corresponding deployment is created and viewable in the RightScale Cloud Management Dashboard.
How to Create CAT Files
In order to create and edit CAT files you need a basic text editor. We recommend using an editor that supports syntax highlighting for the ruby programming language, however, any text editor will do. There are several ways in which you can create CAT files including using the reference CAT listed above, using the RightScale Deployment Exporter, or creating one from scratch. Each of these options is described in greater detail below.
Using the Reference CAT
One of the easiest ways to get up and running in Self-Service is to create a CAT file based on the reference CAT provided above. Leveraging the reference CAT is a great way to become more familiar with the concepts of Self-Service. It is important to note that the CAT we provide for reference is very basic and only describes a single server. In building a CAT for your particular environment you will need to consider things like the number and type of servers required (load balancers, application servers, database servers, etc.), input values appropriate for your environment (database credentials, access keys, repository locations, etc.), and whether to employ Conditions, Mappings, Custom Operations, or other more advanced Self-Service constructs and declarations.
Using the RightScale Deployment Exporter
If you already have existing operational deployments managed by RightScale then the best way to create your CATs is to use the RightScale Deployment Exporter. The Deployment Exporter is a simple ruby command line program that creates an initial CAT version based on a given RightScale deployment. In order to use the Deployment Exporter you will need the following in your development environment.
- Ruby v1.8.7 (or higher)
- RightScale API Client v1.5.15 (or higher)
If you do not already have the RightScale API Client v1.5.15 in your development environment you can install the right_api_client gem using the following command.
gem install right_api_client
The Deployment Exporter (export_deployment.rb) is currently available as an open source tool from the following repository.
Use the Download ZIP button on the GitHub page to save a copy of the rs-selfservice-tools to your local drive.
The command line syntax for the Deployment Exporter is quite simple:
ruby export_deployment.rb <options>
-d, --deployment ID              Deployment ID
-e, --email EMAIL_ADDRESS        Email Address
-p, --password PASSWORD          Password
-r, --refresh REFRESH_TOKEN      Refresh Token
-u, --url API_URL                API Endpoint URL
-c, --concurrent_launch          Set the resources to launch concurrently
-i, --deployment_inputs          Set inputs at the deployment level
-a, --account ID                 Account ID
Here is an example:
ruby export_deployment.rb -d 457494003 -e joe.smith@acme.com -p <joes rs accnt pwd> -a 1234
The --deployment ID and --account ID option values can be quickly retrieved from your RightScale deployment URL. The --email and --password option values must match those associated with your RightScale account. Instead of username and password, you can use the Oauth refresh token by using the --refresh option
To run the Deployment Exporter:
- Open your terminal application and navigate to the location where you saved the rs-selfservice-tools.
- At the command prompt, run export_deployment.rb using the syntax described above.
- The exported CAT file is saved in the current directory. The filename for the CAT is based on the nickname of your RightScale deployment.
Creating a CAT from Scratch
Once you feel comfortable with the concepts of Self-Service you may be ready to create CAT files from the ground up. Prior to attempting to create a CAT file from scratch we recommend you gain a solid understanding of the CAT language constructs and syntax by reading Cloud Application Template Language. In addition, familiarity with the RightScale Cloud Workflow Language (RCL) is highly advised. We recognize that creating CAT files for the first time can be challenging, especially for complex cloud infrastuctures. Rest assured, our Professional Services team is available to assist you in creating CATs suitable for your particular workload requirements.
Depending on the complexity of your environment, there will be a number of items that will need to be defined in your CAT. See Writing your first CAT for a walkthrough of a CAT file. Or reference the CAT Language Reference for syntax specifics.