Background Information
Servers that support Server Login Control populate their SSH authorized-keys file with multiple trusted keys based on policy received from the RightScale Dashboard, typically inserting one public key per user with server_login permission. When compared to the traditional technique of binding a single, shared SSH key to the server at launch time, Server Login Control has the following advantages:
- The server grants and revokes trust in real time as a user's
server_loginprivileges are granted and revoked. - Public-key authorization can be used even in clouds that do not natively support SSH public-key authentication.
- Private keys are never shared between users.
- Rather than creating a cloud-specific or RightScale-specific key pair, users can continue to use their preexisting, personal key pair.
- If using a personal key pair, users can easily SSH to cloud instances without going through the RightScale Dashboard.
This document will show you how to generate a personal SSH key pair and upload the public key to RightScale for use with Server Login Control.
Important Note: When using Server Login Control (a.k.a Managed SSH) to manage your user's keys, the user's public key may not disappear from the ~/.ssh/authorized_keys file immediately after revoking the 'server_login' permission from that user. This is normal - the key should eventually be removed from the authorized_keys file by a daemon that runs - but it only runs periodically at specific intervals so it may not be removed immediately.
If you find that your user's keys are still in the authorized_keys file after some time has passed and they should not be because they have no server_login permission, please contact our support team for assistance.
Answer
The procedure for creating a key pair varies depending on your operating system and preferred SSH client. In all cases, however, the procedure has three steps: create a key pair, change your RightScale SSH preferences, and test to ensure everything works as expected.
1. Create a Key Pair on Your Computer
Linux and MacOS X
Open a terminal window. At the shell prompt, type the following command:
ssh-keygen -t rsaThe ssh-keygen program will prompt you for the location of the key file. Press Return to accept the defaults. You can optionally specify a passphrase to protect your key material. Press Return to omit the passphrase. The output of the program will look similar to this:
Enter file in which to save the key (/Users/tony/.ssh/id_rsa):
Created directory '/Users/tony/.ssh'.
Enter passphrase (empty for no passphrase):
Enter same passphrase again:
Your identification has been saved in /Users/tony/.ssh/id_rsa.
Your public key has been saved in /Users/tony/.ssh/id_rsa.pub.
Note the location to which your public and private key were saved; they will be required in a subsequent step.
Windows (PuTTY SSH Client)
- On your Windows workstation, go to Start > All Programs > PuTTY > PuTTYgen. The PuTTY Key Generator displays.
Click the Generate button and follow the instructions. Once key generation has finished, you will be presented with the results:
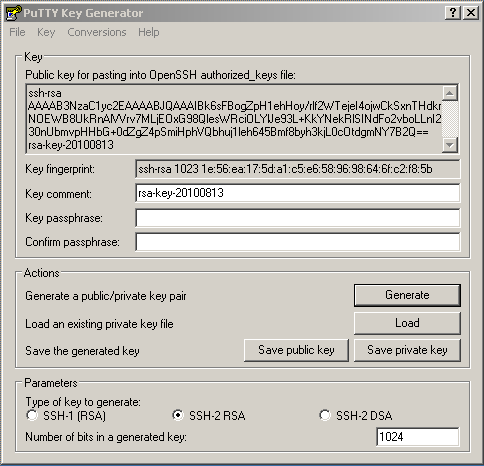
Click Save Private Key to save the private key to a file. Take note of the full path of the private key file, which is especially important if you save it under your
Documents
directory. Repeat the process for the public key, or simply copy the public key from PuTTY's text area into your clipboard and save it as a text file.Close the PuTTY Key Generator.
2. Change RightScale SSH Preferences
- Log into the RightScale Dashboard and navigate to Settings > User Settings > SSH.
- Click Edit. Under the Authentication section, choose the radio button labeled, Use the credentials stored on my computer.
- Open your public key file in a text editor and copy its contents to your clipboard. Paste them into the text area labeled Public Key.
If you are using the Java Web Start application or the Java applet as your session launcher, type the location of your private key file into the text field labeled Private Key. Make sure to use an absolute filesystem path without any special characters such as
~or$HOMEor%HOMEPATH%. If you are using ssh:// protocol links as your session launch preference, configure your SSH client to automatically use your private key for authentication. When you are done, the page will look similar to this: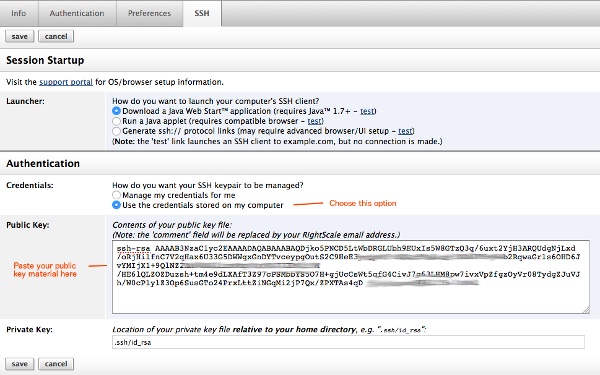
Click Save to store your SSH preferences.
3. Test Server Login Control
Launch a server that uses RightImage 5.1.1 or greater. Once the server becomes operational, navigate to the server's page and press the SSH Console button.
If you connect successfully, then everything is working fine. Congratulations!