Overview
This tutorial takes you through writing two separate PowerShell RightScripts. The first one simply renames an attached file to a name you supply as an input. The second script performs a number of administrative tasks, including changing the administrator password, listing environment variables and backing up the registry.
Prerequisites
RightScripts can only be run in the context of a RightScale server, which means a cloud instance that is running the RightLink agent. You cannot run a RightScript on a Windows instance that was launched directly from a cloud image without first installing the RightLink agent. To install the RightLink agent on any running instance, follow the Getting Started with RightLink guide.
This tutorial assumes you have a running Windows server, and access to the software installation files.
If you have never created a RightScript before, see Create a New RightScript.
Steps
PowerShell Script with an Input and Attachment
The sample code demonstrates how to declare an input variable and reference an attachment. The code references the following:
- Input : NEW_NAME
- Attachment : logo-rightscale.png
The purpose of the script is to rename an attached file to the name you supply as the value to the input NEW_NAME. The file that's to be renamed is called 'logo-rightscale.png'. Right-click the following link and choose Save Link As to download the file to your local system. Later, you will attach this file to your new RightScript.
Now navigate to Design > RightScripts > New, and enter the name for your new RightScript. Cut/paste the following PowerShell code into the Scripts box.
#Windows Powershell RightScript with input(NEW_NAME) and attachment(logo.png)

#tell the script to "stop" or "continue" when a command fails
$errorActionPreference = "stop"

$target_file = "c:\$env:NEW_NAME"

if (test-path $target_file)
{
   Write-Output "File [$target_file] already exists. Skipping script"
   exit 0
}

cd $env:RS_ATTACH_DIR
Get-ChildItem . | Select-Object FullName, LastWriteTime

Write-Output "*** Moving file to [$target_file]"
mv logo.png $target_file

Get-ChildItem c:\ | Select-Object FullName, LastWriteTime
Click the Identify action button to extract and display any Inputs from the PowerShell code. The input NEW_NAME should be identified. As a best practice, fill out the Description field that will serve as a hoverable tooltip text for your users, then click the Save action button.
Click the Attachments tab and upload the file 'logo.png' you retrieved from this document.
If you wish you could take a couple minutes to read through this code, to see if you can follow the steps.
- Navigate to Manage > Instances & Servers and filter for Running Instances.
- Click your running Windows server and select the Scripts tab. Expand the 'Any Script' section and click the Select a Script to Run button.
- Click 'Unpublished', click on your new script in the RightScripts column, click the Select button, then click the Run button.
- Enter a value for the NEW_NAME Input and click Continue. You should see progress of the RightScript being run in the Events area of the Dashboard.
Verifying the Script on the Server
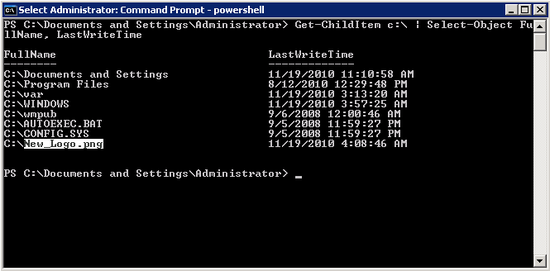
To verify that the script was successfully executed on the server, you can RDP into the Windows server, and verify that the file (with the new name that you specified) exists in the server's C:\ root directory. Alternatively, you could check this by using PowerShell directly:
TCP Port 3389 must be open in the server's security group.
- RDP into the Windows Server
- Go to Start > Run, enter PowerShell and click OK.
Type the following into the command window
Get-ChildItem c:\ | Select-Object FullName, LastWriteTime
Configuring Windows with PowerShell
The aim of the RightScript is to do the following simple tasks using a single PowerShell script:
- Change the administrator password.
- Disable UAC by changing a registry value (User Account Controls (UAC) notifies the user when programs try to make changes to the computer).
- List environment variable values and export these to a file.
- Backup the registry.
Now navigate to Design > RightScripts > New, and enter the name for your new RightScript. Cut/paste the following PowerShell code into the Scripts box.
#Powershell RightScript to configure Windows
#stop and fail script when a command fails
$errorActionPreference="Stop"

#Disable UAC
Set-ItemProperty -path "HKLM:\Software\Microsoft\Windows\CurrentVersion\Policies\System" -name "EnableLUA" -value 0

#Print all environment variables to a file determined by the input ENVFILENAME
$env_file = "c:\$env:ENVFILENAME"
dir env: | sort Name > $env_file

#Backup the registry to the directory c:\
reg export HKLM c:\HKLM.txt /y
reg export HKCU c:\HKCU.txt /y
reg export HKCR c:\HKCR.txt /y
reg export HKU c:\HKU.txt /y
reg export HKCC c:\HKCC.txt /y

#Change the administrator password
net user administrator "$env:ADMIN_PASSWORD"
Click Identify to extract Inputs form the PowerShell code. The following inputs should be identified.
- ENVFILENAME
- ADMIN_PASSWORD
Now click Save. If you wish you could take a couple minutes to read through this code, to see if you can follow the steps.
- Navigate to Manage > Instances & Servers and filter for Running Instances.
- Click your running Windows server and select the Scripts tab. Expand the 'Any Script' section and click the Select a Script to Run button.
- Click 'Unpublished', click on your new script in the RightScripts column, click the Select button, then click the Run button.
Next, you should see progress of the script being run in the Events area of the Dashboard.
Verification of Your Configuration Changes
Be sure to wait for the script to be 100% complete before you perform this verification step. If an RDP window is already open because of the previous step, close the window.
- RDP into the Windows server. You will be prompted for the new password that you set as an input.
- To verify the registry change, run the following command in a PowerShell window
Get-ItemProperty -path "HKLM:\Software\Microsoft\Windows\CurrentVersion\Policies\System" -name "EnableLUA"
You should see output similar to the following:
PS C:\> Get-ItemProperty -path "HKLM:\Software\Microsoft\Windows\CurrentVersion\Policies\System" -name "EnableLUA"

PSPath : Microsoft.PowerShell.Core\Registry::HKEY_LOCAL_MACHINE\Software\Microsoft\Windows\CurrentVersion\Policies\System
PSParentPath : Microsoft.PowerShell.Core\Registry::HKEY_LOCAL_MACHINE\Software\Microsoft\Windows\CurrentVersion\Policies
PSChildName : System
PSDrive : HKLM
PSProvider : Microsoft.PowerShell.Core\Registry
EnableLUA : 0

PS C:\>
- To ensure the Environment Variable and Registry backup files have been created (e.g. HKCC.txt, HKCR.txt, etc.), open Windows explorer and browse to c:. Alternatively, you could check this by using PowerShell directly. Go to Start > Run, enter PowerShell and click OK, then type the following into the command window
Get-ChildItem c:\ | Select-Object FullName, LastWriteTime
Further Reading
- Create a new RightScript
- Developing RightScripts
- Scripting with Windows Powershell (Microsoft technet)