Overview
The purpose of the story below is to explain how a real server is launched into a cloud infrastructure using the RightScale Dashboard/API. It walks you through the process of launching a cloud server using RightScale's ServerTemplate model, so you can also follow along and use it as a hands-on tutorial as well. This document should be especially valuable to users who are new to RightScale or cloud computing, and want a better understanding of key RightScale concepts.
When appropriate, we've provided helpful links to related documentation.
In the end...
Instead of starting at the beginning of the story, we're going to start at the end. Before we begin our journey into the cloud we must first understand our goal or destination, which is to have a successfully deployed server in the cloud that was launched and configured using RightScale's ServerTemplate model.
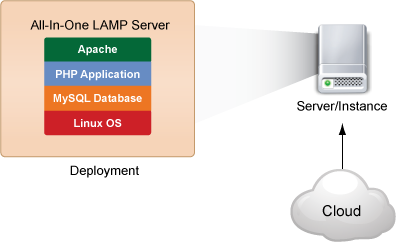
Since we want to keep the story simple, our goal will be to launch a basic LAMP stack (Linux-Apache-MySQL-PHP) server in the cloud. Remember, this server will function just like any other LAMP server in the world however, one of the key differences with a cloud server is how it's configured and becomes operational.
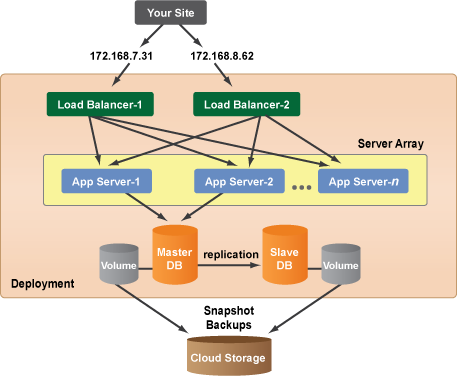
One of the key benefits of the RightScale platform is that you can easily build the same type of server in multiple cloud infrastructures (or AWS EC2 Regions) using the exact same ServerTemplate. It's important to gain a strong understanding of RightScale's ServerTemplate model so that you can see how easy it is to build a true, MultiCloud environment using the RightScale Management Platform. But, before you explore more complex architectures like a scalable, 3 tier multi-zone deployment (shown below), it's important to first understand how to launch a single server.
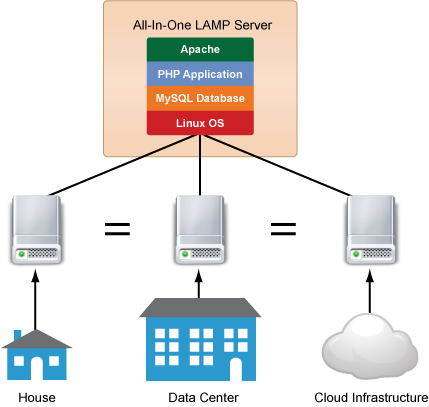
Remember, even in the cloud, your goal is to launch a functional server that satisfies your hardware/software requirements. The actual physical location of the server is not important as long as the visitors to your website or users of your web application have a positive user experience. So whether you're launching a server in the basement of your house, renting a managed server from a dedicated hosting datacenter or launching a server in a private or public cloud infrastructure, your objective is always the same—to launch a stable server that performs as expected. After reading this story you'll have a solid understanding of how to launch servers in the cloud using the RightScale Management Platform.
In the diagram below, each of the servers function as a single server LAMP stack. As long as the server is functioning as expected, the physical location of the server is not relevant to your users. The public and private cloud infrastructures have allowed us to start thinking of servers as another commodity like electricity or water. As long as you can launch a server on-demand and still have the control to configure and customize it for your own purposes, the actual location of the server becomes less of an issue.
Prerequisites
First you need to make sure that you have access to a RightScale account that supports at least one cloud. To enable a RightScale account so that it can be used to manage your public/private cloud infrastructure, you'll need to register that cloud with your account by providing the necessary cloud credentials so that RightScale can confirm that you're authorized to use that particular cloud's resources. Valid cloud credentials are necessary in order to use the RightScale Dashboard/API to manage your cloud resources.
Remember, you can register multiple clouds with a single RightScale account so that you can manage resources in multiple public and private clouds from a single interface. In this example, we're going to launch servers in Amazon EC2, so we need to register our AWS Credentials with our RightScale account. In the case of AWS, once you add valid AWS credentials to a RightScale account, you're authorized to use cloud resources in any of their AWS EC2 Region (e.g. US-East, US-West, AP-Tokyo, etc.). It's important to understand that each of the AWS regions are distinct and separate clouds because resources cannot be shared between them.
Create a Deployment
When you launch servers in the cloud or multiple clouds, it can be very difficult to keep track of where servers are being launched or understand the relationship between multiple servers. For example, if you have a 3 tier Deployment, you might have six servers that are running in the cloud. Although some of the servers might serve a different role or functionality (e.g. Load Balancer, Application Server, Database Server, etc.) they all belong to the same project or website. A deployment provides a way of logically grouping a set of servers together for more effective server management. You'll find that deployments provide a great way of organizing your servers in the cloud much like folders help you organize your files on your computer, especially if you have multiple users who are using the same RightScale account.
The picture below shows how a typical 3 tier system architecture would be represented inside of the RightScale Dashboard. Notice that each of the six servers are represented in the 3 Tier Example
deployment.
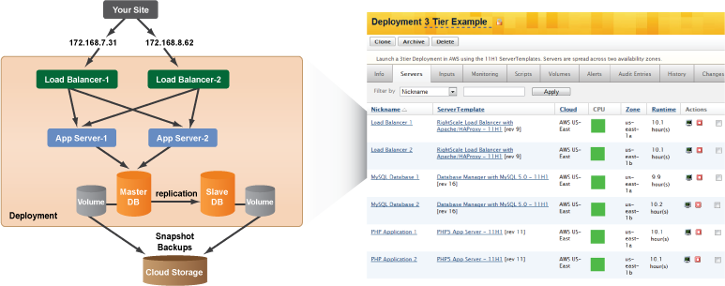
Before you can create a server, you must first create a logical group for your servers called a deployment. It's important to also mention that deployments are cloud-agnostic. (i.e. You can create a MultiCloud Deployment where you're managing servers that are actually running in different cloud infrastructures.)
The new deployment is empty right now, but we'll be adding servers into it shortly.
Select a ServerTemplate
Now that you've created a Deployment for your LAMP server, you're ready to build your LAMP stack in the cloud. There are several different ways to create a LAMP stack server.
- If you're familiar with a cloud infrastructure, you might find a publicly available machine image (e.g. For EC2, Amazon Machine Image - AMI) that's already been configured to launch a LAMP stack in the cloud.
- Create a ServerTemplate from scratch.
- Import a LAMP ServerTemplate from the MultiCloud Marketplace.
Option 1 - The problem with the first option is that it's not a very flexible solution. Perhaps you're concerned about using an image that was published by an unknown user or company. Or maybe the image isn't exactly what you're looking for and the only way to customize it for your own purposes is to launch a server and then manually install software from a shell console, which is definitely doable and similar to how servers were configured prior to the cloud. Although it would be easy to get started with a base machine image and simply customize it yourself, you would also be committing yourself to maintaining subsequent iterations of this image, which will quickly turn into a bundling and maintenance nightmare. In many ways, this is no different than the old dedicated hosting model and is not taking advantage of the automation and power of the cloud. It's also important to remember that you would only be able to use that image in a single cloud since images are cloud-specific. For example, you can't use an image that you created in the AWS US-East region to launch a server in Azure or even in the AWS US-West region. Similarly, instance types in different clouds might have different architecture requirements for their images. For example, in Amazon EC2, you'll need to use a 32-bit image to launch a 'small' or 'medium' instance type. But, if your application requirements change and you need to launch a larger instance type, you'll need to use a 64-bit image instead. So, if you begin using a custom built 32-bit image and you need to vertically scale your server (i.e. change the instance size from 'small' to 'large') or launch it into a different region, you'll have to manually create an equivalent 64-bit version yourself. As an alternative to trying to build and maintain custom images yourself, you can use ServerTemplates which often leverage images published by RightScale (RightImages) so that you can focus your time and effort on improving your application.
Option 2 - The second option might not seem very appealing especially if you're new to RightScale and unfamiliar with ServerTemplates or how they're used to launch servers. However, as you become more comfortable using the RightScale platform and become a savvy RightScaler yourself, you may create customized ServerTemplates of your own.
Option 3 - If you are new to the RightScale platform, the best option is to see if someone else has already created and published a similar ServerTemplate that you can use for your own purposes. As a general best practice, you should regularly check out the MultiCloud Marketplace ( http://www.rightscale.com/library) to see what RightScale components already exist and are available for use. You'll find many ServerTemplates for building most of the common types of servers. Additional ServerTemplates are regularly published by RightScale, our Integrated Services Vendor (ISV) Partners, or other RightScale users. Sometimes the best way to learn about ServerTemplates is to simply inspect some that have already been published by more experienced RightScale users. Any components published by
RightScale
have been developed by RightScale's engineering team with built-in best practices for the cloud and have undergone thorough testing and are safe to use in production environments.
Check out the MultiCloud Marketplace
There are two different ways to access the MultiCloud Marketplace. You can either view the publicly accessible website ( http://www.rightscale.com/library) or if you're logged into the RightScale Dashboard, you can access it under the main navigational menu (Design -> MultiCloud Marketplace). However, in order to import/subscribe to a component from the Marketplace so that you can use it in your own RightScale account, you will need to be logged into the Dashboard and have 'library' user role privileges. (You can check your user role privileges under Settings -> User Settings -> Info tab). One of the goals of the MultiCloud Marketplace is to provide a central repository of components that you can use to configure and launch servers into any supported cloud infrastructure.
Inside the MultiCloud Marketplace you'll be able to import or subscribe to several different types of RightScale components:
- ServerTemplates
- RightScripts
- MultiCloud Images
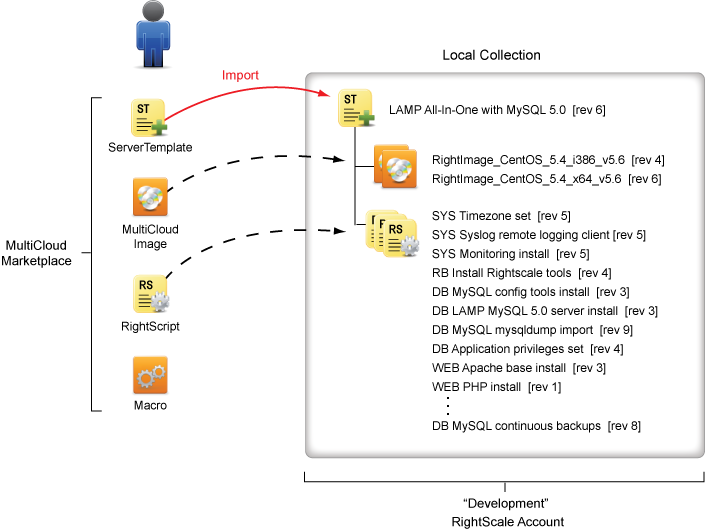
In this example, we're looking for a specific ServerTemplate that can be used to launch a simple LAMP server in the cloud. You can use the categories, keyword search, and filter options to more effectively browse through the library of assets. Hopefully you'll be able to find an exact match of what you're looking to build or something similar that you can use as a starting to point that will at least give you a head start in your development. When you find a ServerTemplate that you want to use (e.g. LAMP All-In-One with MySQL 5.0) you can import it into your RightScale account's local collection. Imported ServerTemplates will appear in the Dashboard under Design -> ServerTemplates. Once a component has been imported, it becomes accessible to all users in the RightScale account.
Note: When you import a component from the Marketplace you will only be importing the published revision and not the entire lineage (all previous revisions) of a component.
So, let's assume you've imported the most recently published revision of that ServerTemplate.
When you import a ServerTemplate, you will also implicitly import the RightScripts and MultiCloud Images (MCIs) that are used by the ServerTemplate. After all, a ServerTemplate would not be usable without MCIs and scripts. Later on, we'll explain the purpose of scripts (RightScripts, Chef Recipes) and MCIs.
Add a Server to a Deployment Using a ServerTemplate
Now you can use the ServerTemplate to create a definition for a server that can be launched into a specific cloud infrastructure. There are two different ways that a ServerTemplate can be used to launch a server. You can either use it to add a server directly into a deployment or configure a server array so that it uses the same ServerTemplate for launching identical server instances (for horizontally autoscaling).
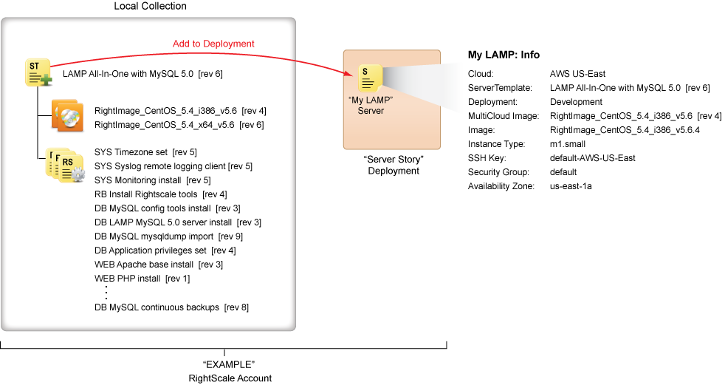
In this example, we're going to add a server to the deployment we just created. When viewing the ServerTemplate, click the Add to Deployment action button to start the process of creating a server definition using the selected ServerTemplate.
First, you're going to have to select into which cloud infrastructure the server will be configured to launch. The available cloud choices will be directly affected by the MultiCloud Images that are referenced by the published ServerTemplate. Remember, a ServerTemplate is cloud-agnostic. But, it's the MCIs that control into which clouds you'll be able to define and launch the server. So, if you don't see a cloud or AWS region listed as a selectable cloud option it's because the ServerTemplate does not have an MCI that maps to a usable image in that particular cloud. To add cloud support for a missing cloud/region, you'll need to clone the ServerTemplate and add another MCI that has a pointer to an image in the desired cloud or clone and modify the MCI itself.
Note: You should think of each AWS region as a distinct and separate cloud infrastructure because cloud resources like images, SSH Keys, etc. are cloud-specific and can only be used within the cloud itself.
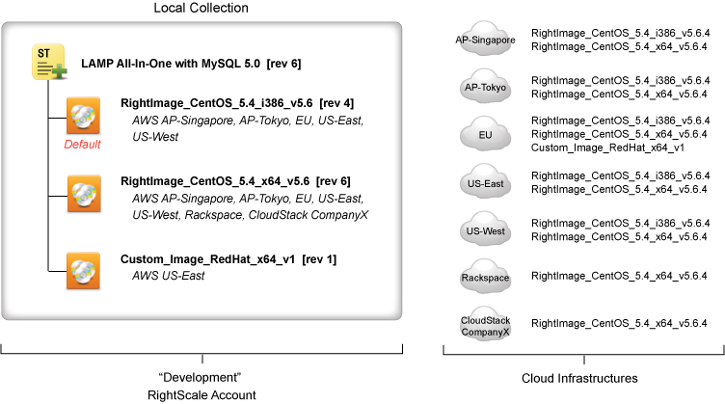
In the picture above, we're emphasizing several key points:
- An image (e.g. RightImage_CentOS_5.4_i386_v5.6.4) is a cloud-specific resource and exists in a specific cloud infrastructure
- A ServerTemplate can have more than one MultiCloud Image
- As a best practice, each MultiCloud Image should map to identical images (i.e. The
RightImage_CentOS_5.4_i386_v5.6
MCI contains references to the sameRightImage_CentOS_5.4_i386_v5.6.4
images located in each supported cloud.) - The MCI is used to pick the appropriate image that will be used to launch the server based on the selected cloud
- If a ServerTemplate has multiple MCIs, it will have a
Default
MCI - Your cloud selection will determine which MCIs will be available for use. For example, if you wanted to use the ServerTemplate to create a Server in the 'AWS US-East' cloud, you could use any of the MCIs because each MCI has a reference to an image in that cloud. The list of MCIs will automatically be filtered after you've made your cloud selection.
In this example, we're going to launch a server in the AWS US-East region (cloud).
Next, you'll need to specify some basic configurations for the server. Each cloud may have a different set of prerequisite settings that are required in order to launch a server. For AWS EC2, you'll need to make selections for the following cloud resources:
- SSH Key
- Security Group
- Image*
- Instance Type*
* Defined by the selected MultiCloud Image.
For our example, let's inherit the default selections for the MCI and instance type. You can also use the default
SSH key and security group that RightScale has already created for you in each cloud. Although, a user's own SSH key will be used to open an SSH console session into a machine, you must still provide an SSH key in order to launch an EC2 instance. A security group is also a required EC2 resource and is used to control a server's firewall permissions. The default
EC2 security group will have TCP ports 22 and 80 open.
Once you've made your other cloud-specific selections, a server will be added in the Deployment you selected and you'll get redirected to the Deployment's Servers tab.
Click on the text link to view more information about the Server that you just created. Under its Info tab, you'll be able to see the basic configurations of your server. Currently, the server's state is inactive
because it's just a definition of a server. It may or may not be launched in the future to create a real running server/instance in the cloud.
What is an Image, RightImage and MultiCloud Image (MCI)?
At this point, you might be asking yourself, What are the differences between these different types of images
?
Images
In order to launch a server in a public/private cloud, you must specify which machine image will be used to build your server. At a minimum, each image will install an operating system and basic cloud/networking tools, but it may also include other software installations and configurations. You cannot launch a server without a machine image.
RightImages
A RightImage is a machine image that's specifically designed to launch servers in the cloud using RightScale's ServerTemplate model. Each RightImage is developed, tested, and published by RightScale. Whereas other machine images may contain all software installations and configurations of a server, RightImages are designed to be lightweight, modular, and only contain the minimum components required to launch stable servers inside a supported cloud infrastructure. Each RightImage includes a base installation of an operating system (e.g. CentOS, Ubuntu, Windows), EC2 tools, standard networking, Internet tools, and RightLink. The RightLink agent is bundled inside of every RightImage so that RightScale can more effectively and securely interact with the server using our latest automation features. See RightLink to learn more.
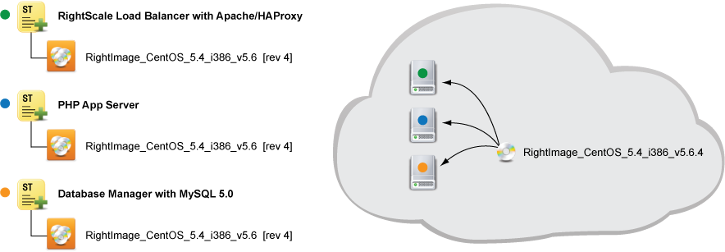
The key benefit of using RightImages is that you can use the same RightImage to launch all of your servers. Instead of creating static, custom images that include all aspects of a server and are architecture and cloud-specific, you can use one of our tested RightImages and then execute a series of scripts to control the ultimate functionality of a server. This way, you'll be able to focus more of your time and energy into application development instead of wasting time and effort building and replicating custom images. By using our own RightImages, you can easily upgrade all of your servers to use our latest RightImages simply by adding the most recently published MCIs to a ServerTemplate.
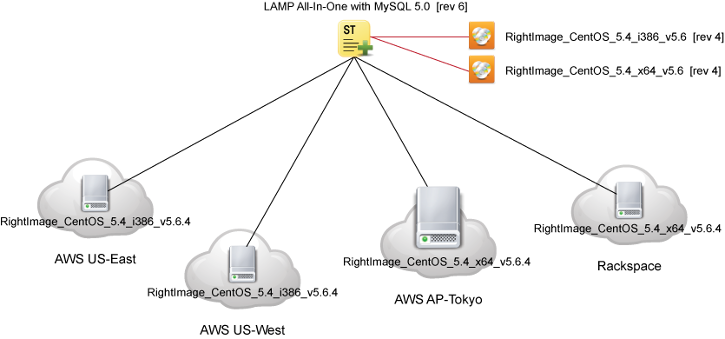
In the picture below, three different ServerTemplates are used to launch three different types of servers. Since each ServerTemplate is using the same MCI, all of the servers are launched using the same RightImage.
MultiCloud Images
A MultiCloud Image is a RightScale-specific concept that's designed to select an appropriate machine image and instance type combination based on your cloud selection. A MultiCloud Image can have references to multiple images, but only one image per cloud/region. A ServerTemplate can then leverage multiple MCIs to support different combinations of system architecture, operating system, etc. Ultimately, it's the MCIs that control into which clouds a ServerTemplate can be used to create and launch a server.
The same ServerTemplate can be used to create and launch the same type of server (e.g. LAMP All-In-One with MySQL 5.0) into multiple clouds. In the diagram below, the same ServerTemplate is used to launch the same type of LAMP server in multiple clouds because it's using MCIs that support all of those clouds. Notice that the server instance in the 'AWS AP-Tokyo' region is using a 64-bit image because it's a larger instance type. Another benefit of MCIs is the ability to vertically scale to larger/smaller instance types by simple changing the selected MCI.
Exploring the Server
Info tab
Let's take a closer look at the Server we just created. If you click on the Server and view its Info tab, you'll be able to see its current configurations.
As you can see, when we inherited the selections from the MCI, it automatically selected an appropriate machine image and a compatible instance type based on the cloud selection. Of course, you can override any of these settings at the Server level, if necessary. But be careful! If you manually change the instance type, you must make sure to select an appropriate image with the correct system architecture. For example, if you want to change the instance type to an 'm1.large' EC2 instance type you must select a 64bit image.
Note: The default MCI that is used by most ServerTemplates published by RightScale will select an 'm1.small' instance type and a 32bit RightImage.
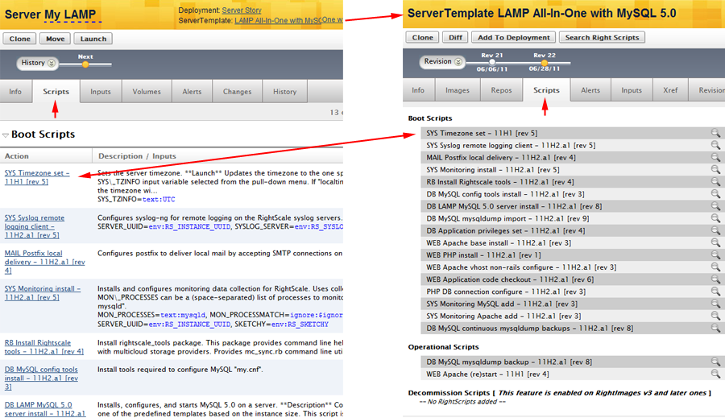
Scripts tab
Next, click on the Server's Scripts tab. The Scripts tab shows the scripts (RightScripts or Chef Recipes) that may be executed on the server. Next, go to the Scripts tab of the ServerTemplate that was used to create this Server. You'll notice that they are identical lists even though they are displayed in slightly different ways. A Server's scripts will always reflect what is defined by its ServerTemplate. You cannot add a script at the Server level. Therefore, if you need to add a script to a Server, you'll need to clone the ServerTemplate or select its HEAD version (if available) so that any scripts that you add/remove from the editable ServerTemplate will automatically be reflected at the Server level. As a best practice, you should only use HEAD ServerTemplates for development and testing purposes. Any production server should always use a committed revision of a ServerTemplate, so that its configuration cannot be changed.
There are three different types of scripts:
- Boot Scripts - These are scripts that will be run at boot time when the server is launched. Remember, it's the ServerTemplate's list of scripts that affect the ultimate functionality of the server. For example, if you're creating a LAMP server, you'll need to install and configure MySQL, PHP, and Apache on the server. It's important to remember that the order of the scripts makes a difference because they will be executed automatically in sequential order after the image has been loaded onto the server, which installs the chosen operating system. Therefore, you must always remember to install the software application before attempting to run a script that will modify its configuration settings.
- Operational Scripts - Operational Scripts are scripts that are intended to be executed on the server once it is operational. Therefore, these scripts may or may not be run on the server. Operational scripts are run manually (on-demand).
- Decommission Scripts - Similar to Boot Scripts, Decommission Scripts are also executed automatically and in sequential order, except they are executed when the server is terminated. You only get 100 seconds to execute all of the decommission scripts before the server is terminated. So, there's not enough time to have a script that will take a final backup of your database. Decommission scripts are intended for performing any final clean-up actions so that you can gracefully terminate a server. For example, a ServerTemplate for an application server will most likely have a decommission script that removes the application server from the load balancer pool so that when it's terminated, the load balancers will no longer send traffic to the old application server. And don't forget, once a server is terminated, it's gone forever; you will never have access to that server (virtual machine) ever again, so be sure to plan accordingly.
Configure the Server
Now that we've seen which scripts will be executed to configure the server, the next thing that we'll have to do is make sure that we've provided values for any missing inputs so that the scripts will be executed successfully. Inputs provide a way of passing in user-defined variables when a script is executed on a server.
As a best practice, you'll want to get in the habit of defining inputs at the ServerTemplate or Deployment levels to take advantage of the input hierarchy. See Understanding Inputs for further details.
Use deployments to help you maintain consistent server configurations. For example, you could configure your deployment so that the same input parameters are being used by all servers in your deployment to ensure that all scripts will use the same values; define an input once and it will get used by multiple servers. Similarly, you can also easily run a script across several/all servers in your deployment, which can prove extremely useful for performing global actions such as code updates where you may need to point to a different branch in your SVN repository.
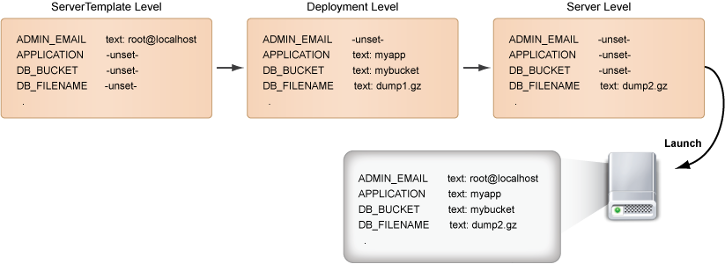
In the diagram below, notice that generic inputs are typically predefined at the ServerTemplate level. However, any customer-specific inputs are purposely left undefined. If you're following best practices, you'll define any missing customer-specific inputs at the Deployment level. Lastly, you can overwrite any inputs at the Server level. In the example below, we're launching this particular server to test a recent dump file so we've overwritten one input (DB_FILENAME) so that a different dump file (dump2.gz) is used.
So, instead of defining inputs at the Server level, go back to the Deployment level and click on the deployment's Inputs tab. When you're looking at the Scripts tab at the Deployment level, you will see an exhaustive list of all the inputs that are used by any of your Server's scripts, which will include boot, operational, and decommission scripts. Since many of the scripts are designed to use the same input (e.g. MASTER_DB_DNSNAME), you can define a value for the input at the Deployment level so that the same value will be used by all of your scripts on all of your servers (as long as the input is not being overwritten at the Server level). It's important to get in the habit of defining inputs at the ServerTemplate or Deployment levels to ensure consistency across all server configurations. You should only overwrite an input at the Server level for performing strategic actions or during development and testing scenarios.
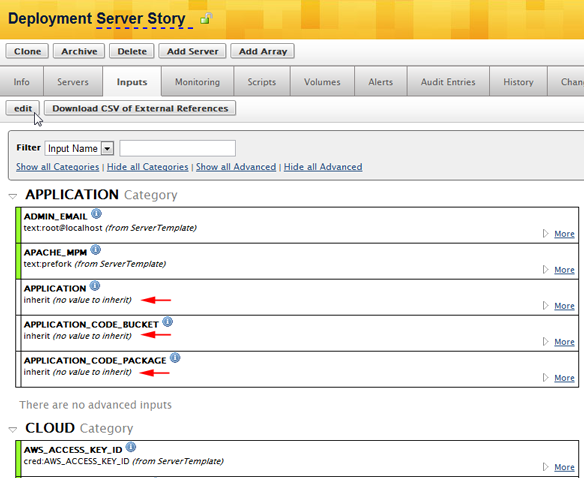
Notice that most of the generic input values have already been predefined at the ServerTemplate level. Although you still have the option of changing any of these preset values you will often find that the default values are typically sufficient for most use cases. However, there are usually a couple of inputs that have missing values, which are purposely left undefined because they are user-specific. For example, if you're using a PHP Application ServerTemplate, you'll need to provide the location and login information to access your application in your SVN repository so that the code checkout script will be able to retrieve your application code.
Although it's recommended that you define values for any missing inputs at the Deployment level, it's only critical that you define input values for boot and decommission scripts because those scripts are run automatically when a Server is launched or terminated. These values must be defined otherwise servers will become stranded in the booting or decommissioning phases. Inputs that are used by operational scripts will also be listed, but since those on-demand scripts that may or may not ever be executed on the running server, you technically do not need to define values for those inputs in order to successfully launch and terminate a server.
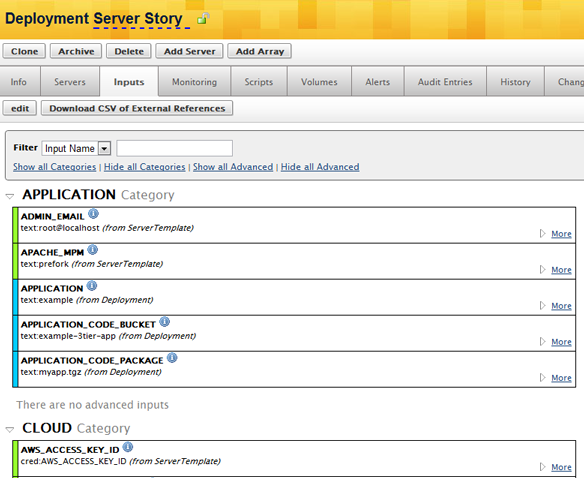
Once you've defined the missing inputs at the Deployment level, go to the server's Inputs tab and you'll see that all of the inputs are defined for the server because the values are being inherited from the ServerTemplate and Deployment levels. The server is now configured to be launched in the chosen cloud infrastructure. In this example, we're going to launch the server in Amazon's 'US-East' region of EC2.
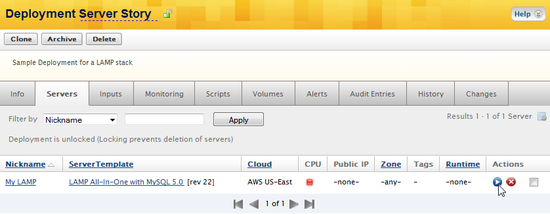
Launch the Server
You can launch a Server several different ways. If you are looking at the deployment's Servers tab, you can click the launch icon under the Actions column. Similarly, if you're viewing the Server, you can click the Launch action button.
Next, you will be shown the Inputs confirmation page, which will show you all of the inputs that will be used by the server's boot or decommission scripts. In order to prevent servers from becoming stranded in booting/decommissioning, you will not be allowed to launch a server until you've defined values for all of the inputs. Since we're inheriting most of the inputs from the ServerTemplate and defined values for the missing inputs at the deployment level we're ready to launch the server.
Click the Launch button. You would only click the Save and Launch button if you make a change to any of the inputs and want to save the changes at the Server level. You should only use the Save and Launch option under certain circumstances.
RightScale is now going to make a request to the specified cloud infrastructure for a cloud server/instance on your behalf (using your cloud credentials). You can now track the progress of your cloud server under the Events pane in the Dashboard.
The server will transition through several different states until it is operational.
- pending - RightScale has made a request to the cloud for the server/instance type that you requested and also provided any other required information by the cloud. For example, in order to launch an EC2 instance you must specify which EC2 Image, SSH Key and Security Group will be used. The server instance will also be assigned IP addresses and a unique ID by the cloud provider.
- booting - Once the cloud server instance has been provisioned to you and the image has been loaded on the virtual machine the cloud will consider it
active
and fully configured. But, from RightScale's point of view, the server is not quite operational yet because the boot scripts still need to be executed on the server instance in order to complete the installation and configuration process. - operational - Once all of the boot scripts have been successfully executed on the server instance, RightScale will label it as an
operational
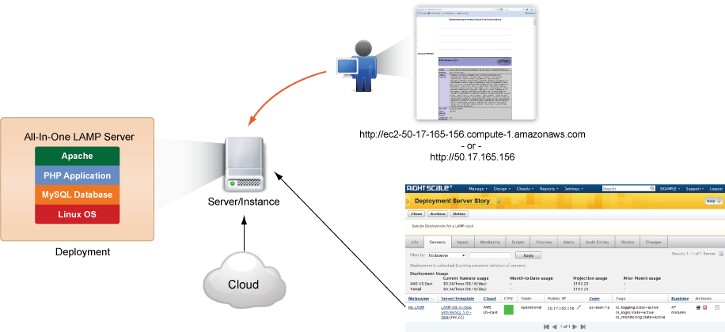
server because the server is now configured for its intended purpose. In this example, we've launched an All-In-One LAMP server.
To learn more details about what is actually happening during each state, see Server States.
To view the actual server, you can use the server's Public IP Address
or Public DNS name
link (located under the Server's Info tab) to view the running server in a browser window. In our example, we would see the default PHP landing page.
The diagram below summarizes the story of our RightScale Server. We used a ServerTemplate to create and launch an All-In-One LAMP server in a cloud infrastructure using a MultiCloud Image to select an appropriate machine image (RightImage) and a series of scripts and inputs to customize the server's final configuration.