The following software upgrade strategies provide general guidelines and principles. Please use discretion at all times to develop your own software upgrade strategies that are sufficient for your application and environment.
Also, images below may be more tied to MySQL than PostgreSQL.
Objective
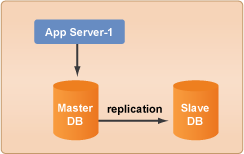
To upgrade an operational, redundant database server setup without any downtime.
Overview
The following document outlines the key steps that are necessary to perform one of the common upgrades to a redundant database setup that's hosted in a cloud infrastructure. For example, you may want to change one of the following aspects of your database servers.
- Instance Size
- Security Group
- Machine Image
- Cloud/Region
- Zone
- ServerTemplate (Select either a newer revision of the same ServerTemplate or a completely different ServerTemplate.)
Note: For changes related to the database itself, please refer to your ServerTemplate's runbook documentation. See ServerTemplates.
Steps
The example scenario below explains how to upgrade the instance size of a redundant database setup to use larger instance types. However, the same steps can also be used to perform any of the type of the common upgrade scenarios described above.
This tutorial assumes that you already have a redundant database setup that was configured using one of the database manager ServerTemplates published by RightScale.
Determine the type of changes that you're going to make to the database setup.
Are you going to use a completely different ServerTemplate (with a different version lineage)?
- If yes, import it from the MultiCloud Marketplace. (Requires 'library' user role privileges.) Proceed to the Major Changes section below.
- If no, proceed to the Minor Changes section below.
Are you going to use a newer revision of the same ServerTemplate?
- If yes, import it from the MultiCloud Marketplace. (Requires 'library' user role privileges.) Proceed to the Major Changes section below
- If no, proceed to the Minor Changes section below.
Are you going to launch the new server into a different cloud/region?
- If yes, proceed to the next step.
- If no, proceed to the Minor Changes section below.
Are you only going to change a server's instance size, zone, security group, ssh key, or machine image?
- If yes, proceed to the Minor Changes section below.
- If no, do nothing.
Major Changes
- If you are going to use a different ServerTemplate, import it from the MultiCloud Marketplace. Go to Design > MultiCloud Marketplace > ServerTemplates. (Requires 'library' user role privileges.)
- If you're going to modify the ServerTemplate, clone the imported version and rename it accordingly. It's recommended that you commit the cloned ServerTemplate before you make any changes to it so that you can use the first revision to compare your changes against the
original
version.
- If you're going to modify the ServerTemplate, clone the imported version and rename it accordingly. It's recommended that you commit the cloned ServerTemplate before you make any changes to it so that you can use the first revision to compare your changes against the
- Click Add Server and follow the wizard to add a new server to the appropriate deployment. Select the desired server cloud-specific configurations (e.g. security group, zone, instance size, image, etc.) depending on the chosen cloud infrastructure.
- Update the inputs for the new server accordingly.
- Example : Change the total size of the volume stripe. (Change the value for the Total Volume Size (1) input) Note: You cannot change the number of volumes in the stripe (Number of Volumes in the Stripe (1) input); you must launch a server using a secondary backup instead of launching a server that will initialize itself as a slave of a running master database server.
- Update the list of alerts for the new server accordingly. Perhaps the existing database servers have custom alerts. If necessary, make sure the new server also has the same alerts.
- Proceed to Launch the Server.
Minor Changes
- Clone the existing
Slave
database server. And rename it accordingly. (e.g. db-3) - Click Edit on the cloned server and make any necessary changes and/or upgrades. Note: The available server options are determined by what is supported by the selected cloud infrastructure.
- Instance Size
- Security Group
- SSH Key
- Machine Image
- Zone
- Update the inputs for the new server accordingly.
- Example : Change the total size of the volume stripe. (Change the value for the Total Volume Size (1) input) Note: You cannot change the number of volumes in the stripe (Number of Volumes in the Stripe (1) input); you must launch a server using a secondary backup instead of launching a server that will initialize itself as a slave of a running master database server.
- Update the list of alerts for the new server accordingly. Perhaps the existing database servers have custom alerts. If necessary, make sure the new server also has the same alerts.
- Proceed to Launch the Server.
Launch the Server
- Launch the new
Slave
server. At the inputs confirmation screen, be sure to configure it so that it will be initialized as a slave at boot time since you already have a runningMaster
database server.- For example, set Init Slave at Boot (or INIT_SLAVE_AT_BOOT if you are using a RightScript-based ServerTemplate) to be ' True' and click Launch. Note: You do not want to use the 'Save and Launch' option because you do not want to save this configuration setting because you might not want to launch it as a slave the next time the server is (re)launched.
- Wait for the server to become operational.
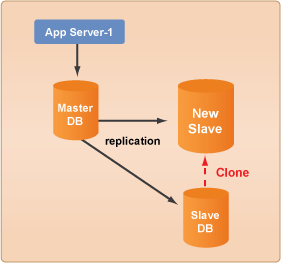
- Verify that the new
Slave
is properly replicating data from the Master-DB to ensure that they are synchronized.
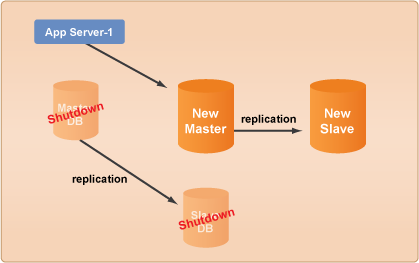
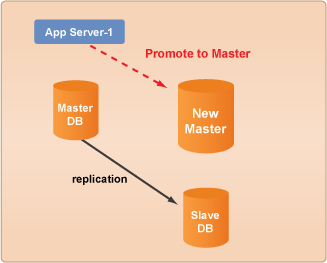
Promote New Slave to Master
- Wait for the new Slave to catch up with the running Master database server.
- Make sure that the new Slave server's network firewall rules (i.e. security group and iptables) are properly configured to accept requests from the application servers.
- Promote the new Slave to become the new Master database server. Go to the new Slave server's Scripts tab and run the appropriate script. All running application servers will soon connect to the new Master database server.
- Run the db::do_promote_to_master or DB EBS promote to master operational script.
- By default, when you promote a slave to master, a primary backup (typically a volume snapshot) will immediately be taken of the new master. Wait for the snapshot to be 100% complete before you launch a new slave server.
- Verify that
New Master
is in fact the new Master-DB.- For MySQL, open the SSH console of
New Master
and run the command, mysql> show databases; You can also click the Monitoring tab and check out the mysql: mysql_threads or mysql_reads graph. Click thenow
option to see recent database activity. (The graph is updated every 20 sec.) - For PostgreSQL, open the SSH console of
New Master
and run the command, psql --list.
- For MySQL, open the SSH console of
- Next, create a Slave-DB of the
New Master
server. Since both the master and slave use the same ServerTemplate, you can simply clone theNew Master
server and rename it accordingly. (e.g. db-4) - Once the snapshot of the new master is 100% complete, you can launch the
New Slave
server. Be sure to set Init Slave at Boot (or INIT_SLAVE_AT_BOOT if you are using a RightScript-based ServerTemplate) to be ' True' and click Launch.
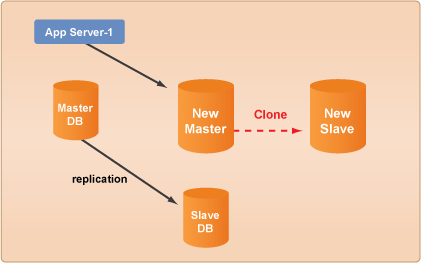
- Once the
New Slave
server becomes operational, it will start replication with theNew Master
server. Verify that the new slave is in-sync with the master. SSH into the slave instance and run the following command: - If everything looks solid, you can shutdown the old Master-DB and Slave-DB servers. Congratulations, you've successfully upgraded your database setup without any downtime.